Presentify for educators · version 2.3
The Presentify educator handbook
Presentify keeps an educator’s teaching day in one place: the assignments you’re scheduled for, the sessions you run, who was present and for how long, what you taught, and how each student is progressing. This handbook walks through every screen in the order you meet it.
The version in your app store may differ slightly from the one described here. Your app’s version number is printed at the bottom of the Login screen and on your Profile screen — worth checking before reporting anything as a bug.
Signing in
Your account is created by an administrator. You set your own password from the invitation email, then use it everywhere — web, iOS and Android share one login.
First login
An administrator sends you an invitation email with instructions for creating a password. Once that’s done:
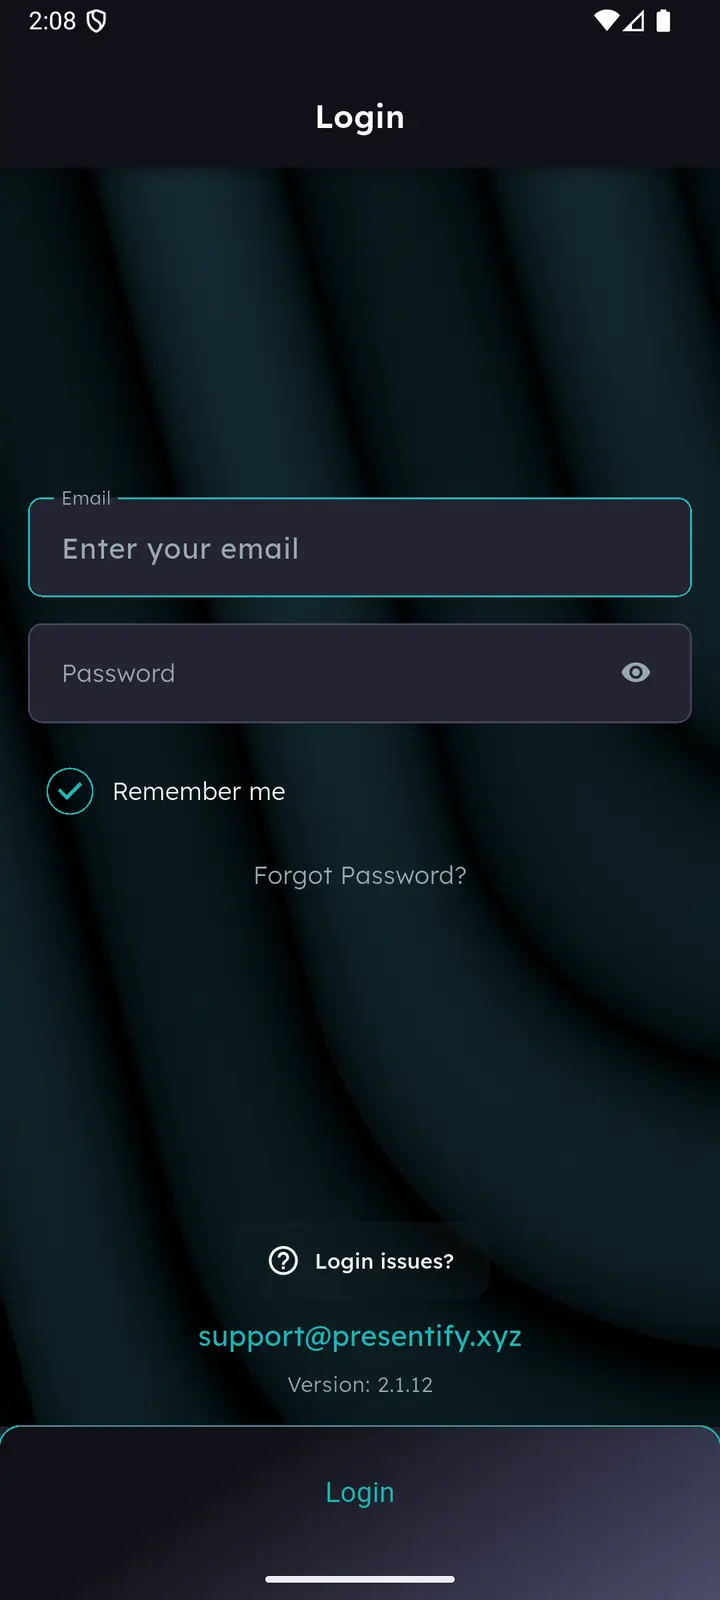
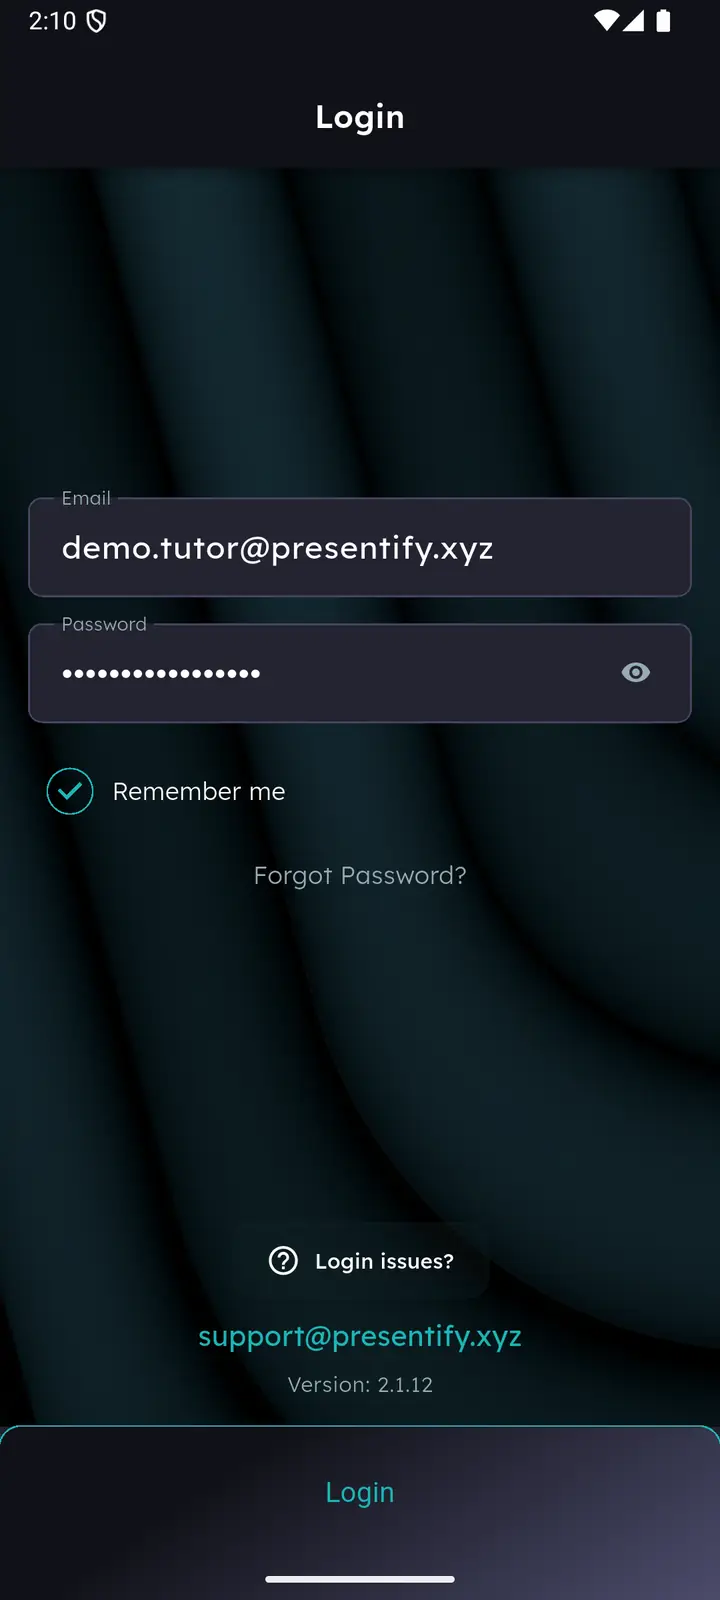
- Enter the email address your Presentify account was created with.
- Enter your password.
- Press the green Login button.
If the credentials are correct you land on the Assignments screen.
Ticking Remember me keeps your email address filled in after you log out. Only use it on a device that is yours alone — never on a shared school computer.
Forgot password
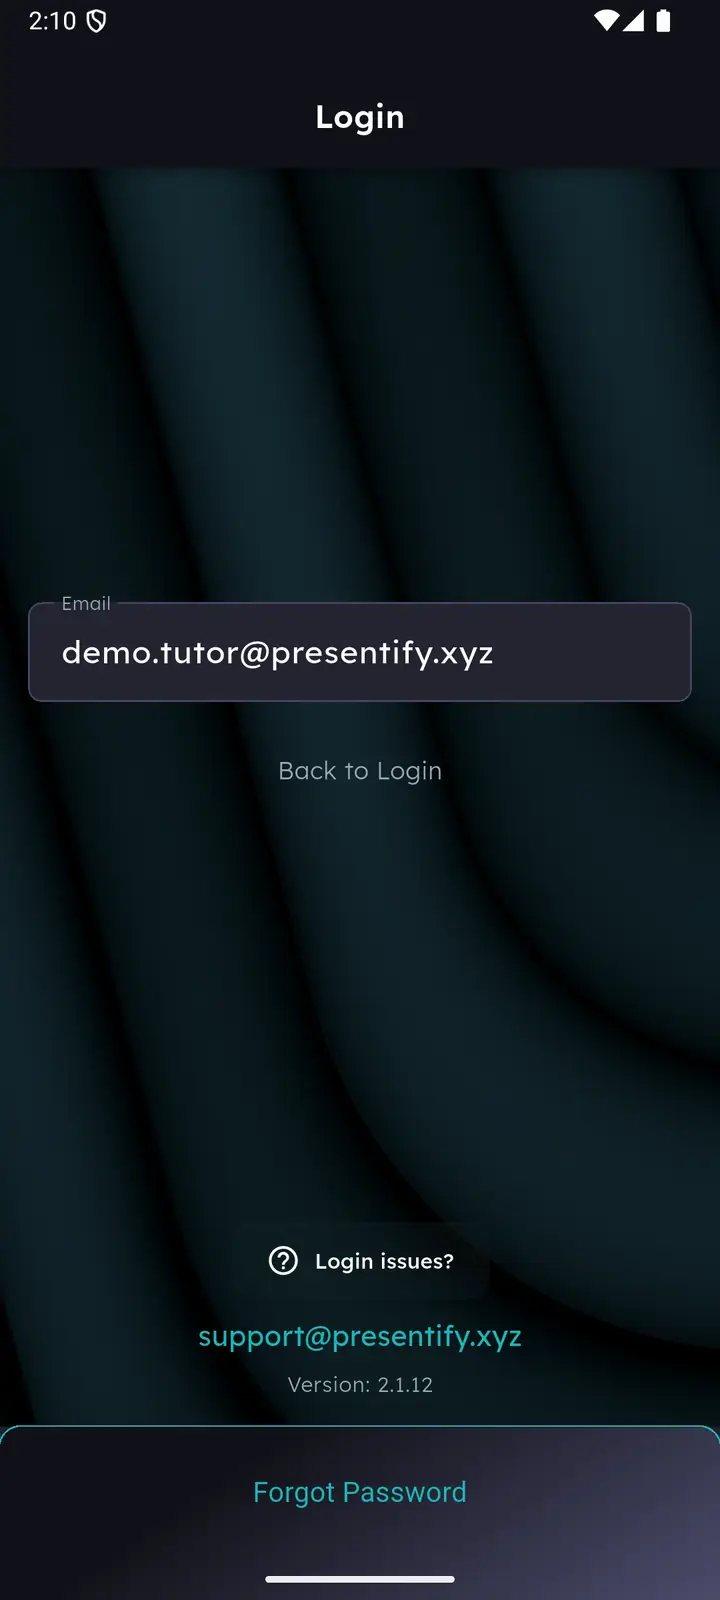
- On the Login screen, tap Forgot Password?
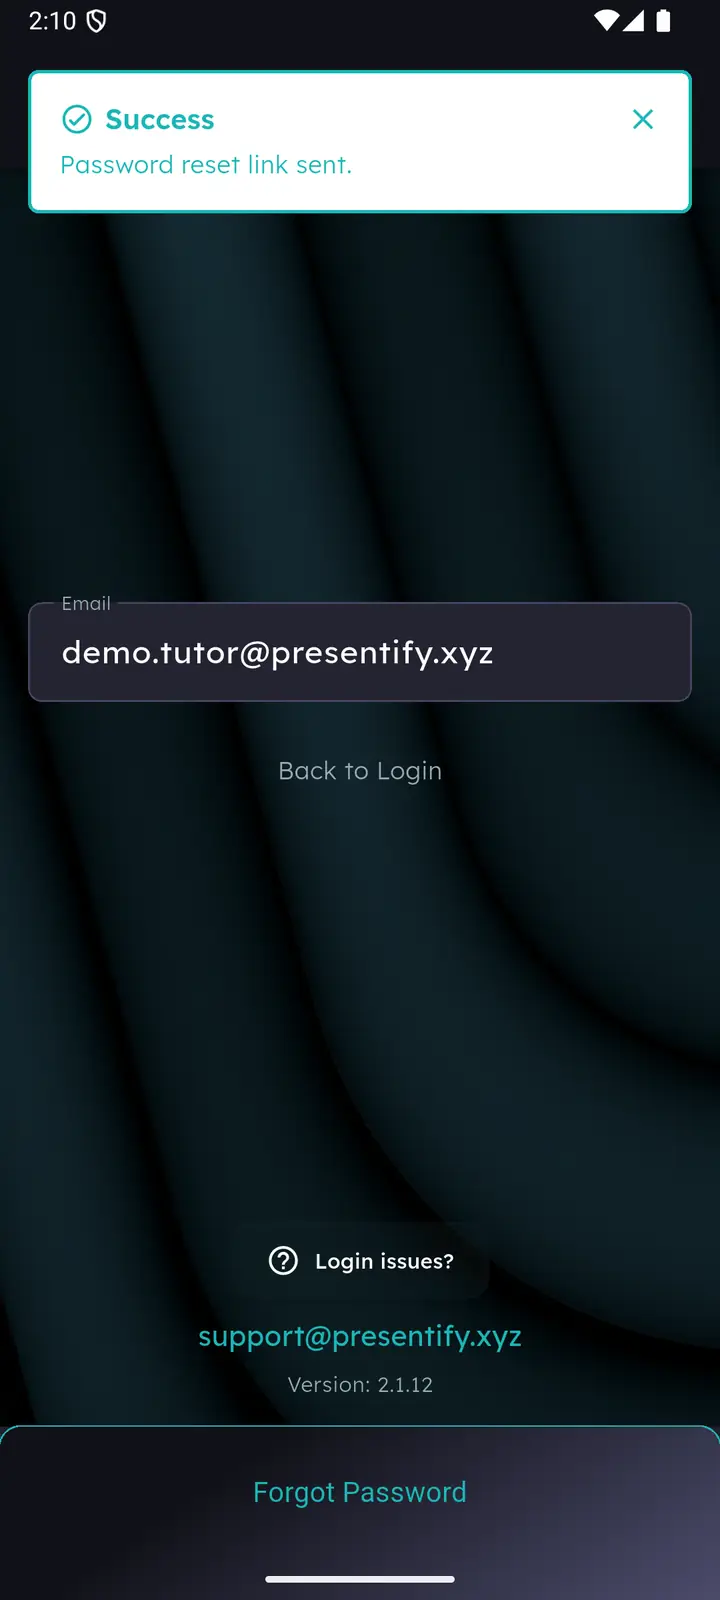
- Enter the email address associated with your account.
- Tap the green Forgot Password button. A confirmation appears: Password reset link sent.
- The email with instructions arrives within a few minutes.
Check your Spam or Junk folder first. If it isn’t there, wait a few minutes and request the reset again.
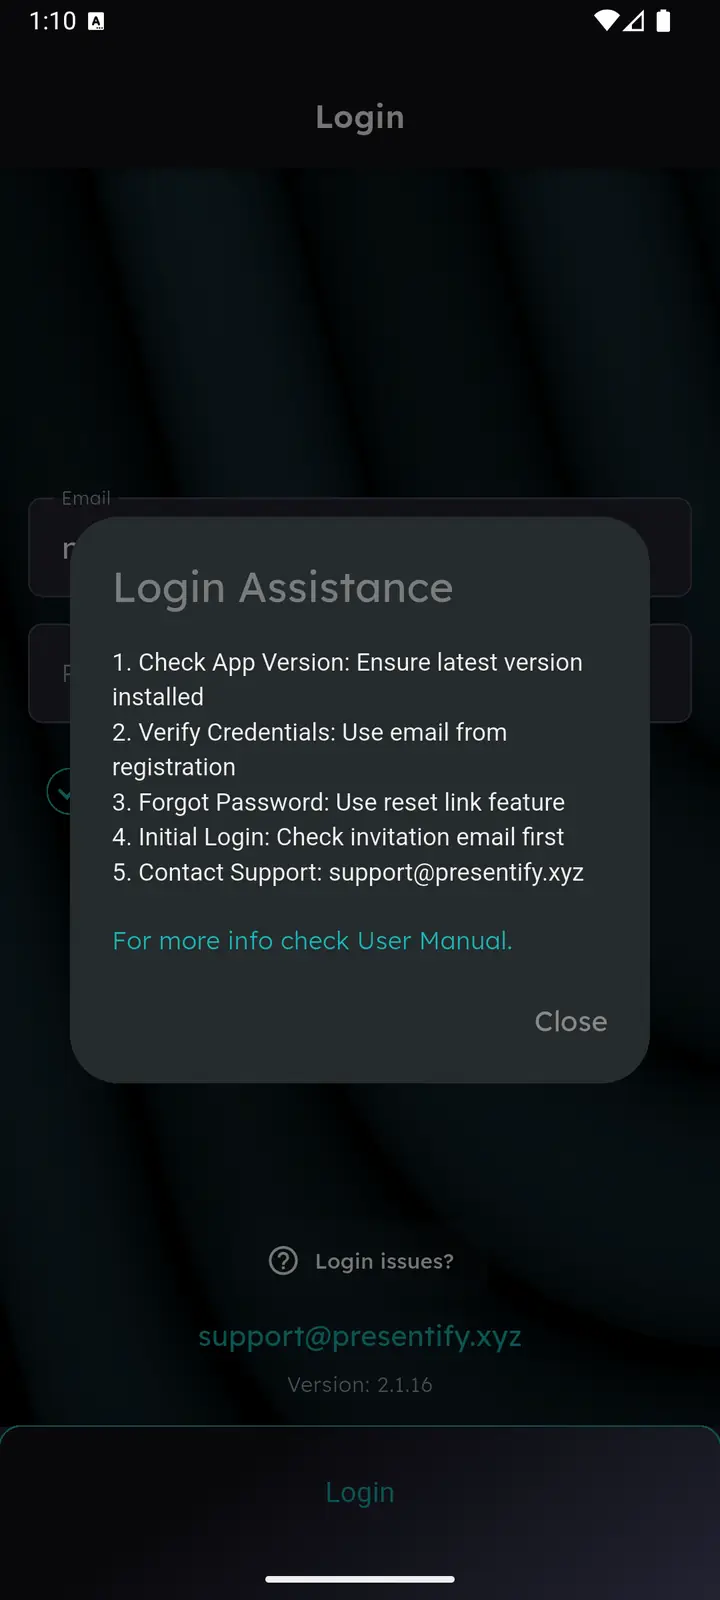
Login Assistance
Tap Login issues? at the bottom of the Login screen for a five-point checklist, a link to this handbook, and the support address.
Version update & hard reload
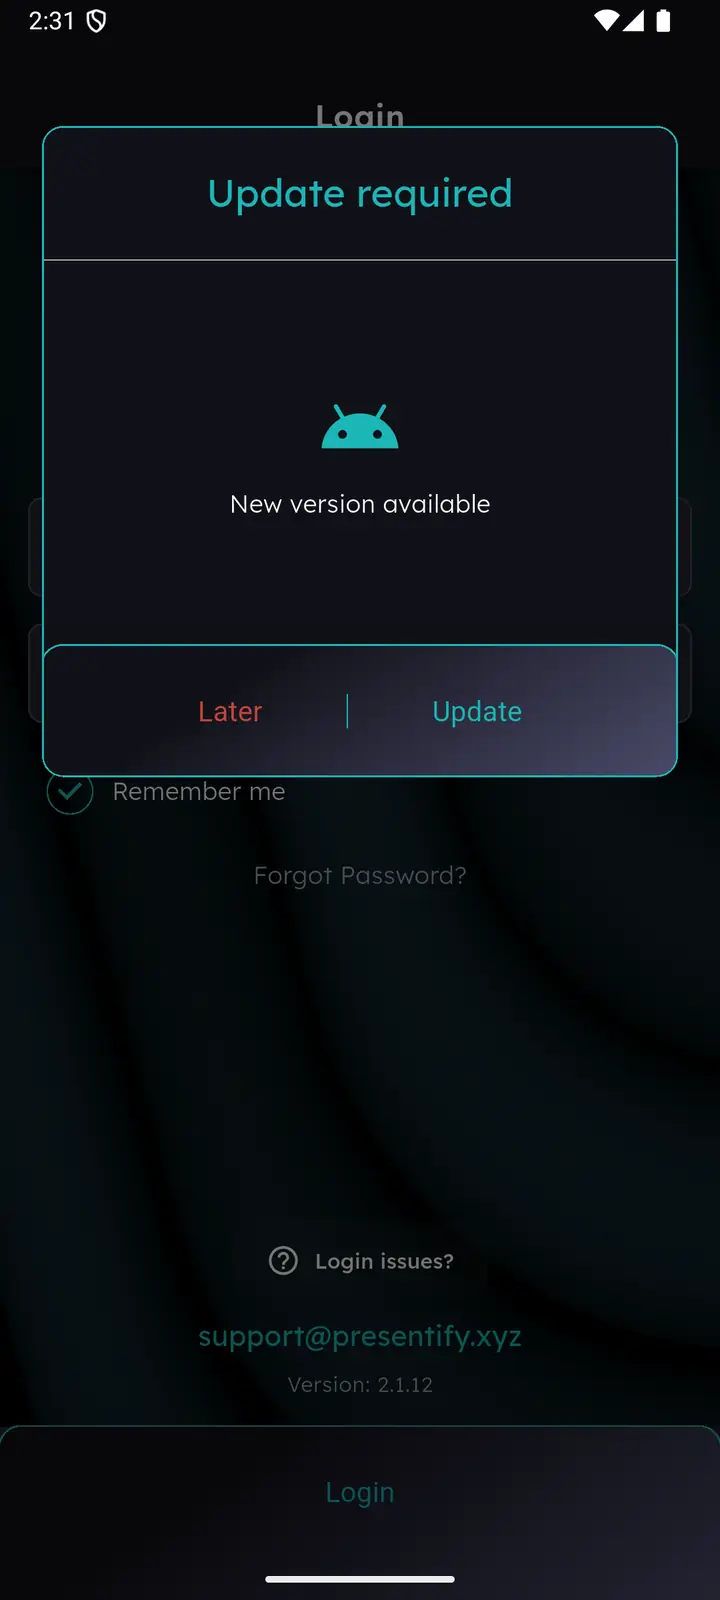
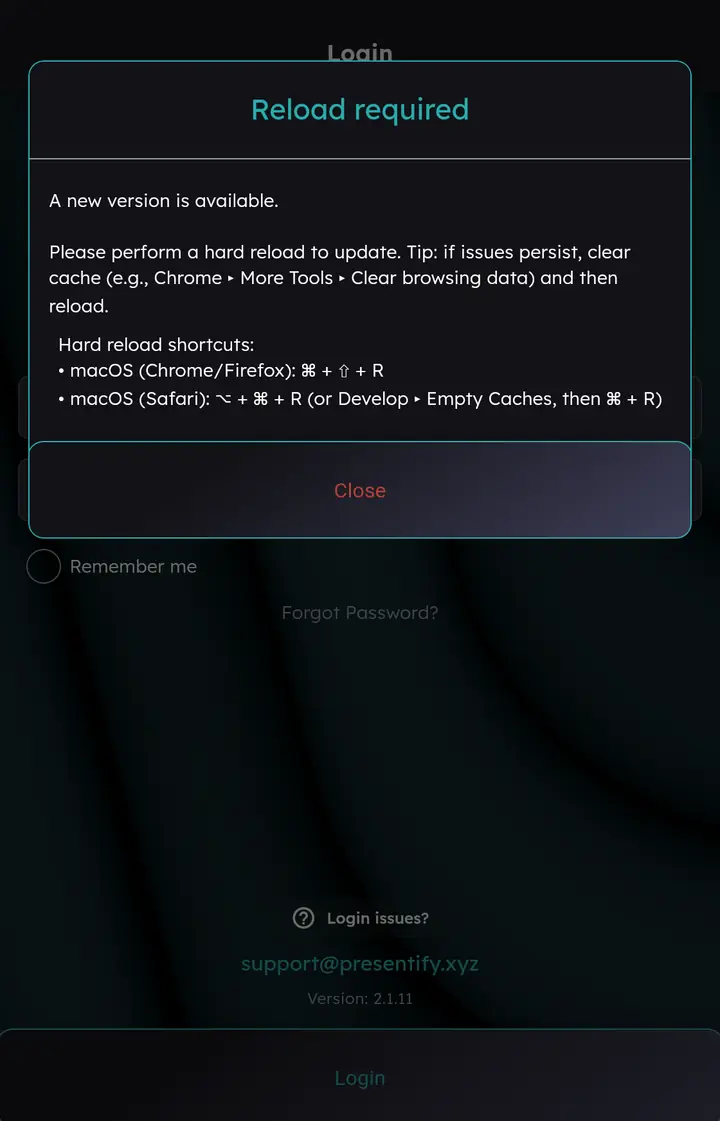
When a newer build is required, the mobile app prompts you to update. On the web there is nothing to install — instead you are asked to hard reload the page, and the exact shortcut for your browser is shown in the dialog.
Why a hard reload?
A normal refresh may reuse files your browser saved earlier (the cache). A hard reload fetches the whole page again, which is what you want when the site shows stale information or looks broken.
| Browser | Windows / Linux | Mac |
|---|---|---|
| Chrome, Edge, Brave, Opera | Ctrl+F5 · Ctrl+Shift+R · Shift+F5 | Shift+⌘+R |
| Firefox | Ctrl+F5 · Ctrl+Shift+R · Shift+F5 | Shift+⌘+R |
| Safari | — | ⌥+⌘+R, or ⌥+⌘+E then ⌘+R to empty the cache first |
| Mobile browsers | No shortcut. Pull down on the page, or use the reload button in the browser menu. | |
If you don’t see it, turn it on under Safari → Settings → Advanced → Show Develop menu in menu bar.
Automatic logout for inactivity
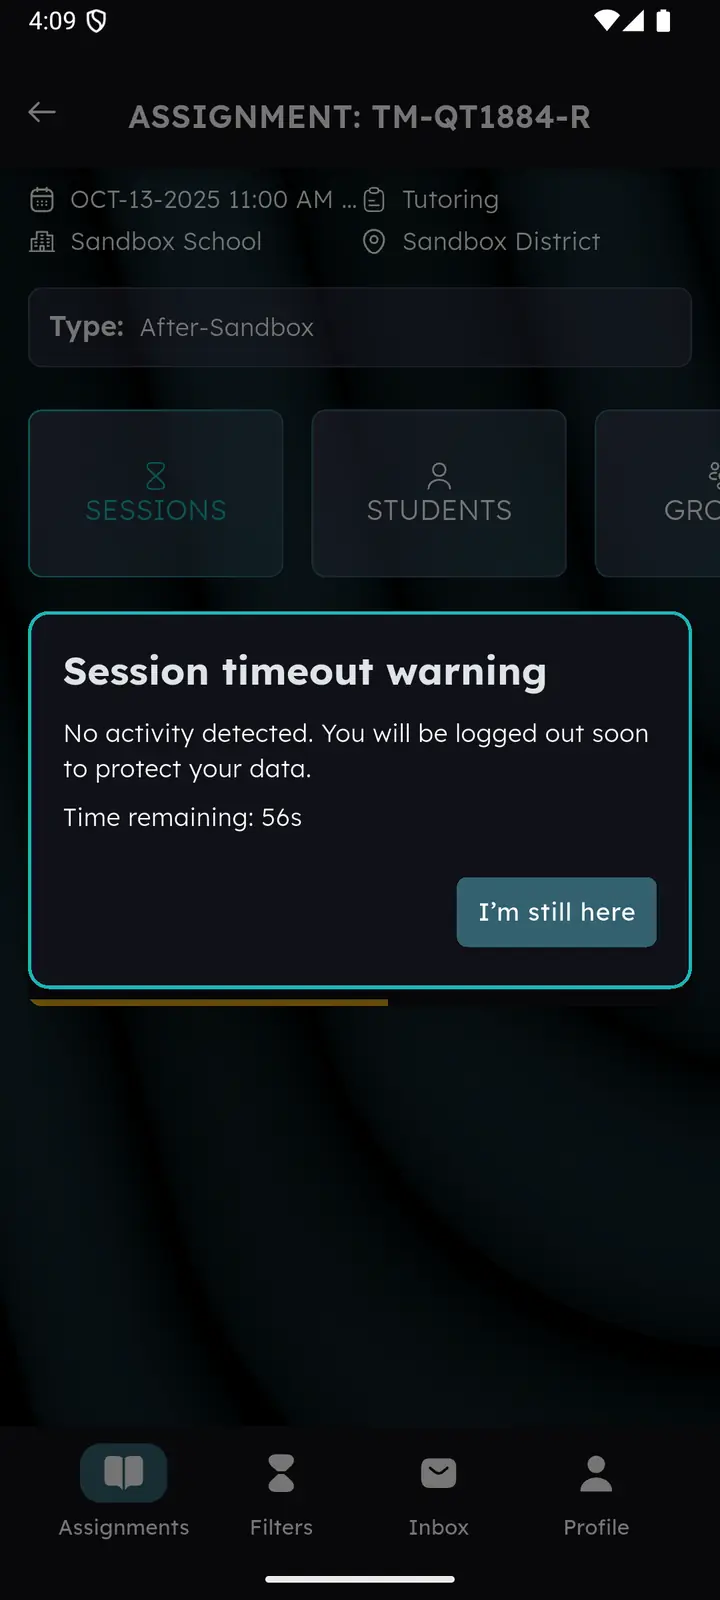
To protect student data, Presentify signs you out after 10 minutes of continuous inactivity.
- At 9 minutes, a Session timeout warning dialog appears.
- It counts down 60 seconds.
- Tap I’m still here — or interact with the app — and the timer resets.
- Ignore it and you are logged out at the 10-minute mark.
Attendance details you typed but never saved are lost on logout. Save as you go rather than at the end of a long session.
Getting around
Presentify has two layers of navigation: four tabs along the bottom that switch between the main areas, and a rail of three buttons inside an assignment that switches what you’re looking at.
The four tabs
| Tab | What it opens |
|---|---|
| Assignments | The default screen: every assignment you’re scheduled for. Chapter 03 |
| Filters | The same data reached step by step — district, then school, then program. Chapter 04 |
| Inbox | Messages sent to you, split into Unread and Read. Chapter 13 |
| Profile | Your own details, password, settings and logout. Chapter 14 |
The main filter rail
Once an assignment is selected (or all three filters are set), three buttons appear above the content. They decide what the screen below shows:
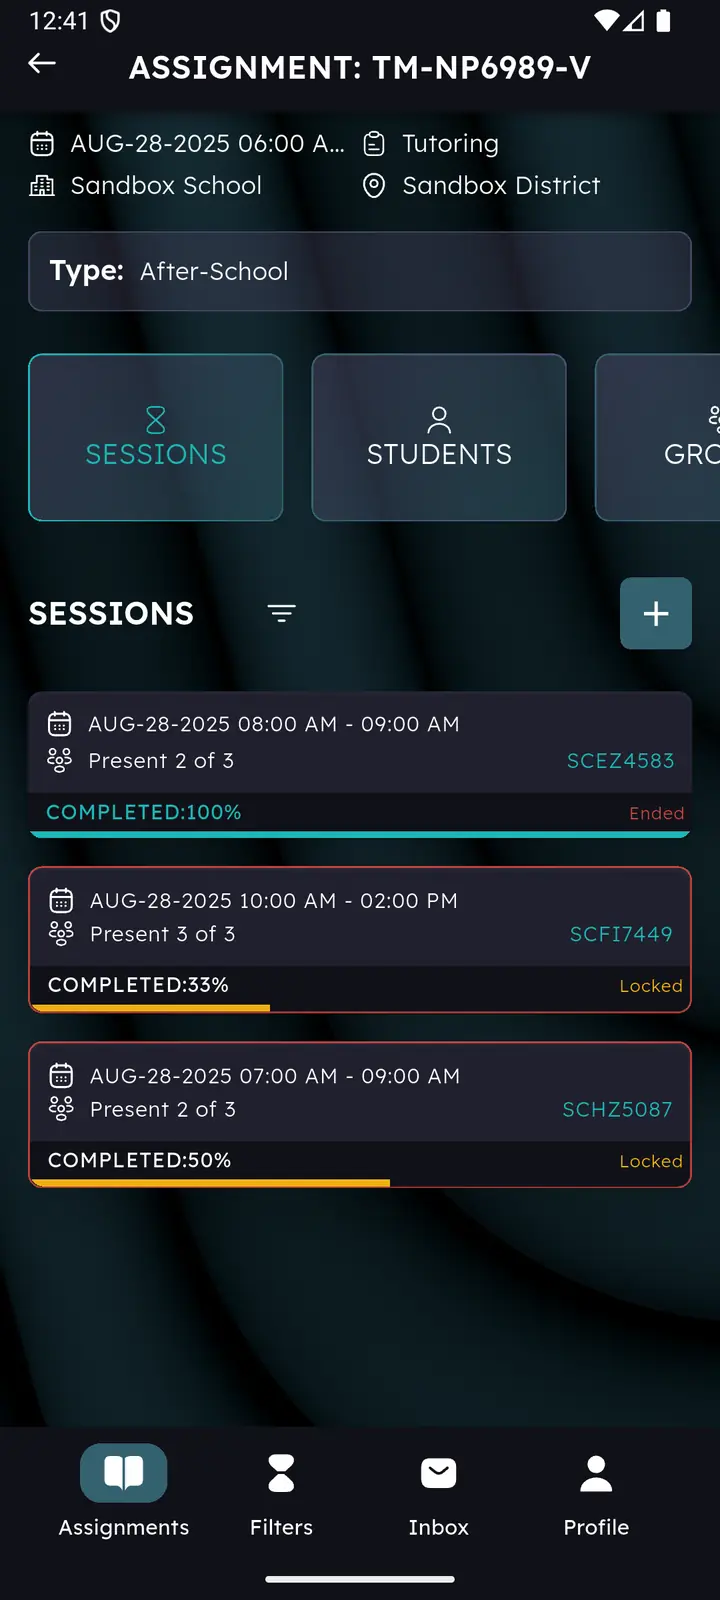
- SESSIONS — the sessions that match, and the + button that creates a new one.
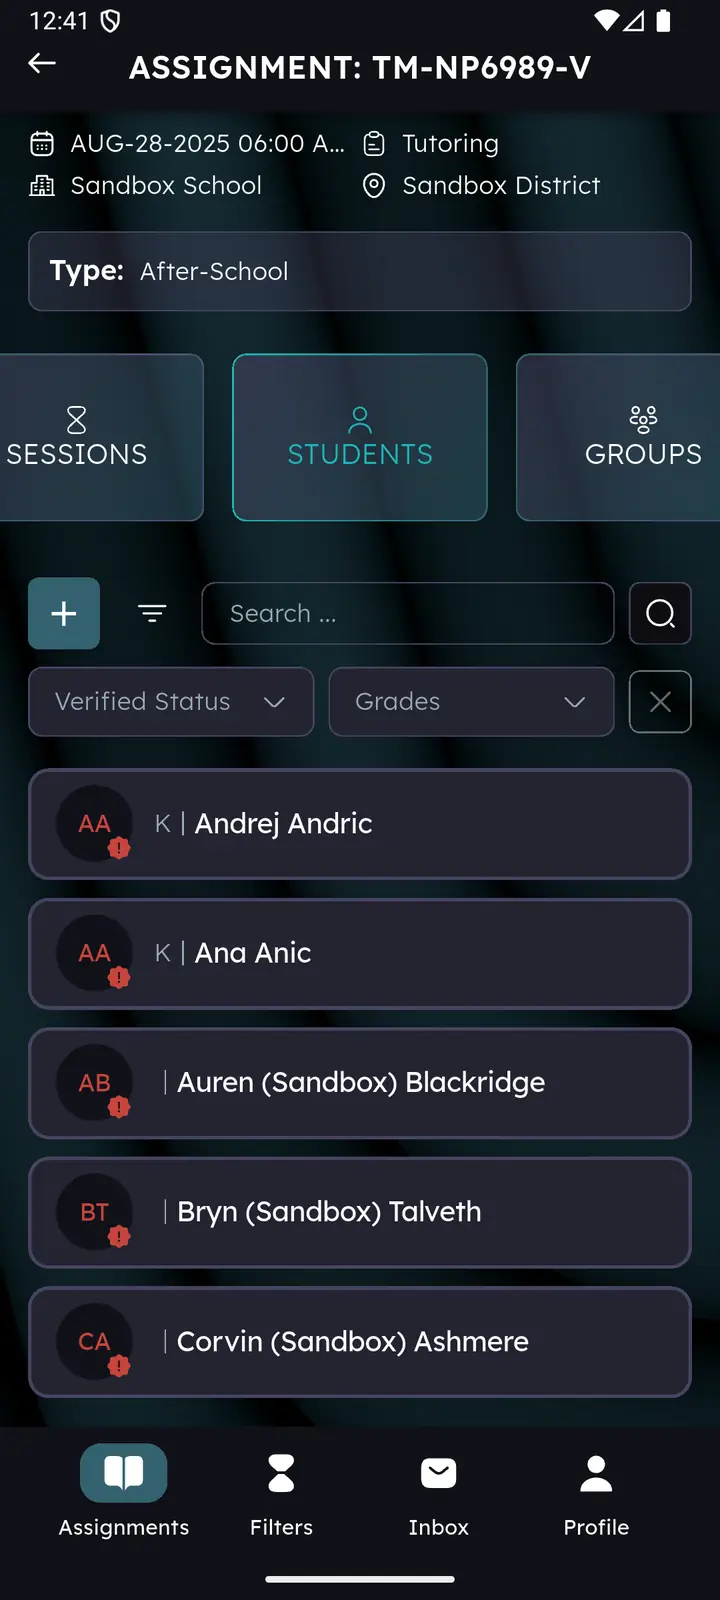
- STUDENTS — every student at the filtered school, with search and Grade / Verified filters.
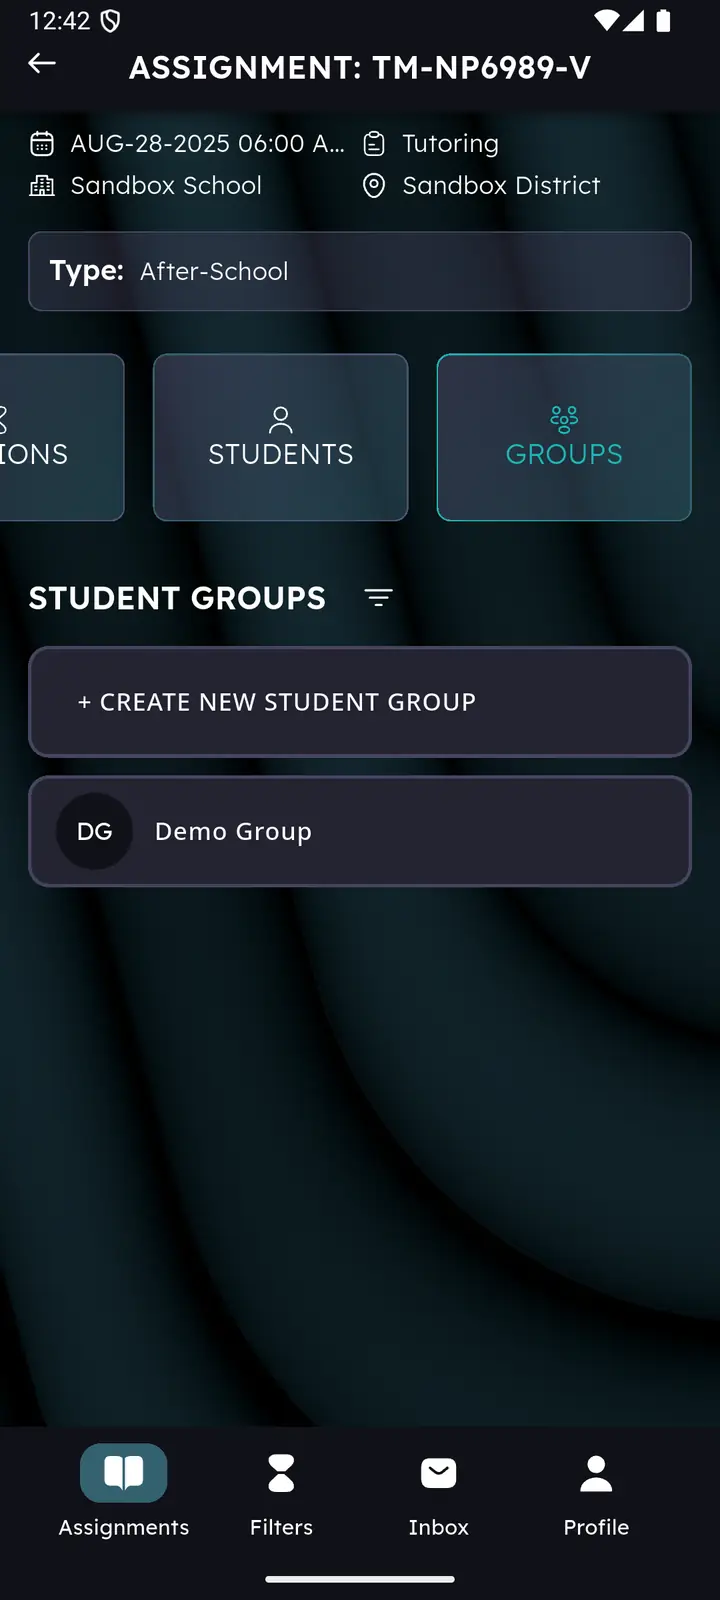
- GROUPS — the student groups you’ve created for that school and program type.
Assignments
An assignment is your permission slip and your calendar window in one. Each belongs to a single educator and defines the time range in which that educator may create sessions, at one school, in one district, for one program.
Assignments also work as filters: selecting one narrows the sessions, students and groups you see to that school and program.
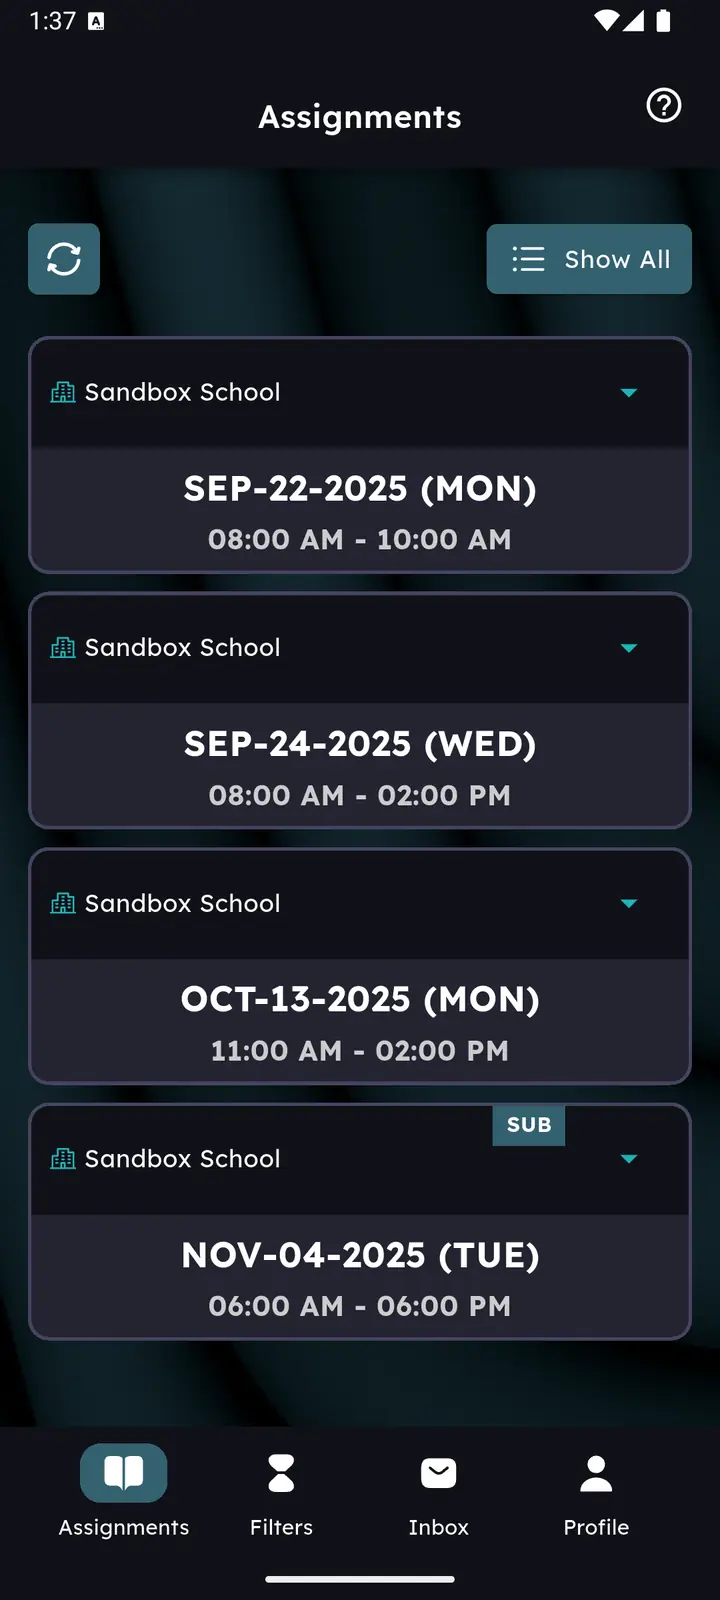
- By default the list shows the 7 assignments closest to today. Tap Show All for the rest.
- Tap the arrow on a card to expand it and see the district, program and program types.
- Tap the refresh icon at the top left to reload the list.
Long assignment lists now load in batches as you scroll instead of making you wait for the whole list.
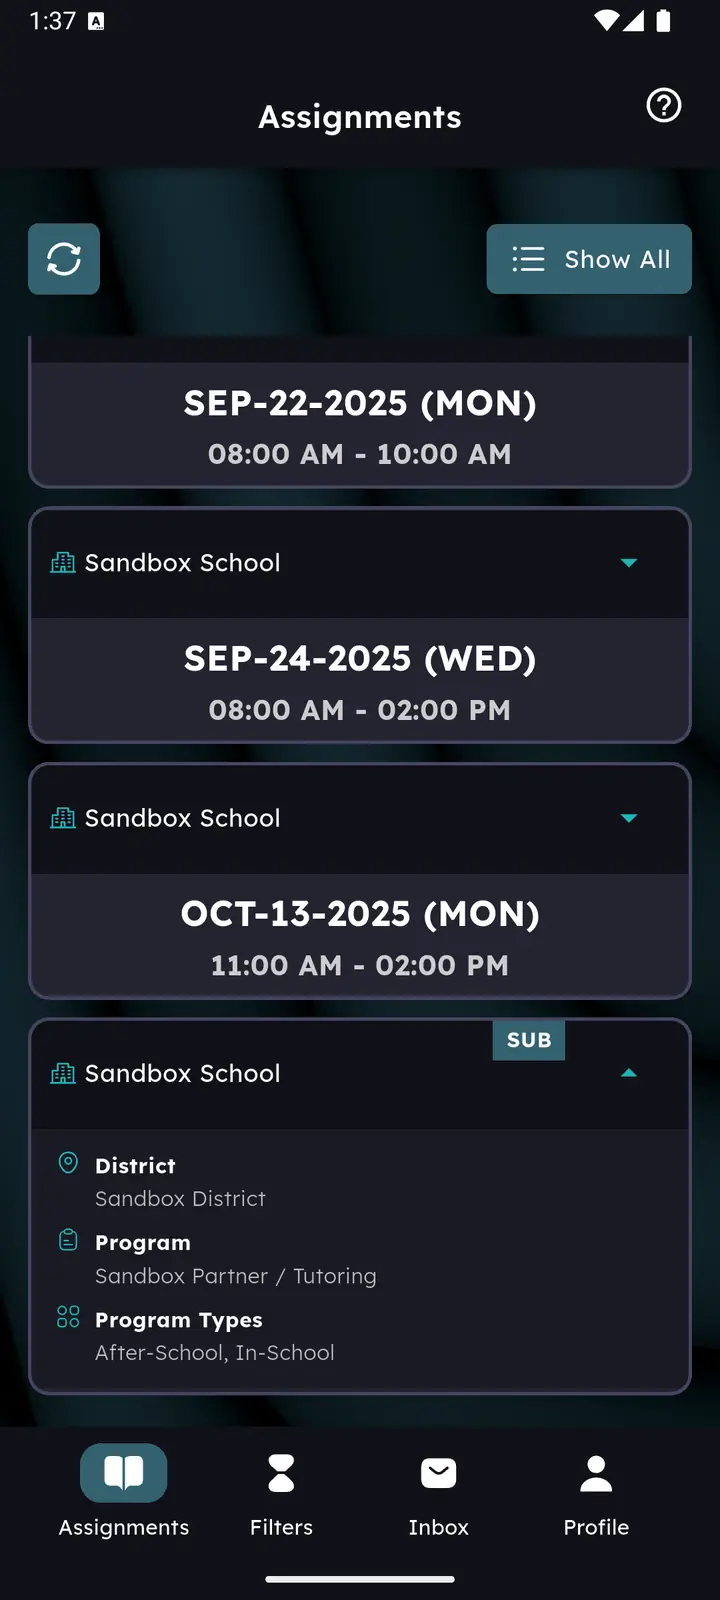
The assignments screen
Selecting an assignment applies its filters and opens the main view, which contains:
- the selected assignment’s information at the top;
- Program Type — auto-selected when only one is available, otherwise you must choose one before the filter rail activates;
- the main filter rail: SESSIONS, STUDENTS, GROUPS;
- the view for whichever rail button is active.
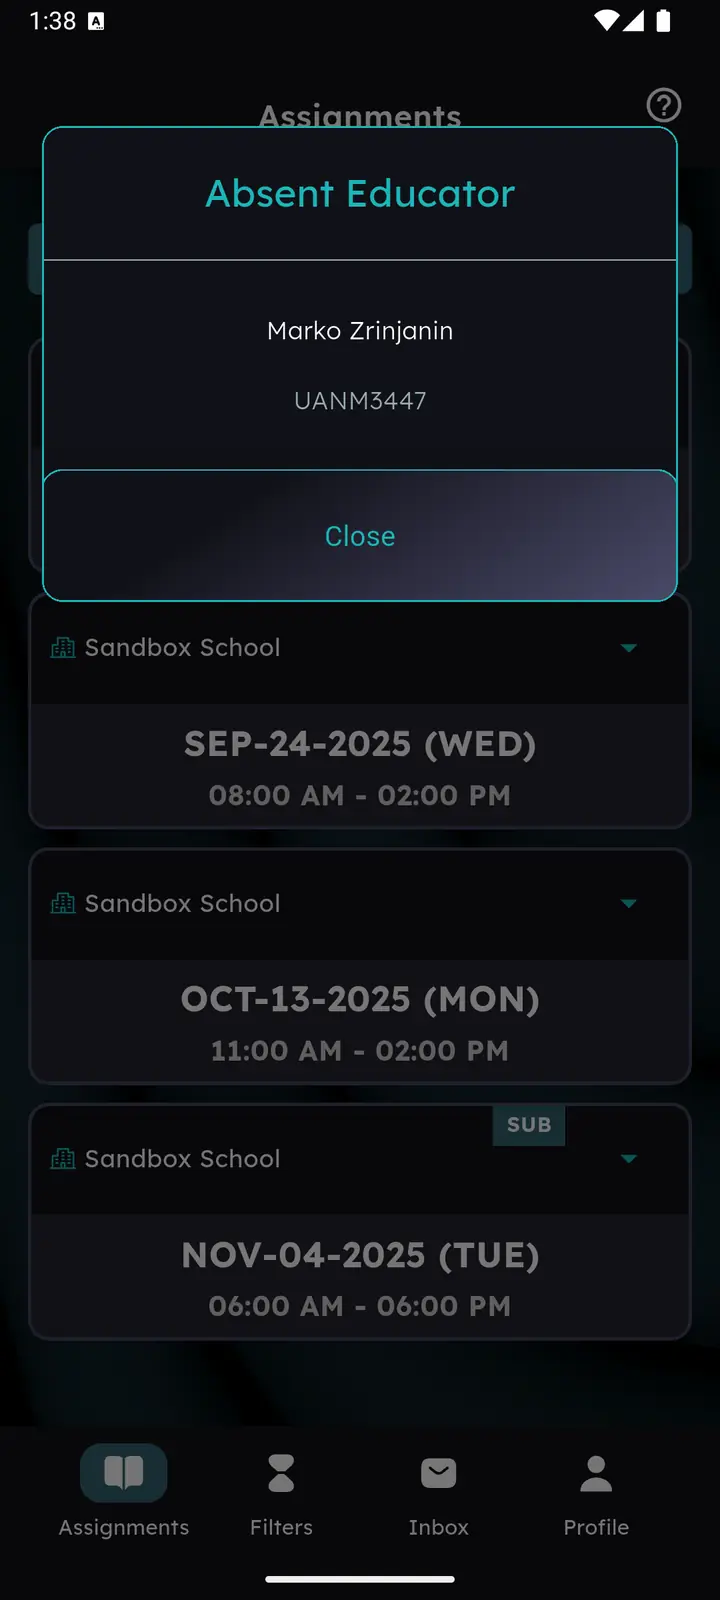
The substitute (SUB) flag
You may be assigned to cover for an absent educator. Those assignments carry a SUB flag — tap it to see the name and ID of the educator you’re covering for.
Filters
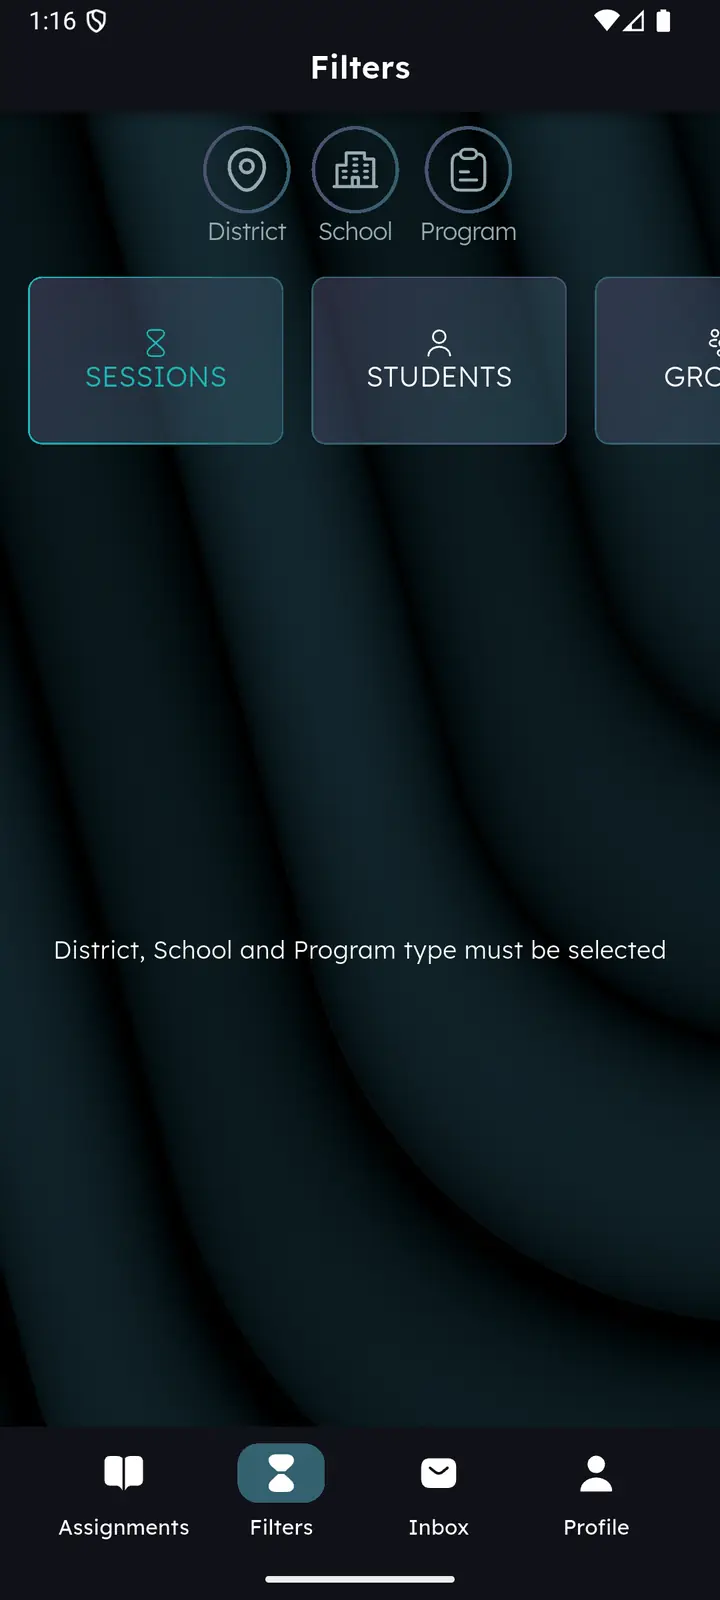
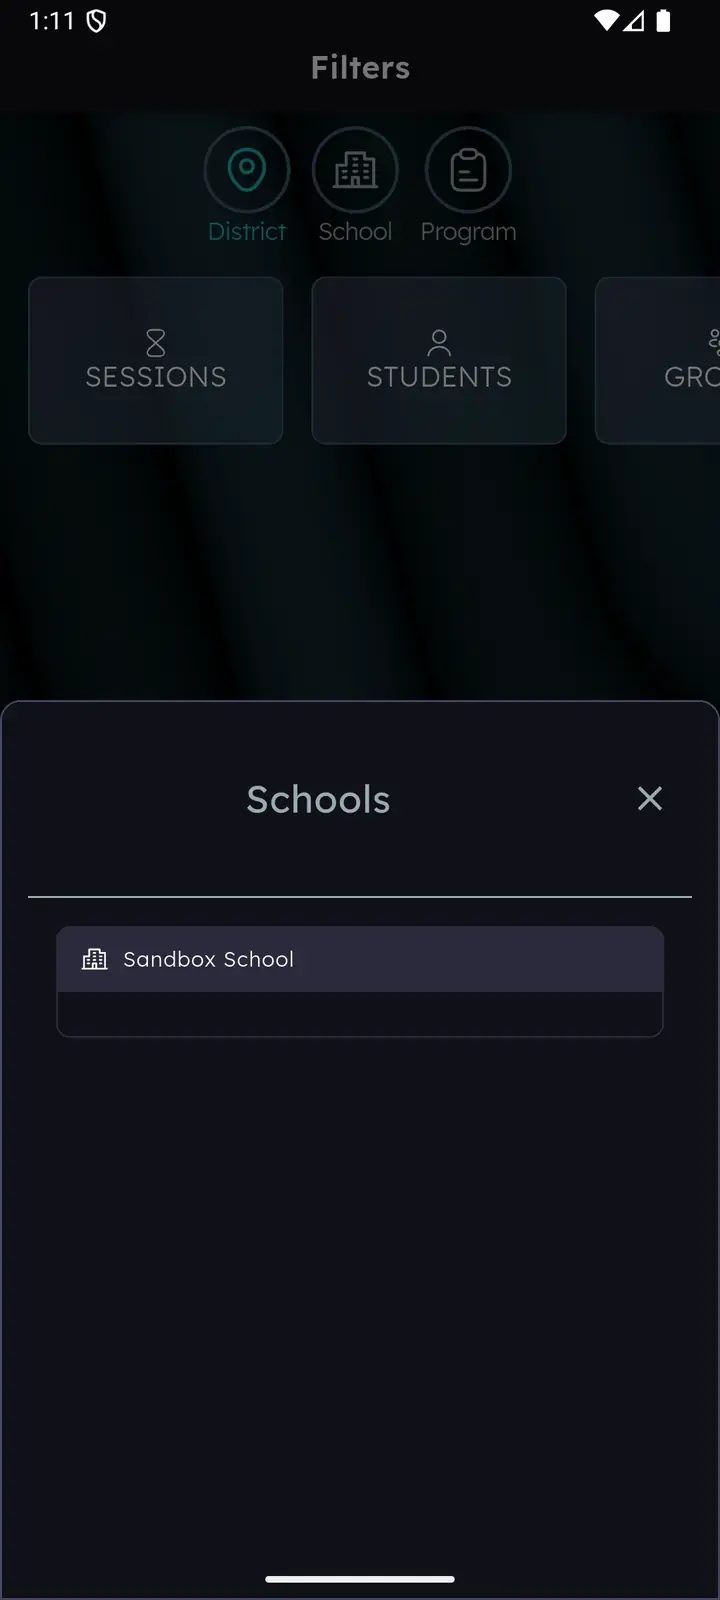
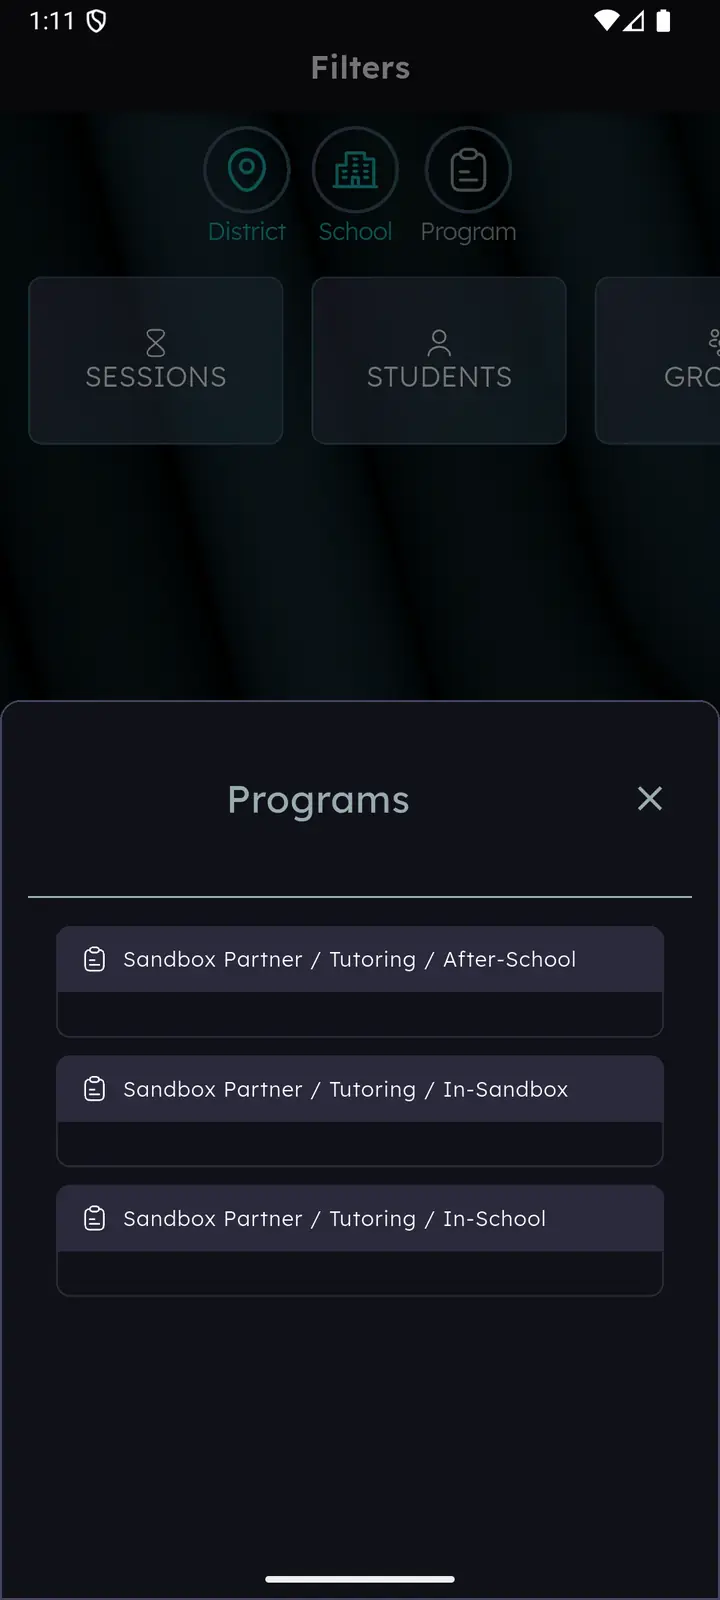
The Filters tab reaches the same sessions, students and groups as an assignment, but you choose the path yourself: district, then school, then partner / program / program type.
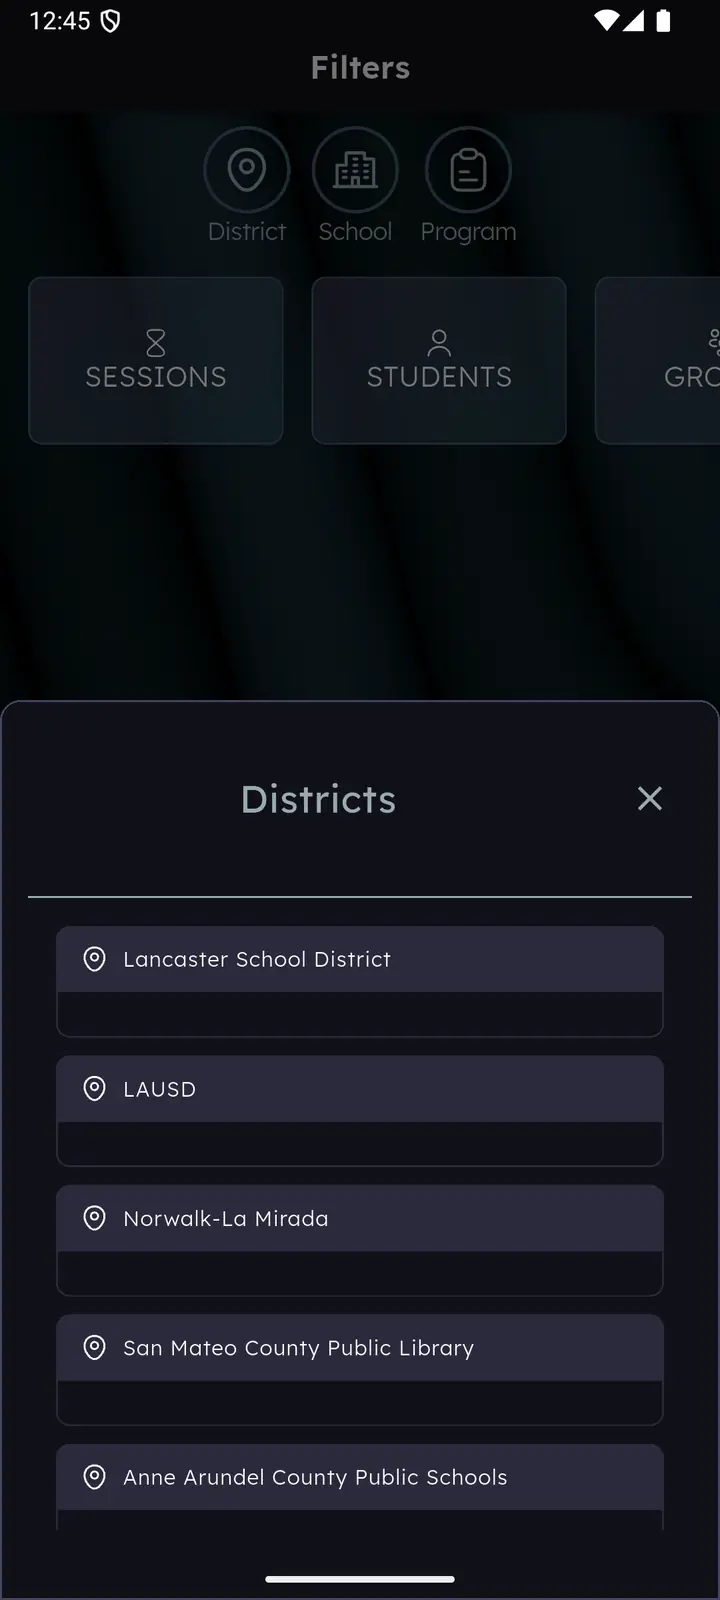
- Tap a filter button to open its list — District, School, or Program.
- Pick a value. The lists narrow as you go: schools are limited to the chosen district, programs to the chosen school.
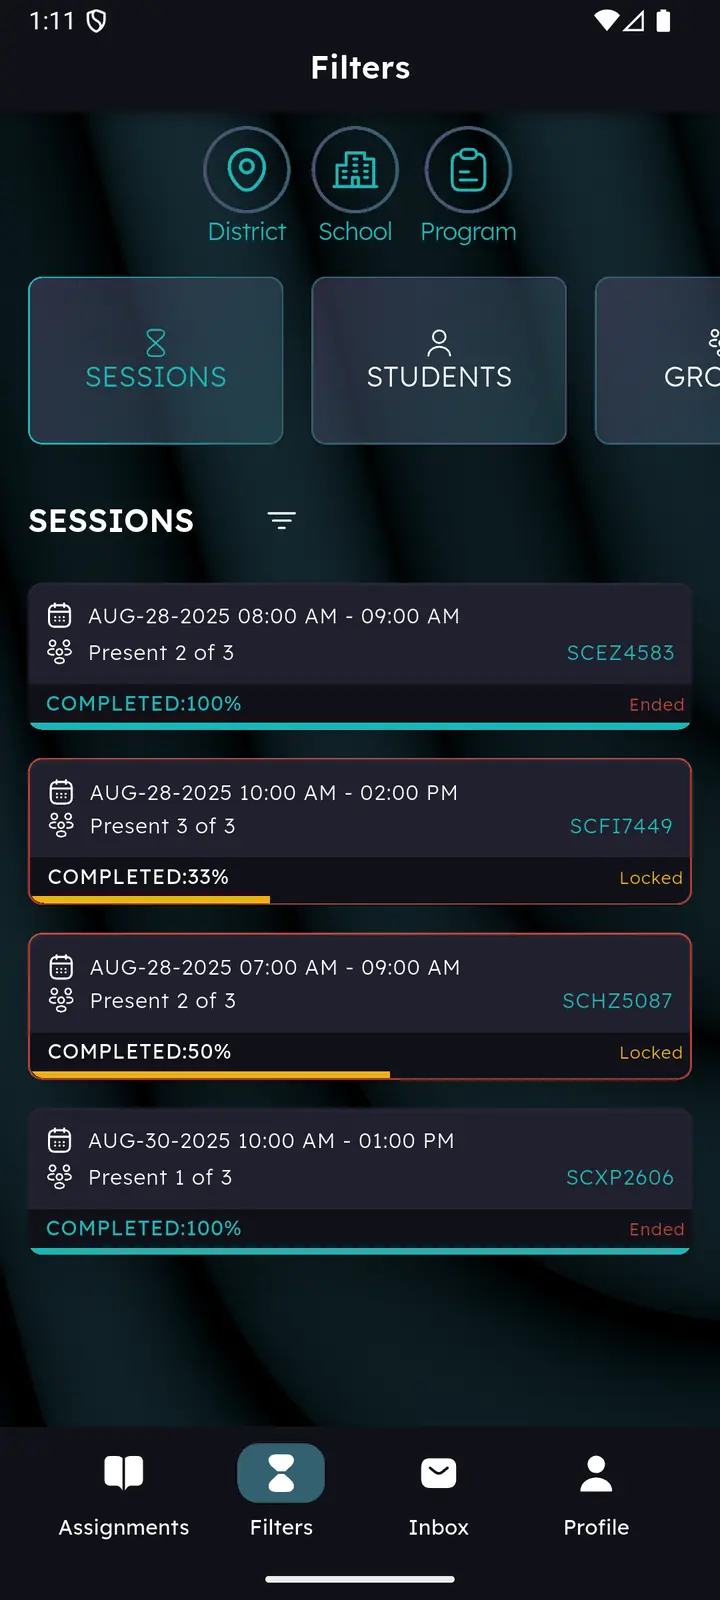
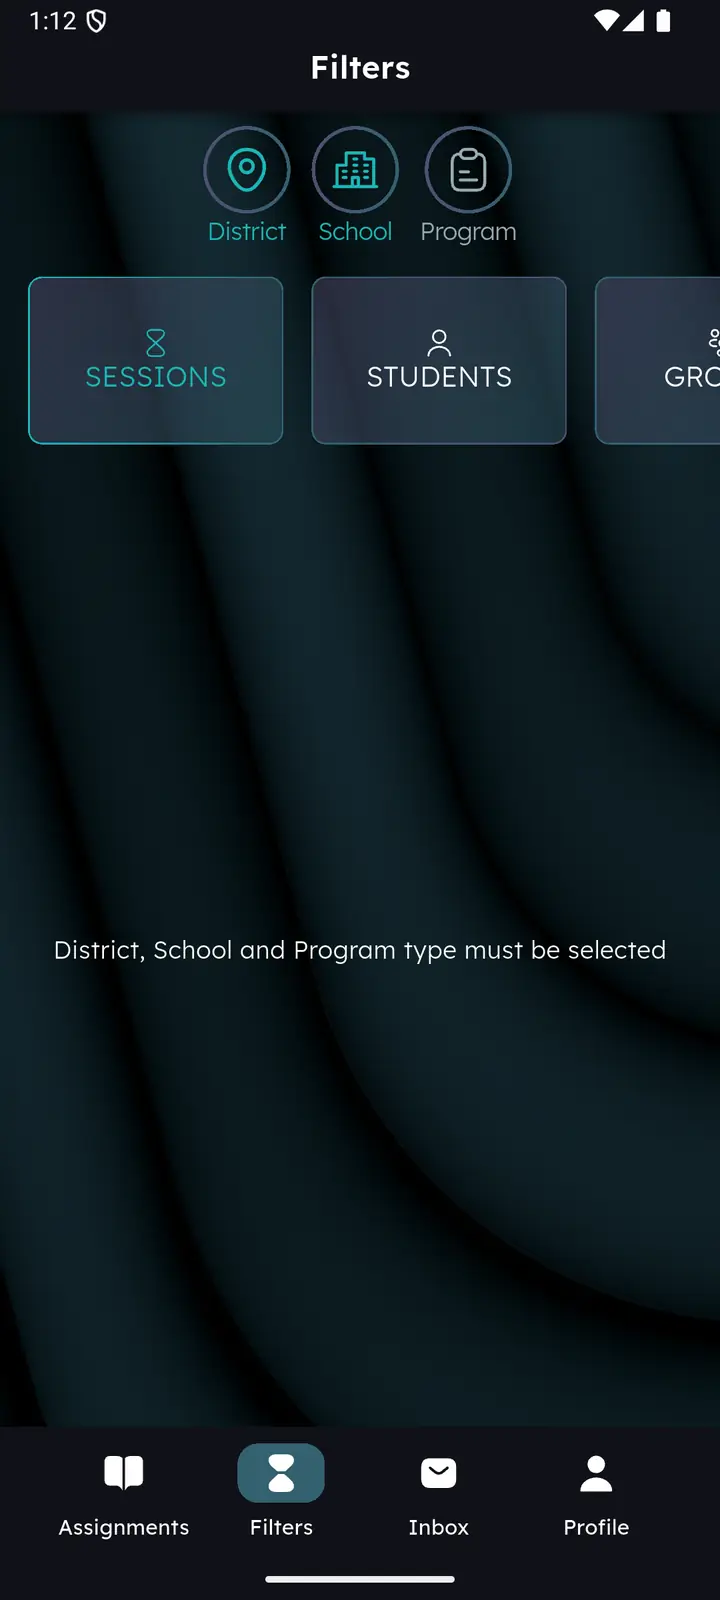
- When all three are set the buttons turn green and the main filter rail becomes usable.
Long-press a filter button to clear that category on its own — no need to start over.
Sessions
A session is one block of teaching time: who taught, at which school, which students were there, for how long, and on what subject. Everything else in Presentify hangs off it.
You reach sessions two ways — from the Assignments screen by tapping an assignment, or from the Filters screen by setting all three filters.
The four statuses
A session moves through these states. Which one it’s in decides what you can still change.
The initial state. The time cannot be changed, but other information can be edited for the next 24 hours.
A started session with attendance saved. Each present student needs both an attendance duration and a subject to count as complete; when every present student is complete, the session reads COMPLETED: 100%.
Not finished within 24 hours — a session sitting at 90% at the deadline locks at 90%. It can no longer be edited.
Completed 100% and locked. The finished state.
Marking a student present is not enough. Without duration and subject saved, that student never counts toward completion — and once 24 hours pass the session locks with whatever you entered. Finish attendance the same day.
The sessions screen
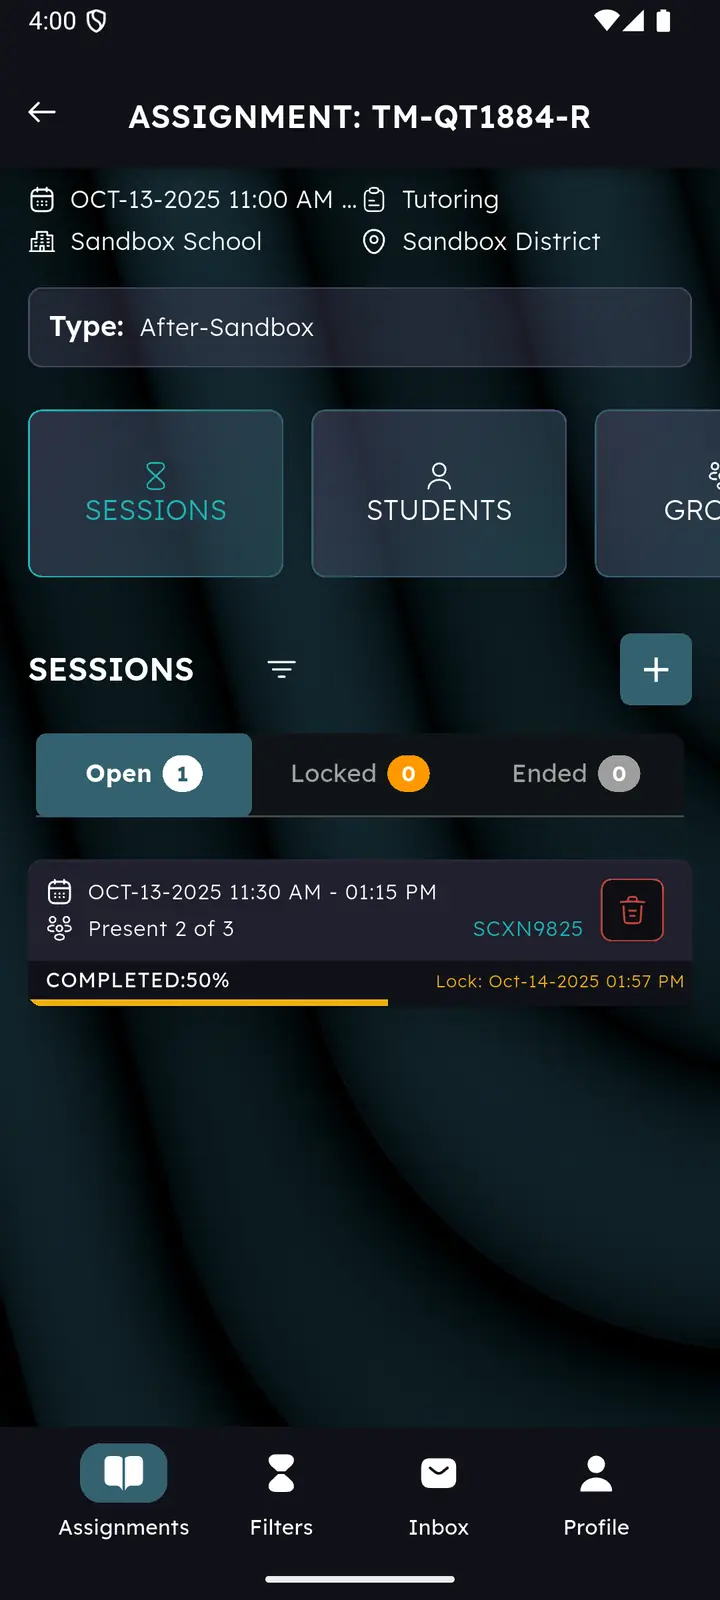
Every session you created for the current assignment or filter, newest first. Each card shows the date and time range, how many students were present, the session code, a completion bar and the status.
- Status tabs New — Open, Locked and Ended tabs with counts, so you can jump straight to the sessions that still need work.
- Refresh — scroll down from the top of the list until the refresh icon appears, and keep pulling until it stops moving.
- Create — the + button, top right.
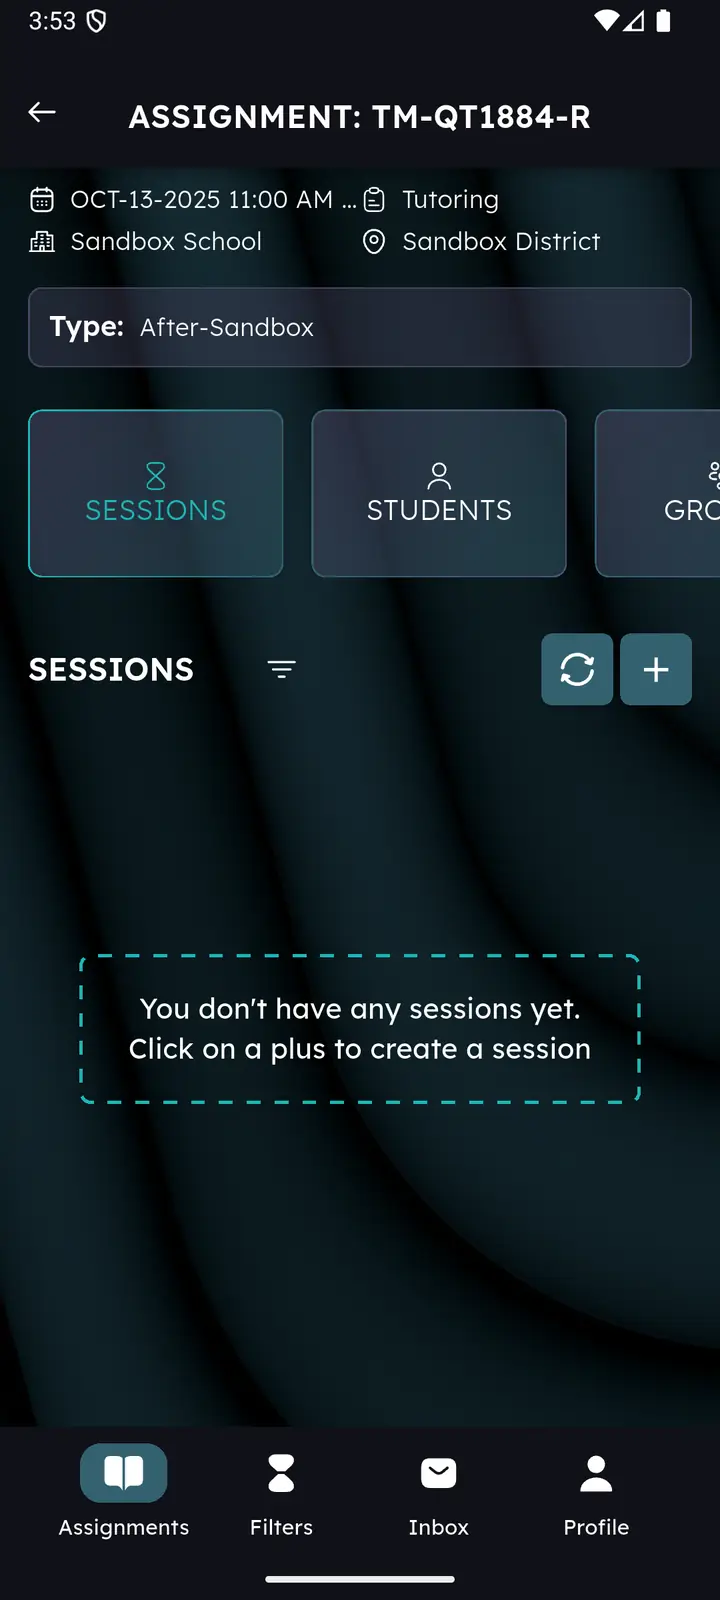
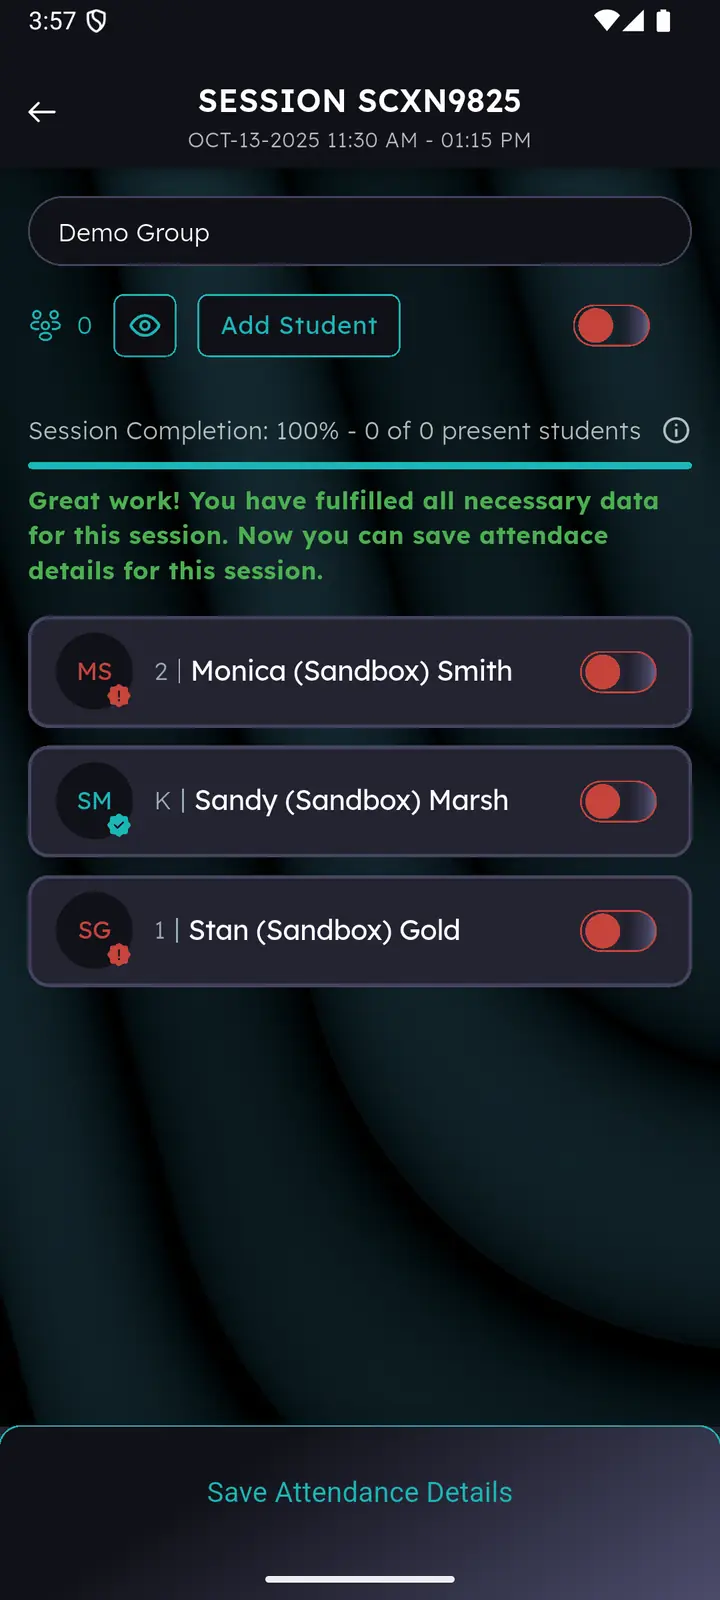
Creating a session — Student Roster type
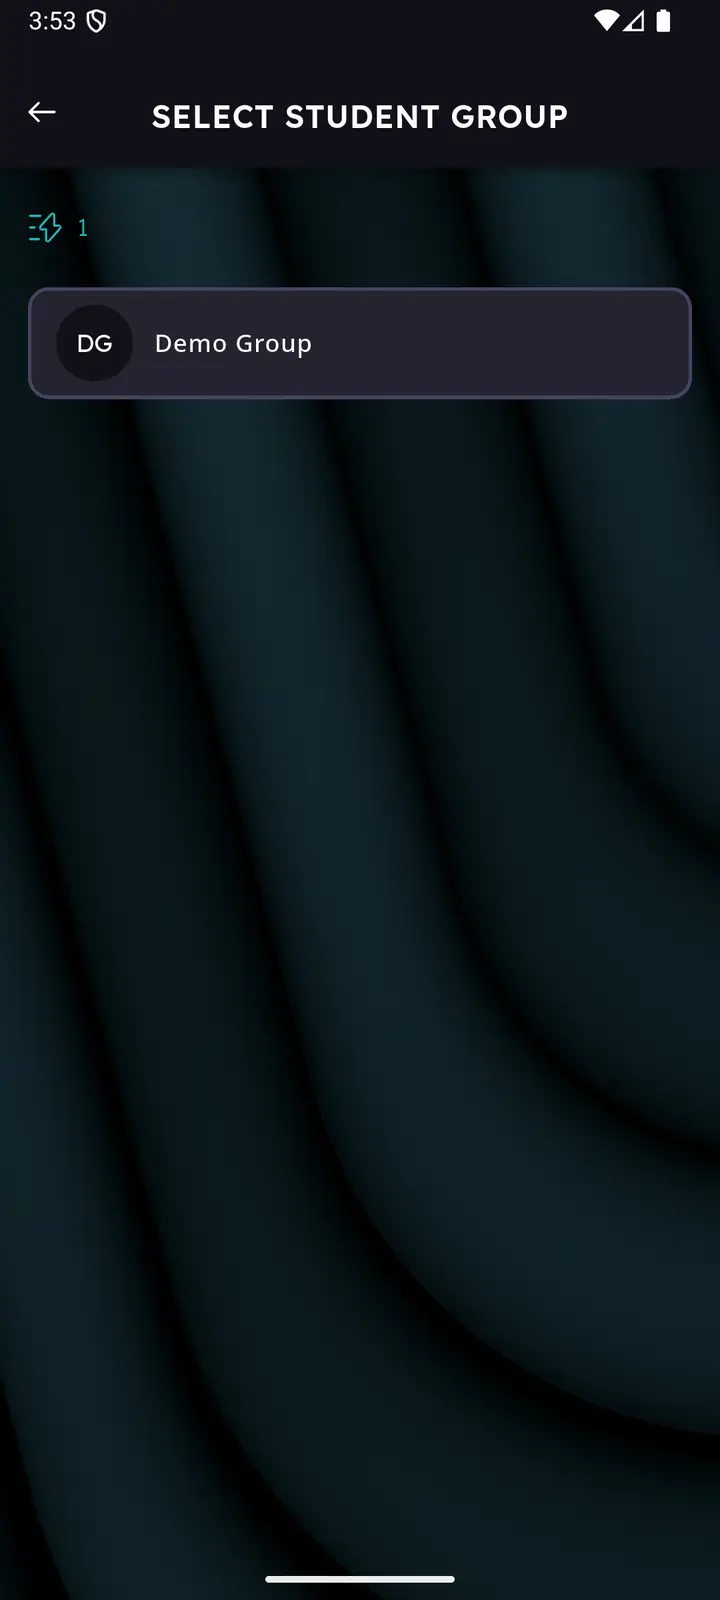
Roster sessions track named students, so they always start from a group.
- Select a student group. A group is required. If you don’t have one yet, tap Add Student and follow Chapter 12.
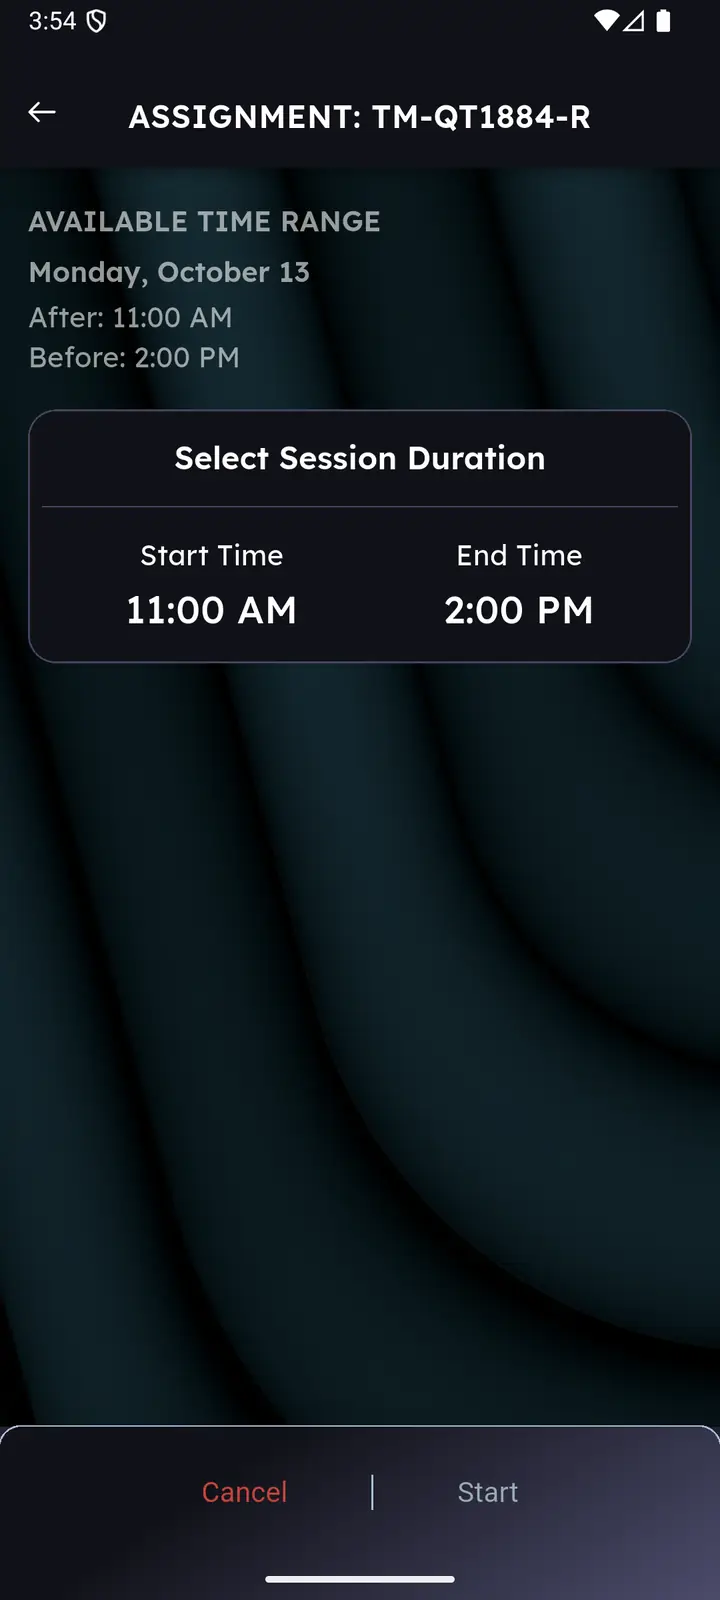
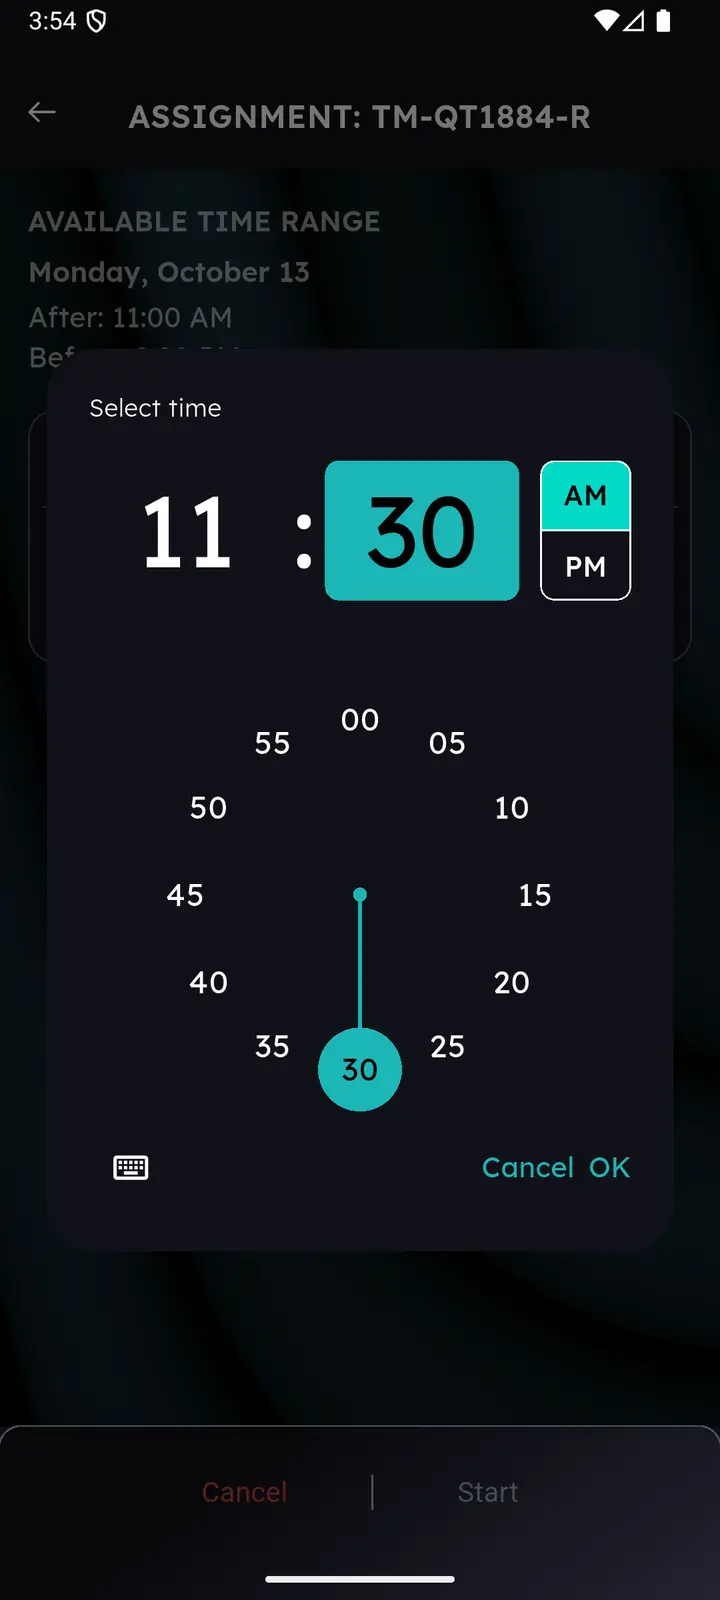
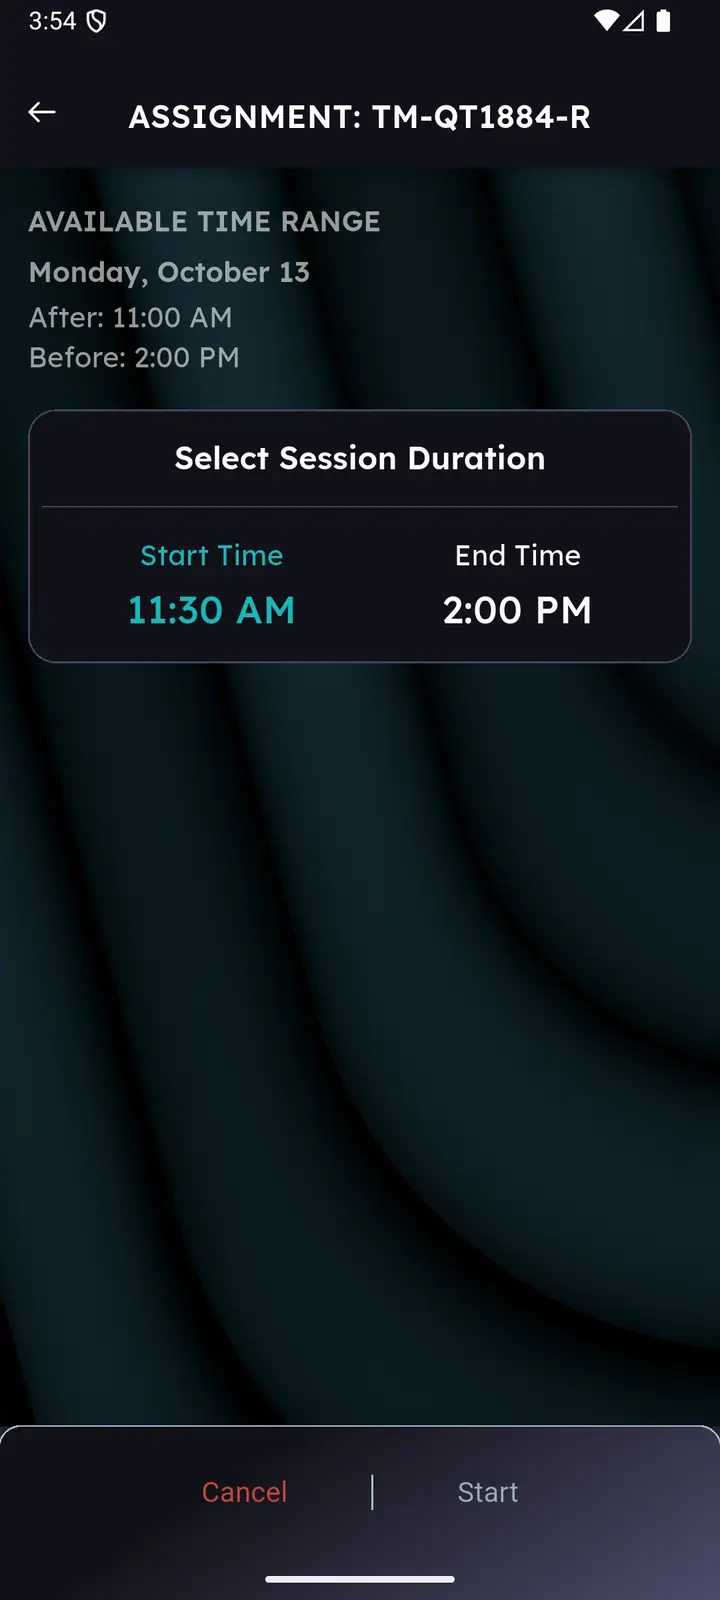
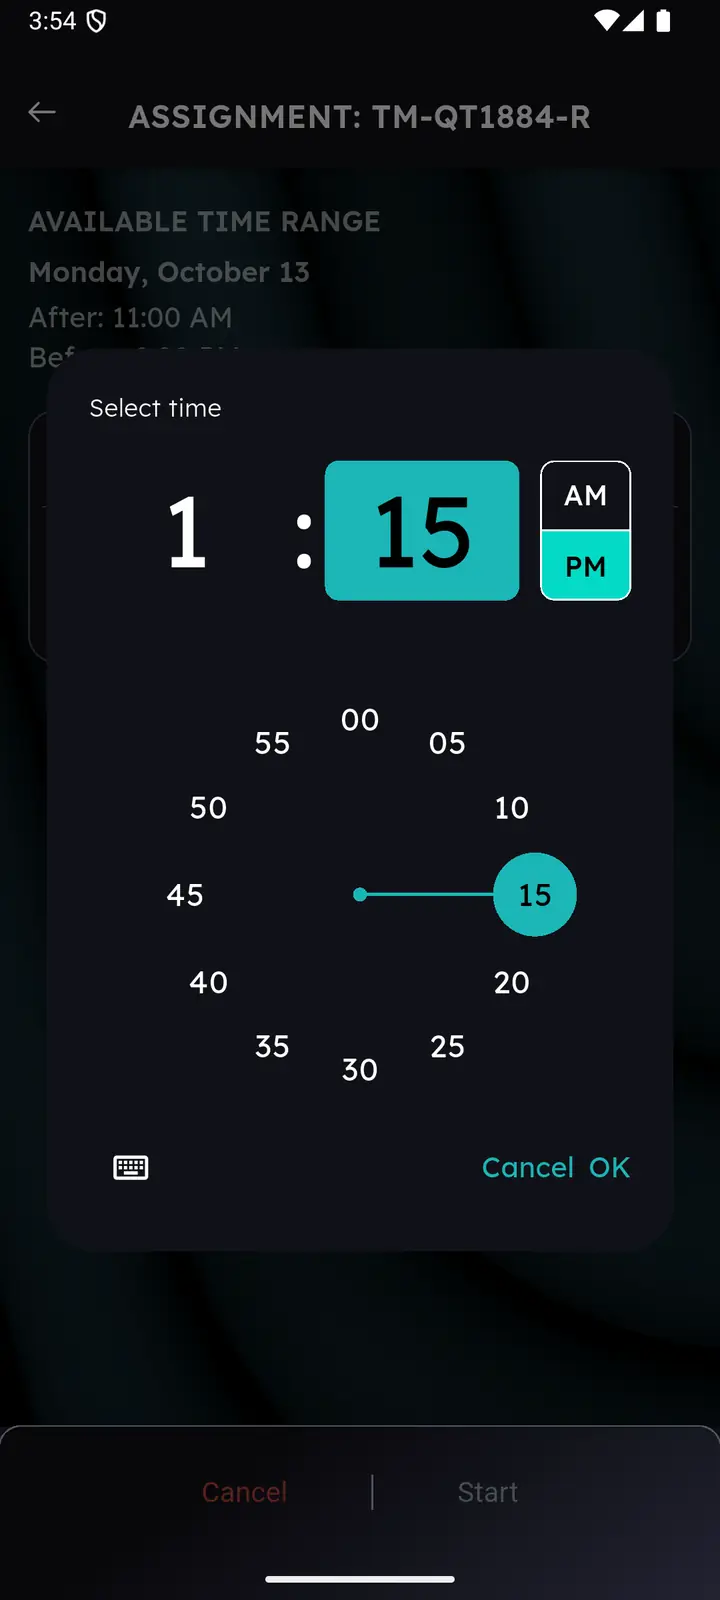
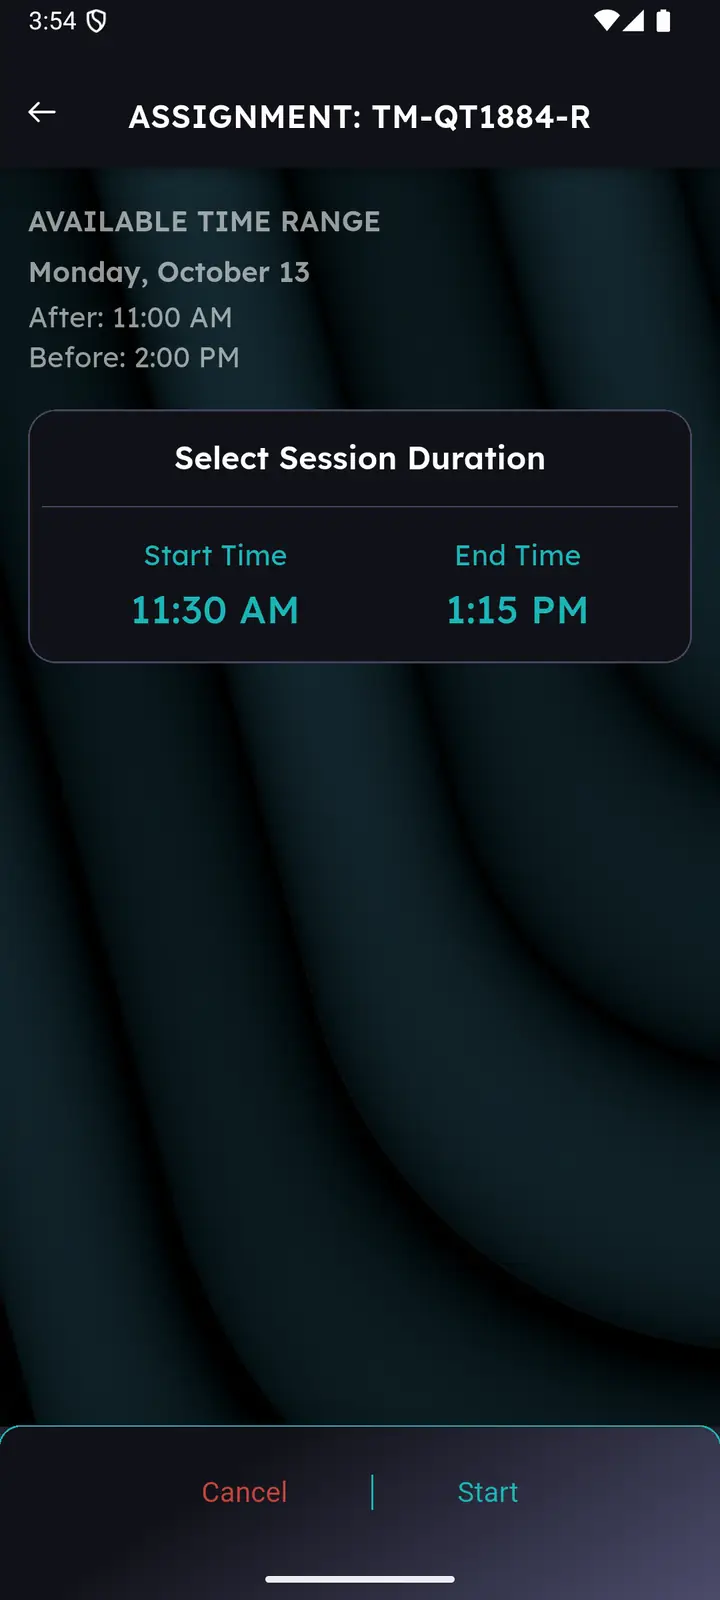
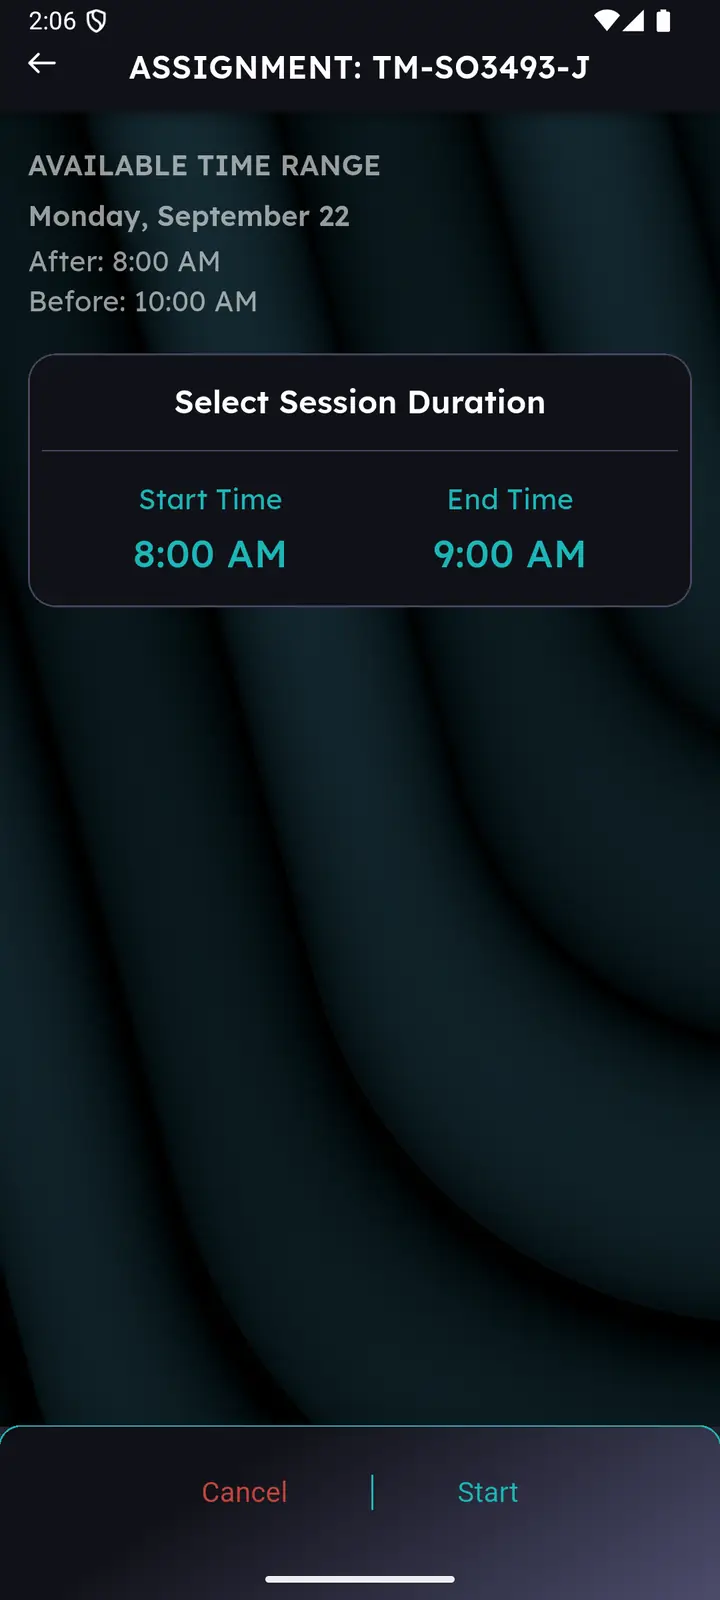
- Select date & time. The assignment’s available time range is shown above; pick a start and end time inside it, then tap Start. This creates an empty session with every student marked absent.
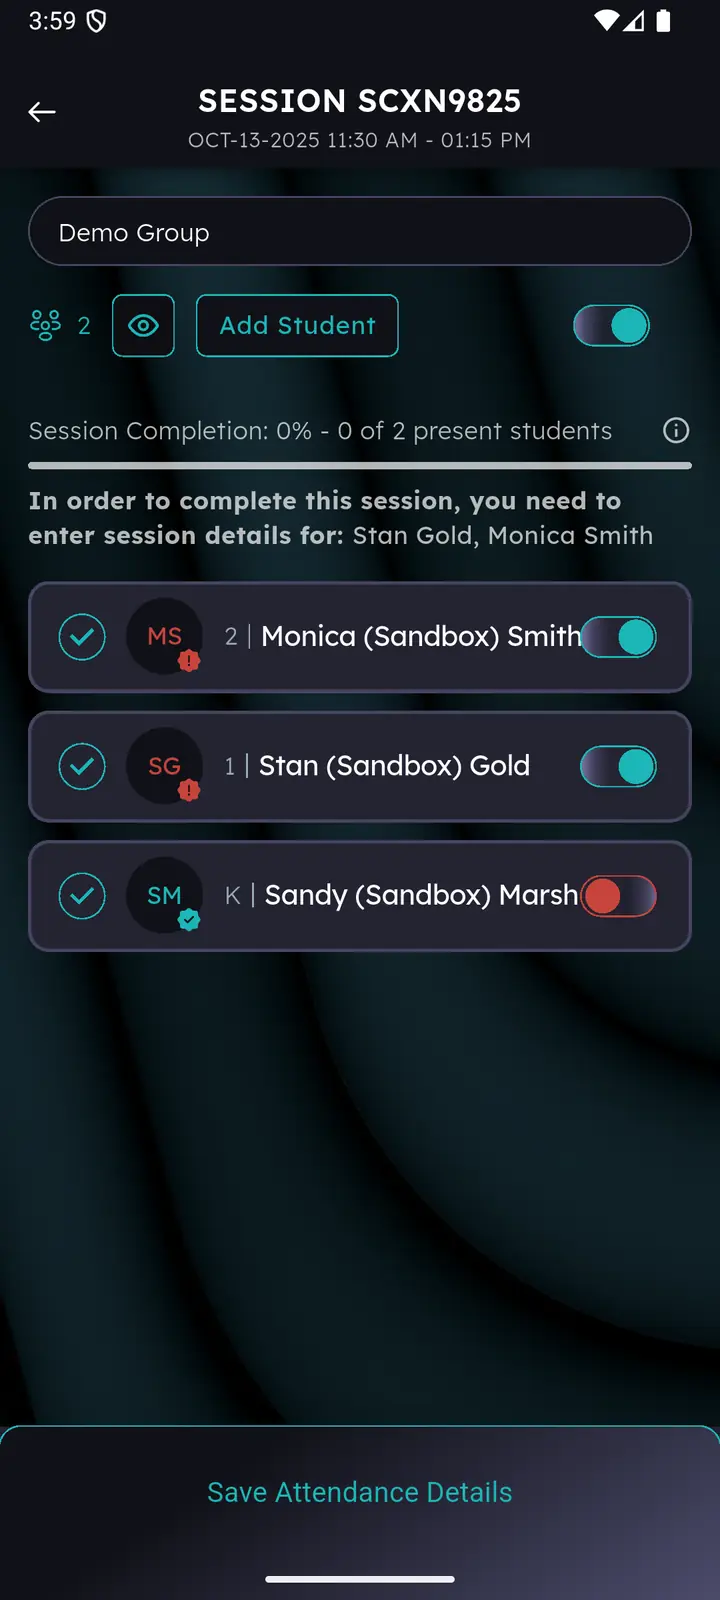
- Set each student’s attendance. Toggle the switch on for the students who attended, then tap Save Attendance Details.
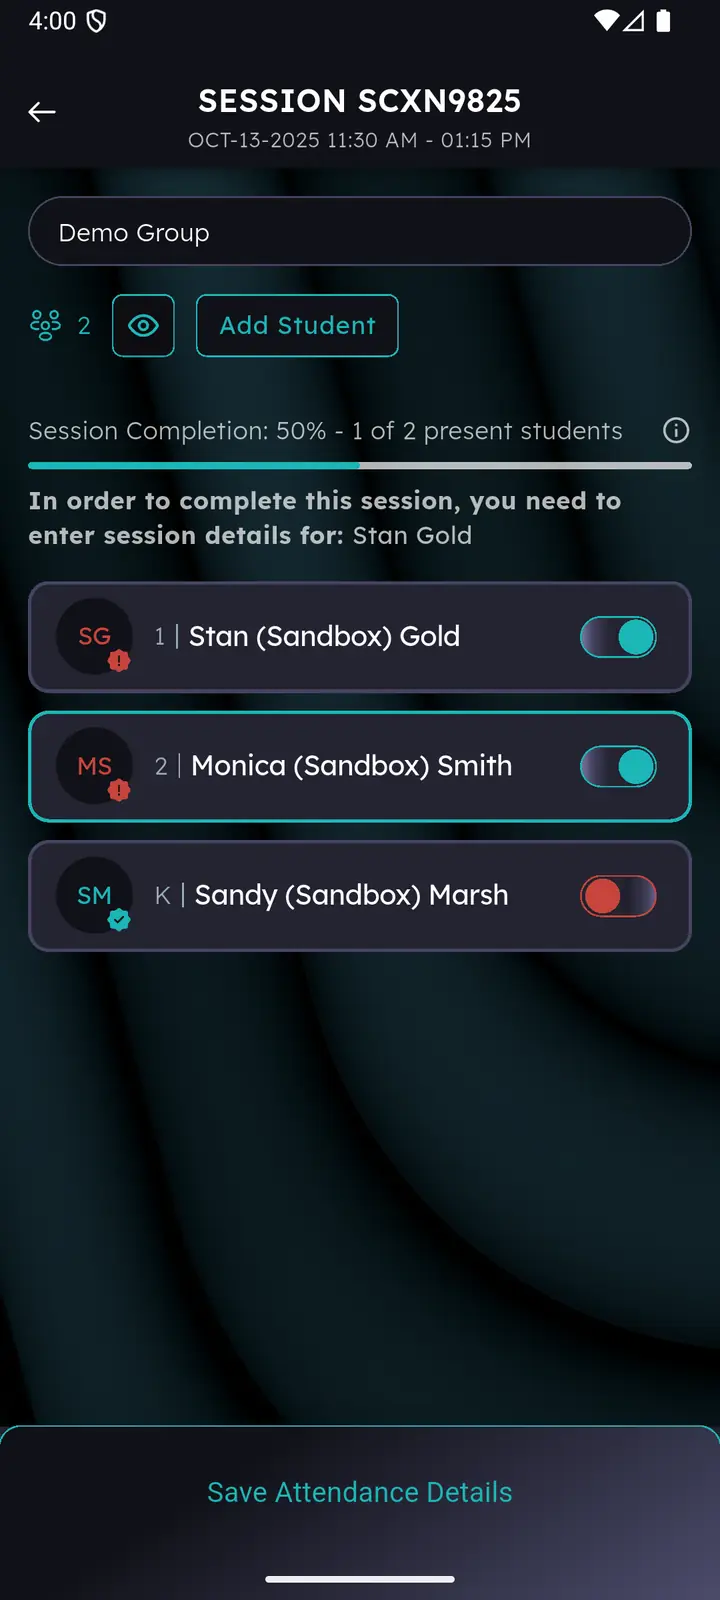
- Fill in the details. Tap a present student’s card to add duration, subject and anything else — see Chapter 06.
Two controls worth knowing
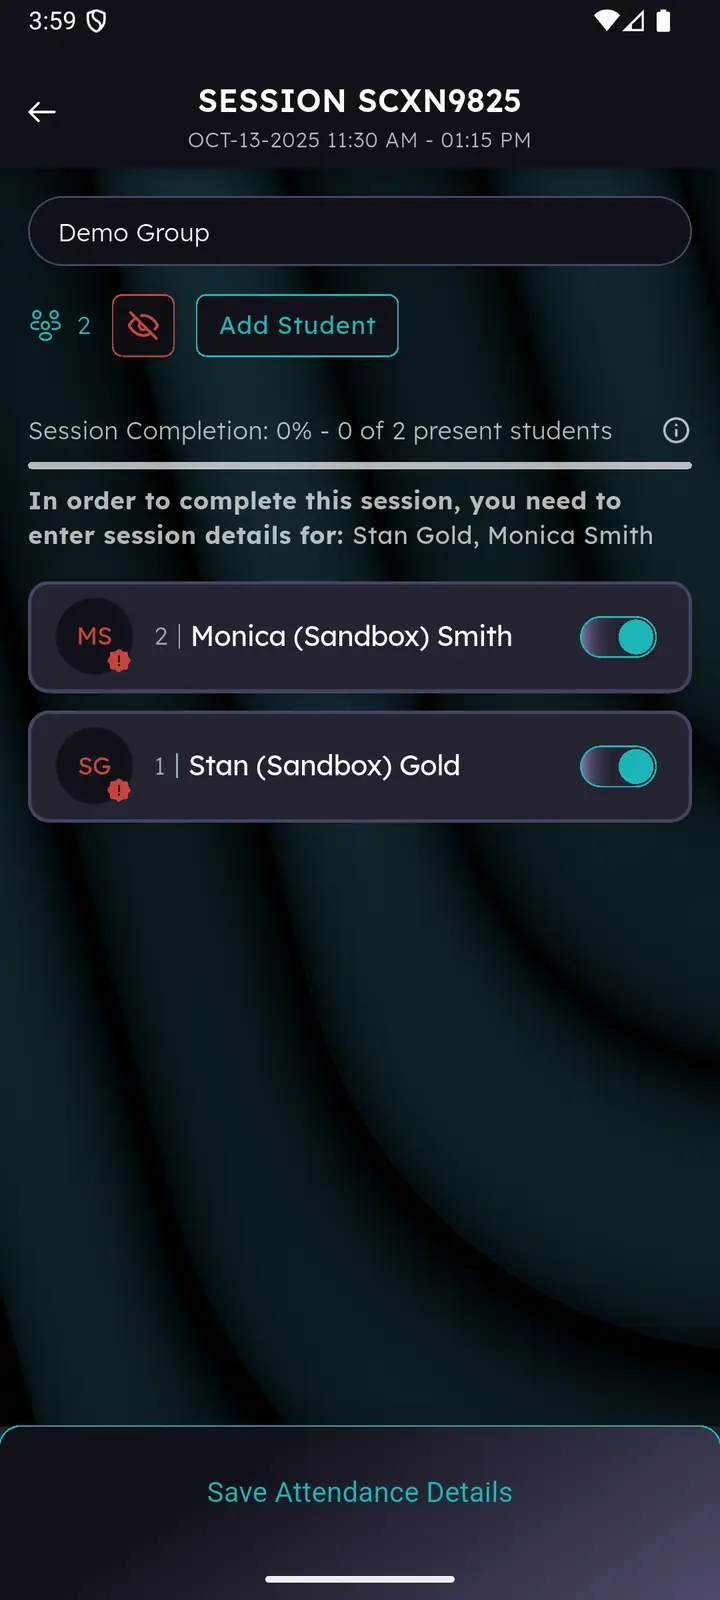
- Eye icon — shows or hides absent students, handy for a long roster where only a few attended.
- Add Student — adds someone who wasn’t in the original group, for this session only.
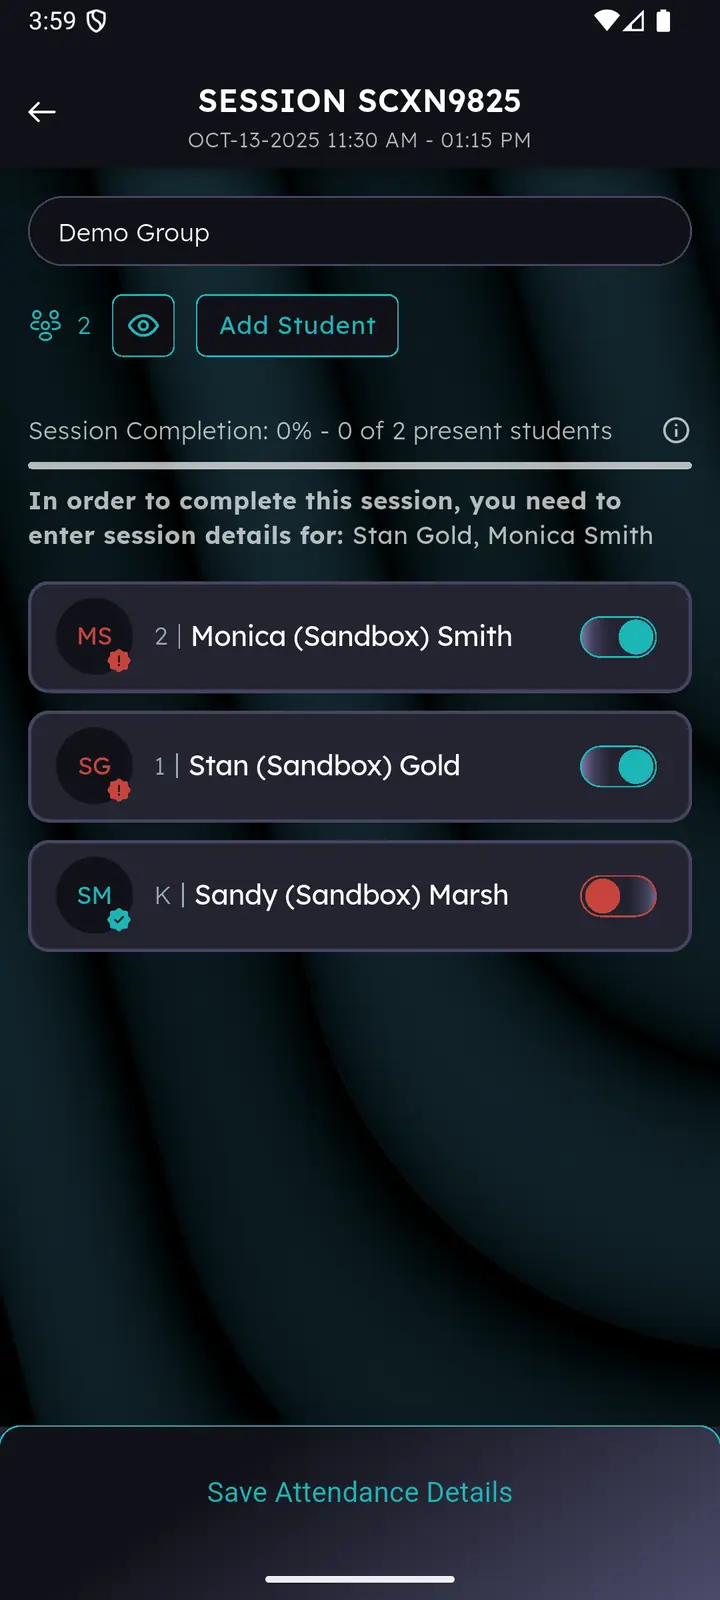
The banner under the progress bar names exactly who is still missing data — “In order to complete this session, you need to enter session details for: Stan Gold”. When it turns green, you’re done.
Creating a session — Student Number type
Some programs record a head count rather than named students. That flow is shorter, and it finishes in one save.
- Select date & time inside the available range and tap Start. An empty session is created.
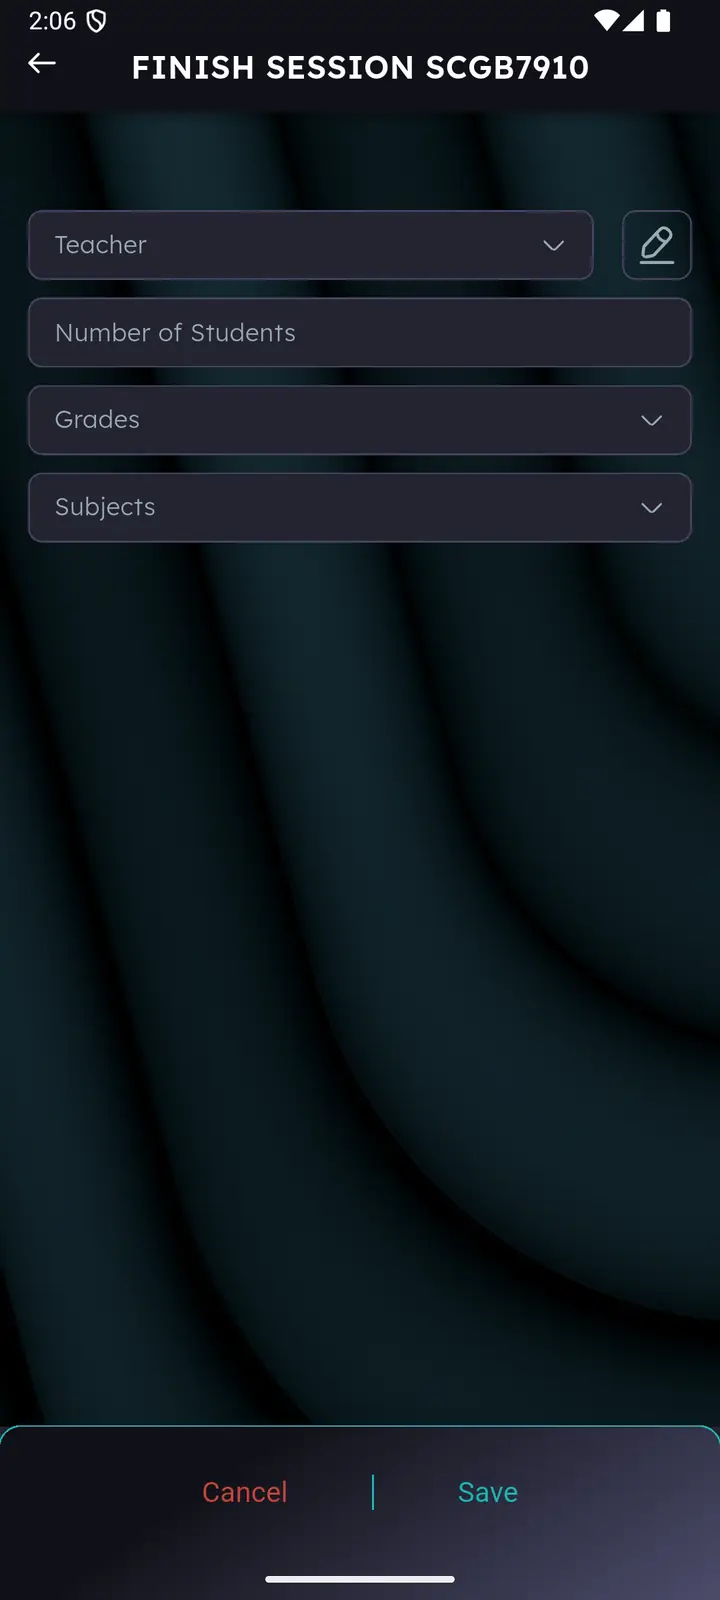
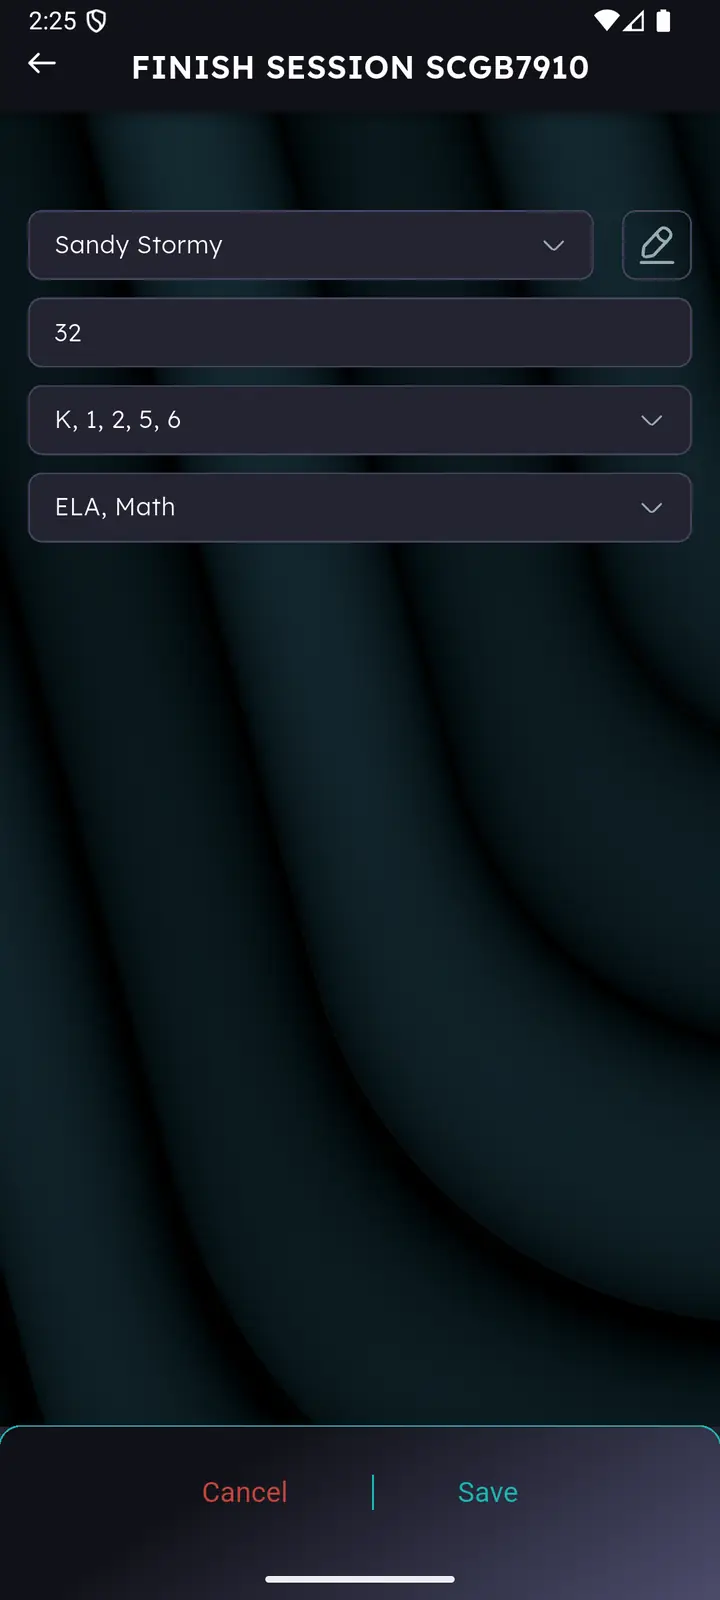
- Fill in the fields — teacher, number of students, grades and subjects.
- If the teacher isn’t in the list, tap the pen icon and type the name. Don’t save yet.
- Choosing Other as a subject opens a free-text field — separate multiple subjects with commas.
- Tap Save.
A Student Number session goes straight to Ended on save. There are no further edits — check the numbers before you tap Save.
Deleting a session New
An Opened session created by mistake can now be removed from the app: tap the trash icon on its card in the Open tab and confirm.
- Deletion cannot be undone.
- If the session already has assessments attached, Presentify warns you before removing them along with it.
- Locked and Ended sessions cannot be deleted — contact support instead.
Attendance details
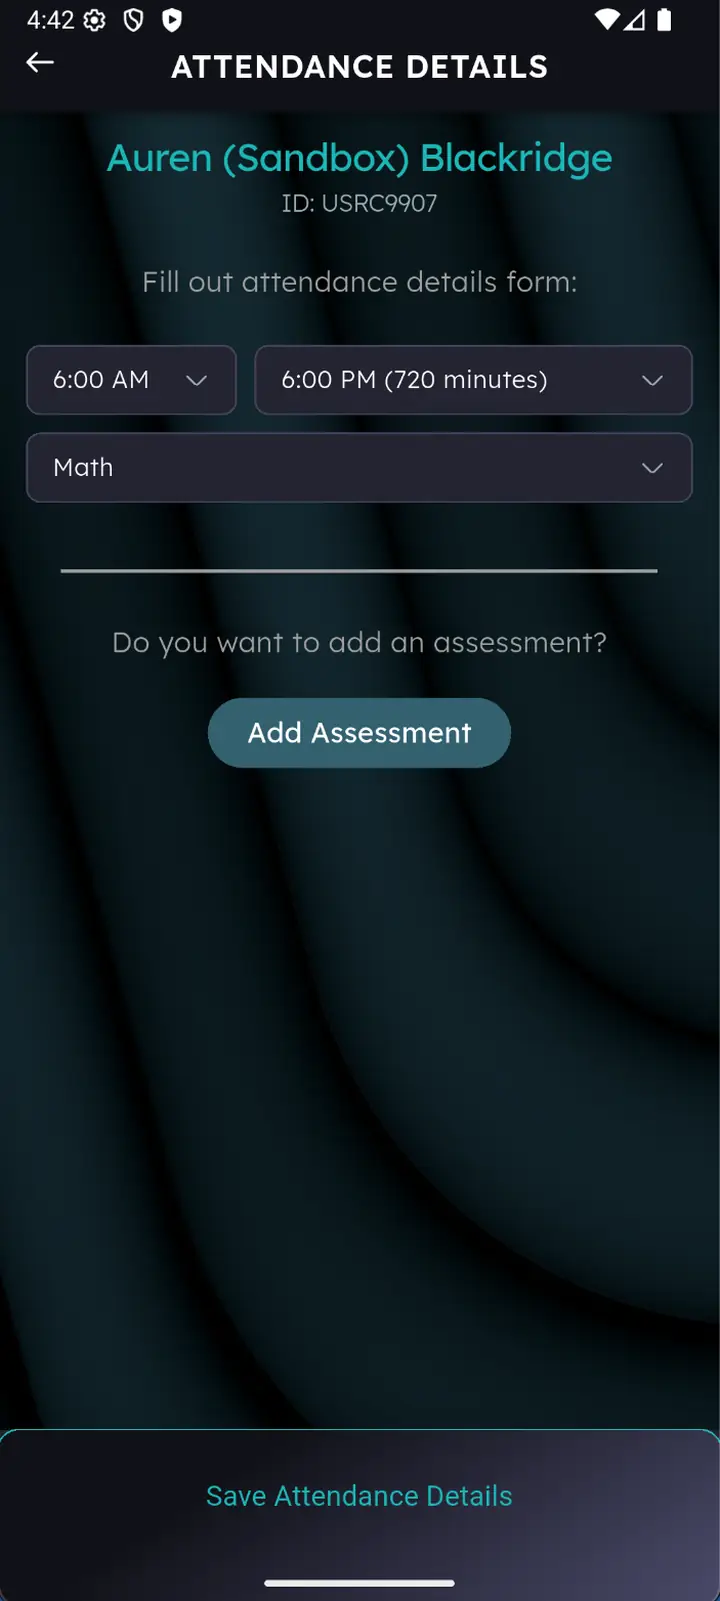
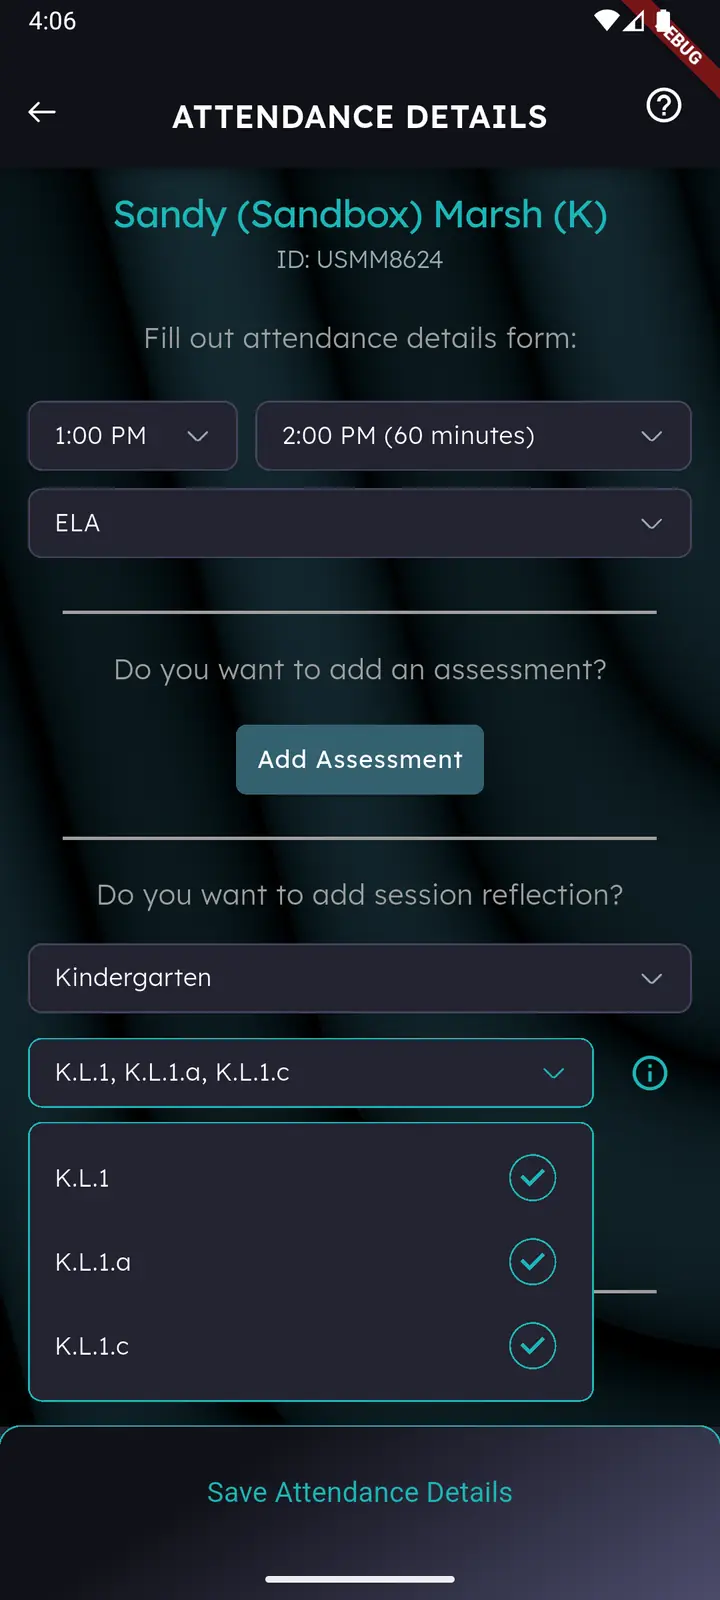
The Attendance Details screen is where a present student turns into a complete record: time in, time out, subject — and optionally an assessment and a session reflection.
Attendance can only be changed while the session is Opened.
Updating a student’s attendance
- Tap a present student’s card (switch on).
- Set time in and time out. The duration in minutes is calculated for you.
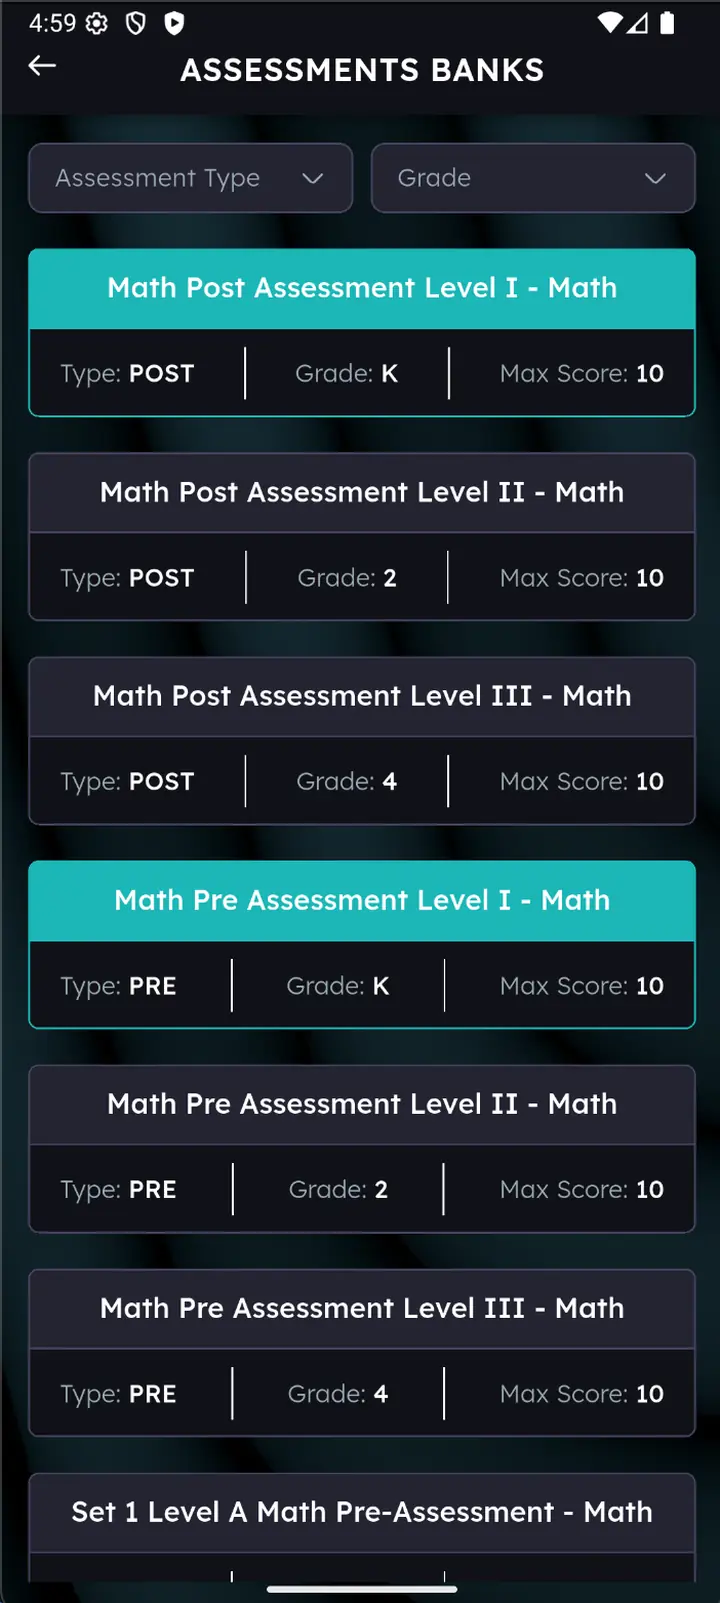
- Choose the subject. Selecting a subject is what unlocks the assessment bank list.
- Optionally tap Add Assessment to open the assessment banks — see Chapter 10.
- Narrow a long bank list with the Assessment Type and Grade filters.
- Tap Save Attendance Details.
A green-labelled assessment bank means this student already has assessments linked to it — the quickest way to see what you’ve already entered.
Session reflections
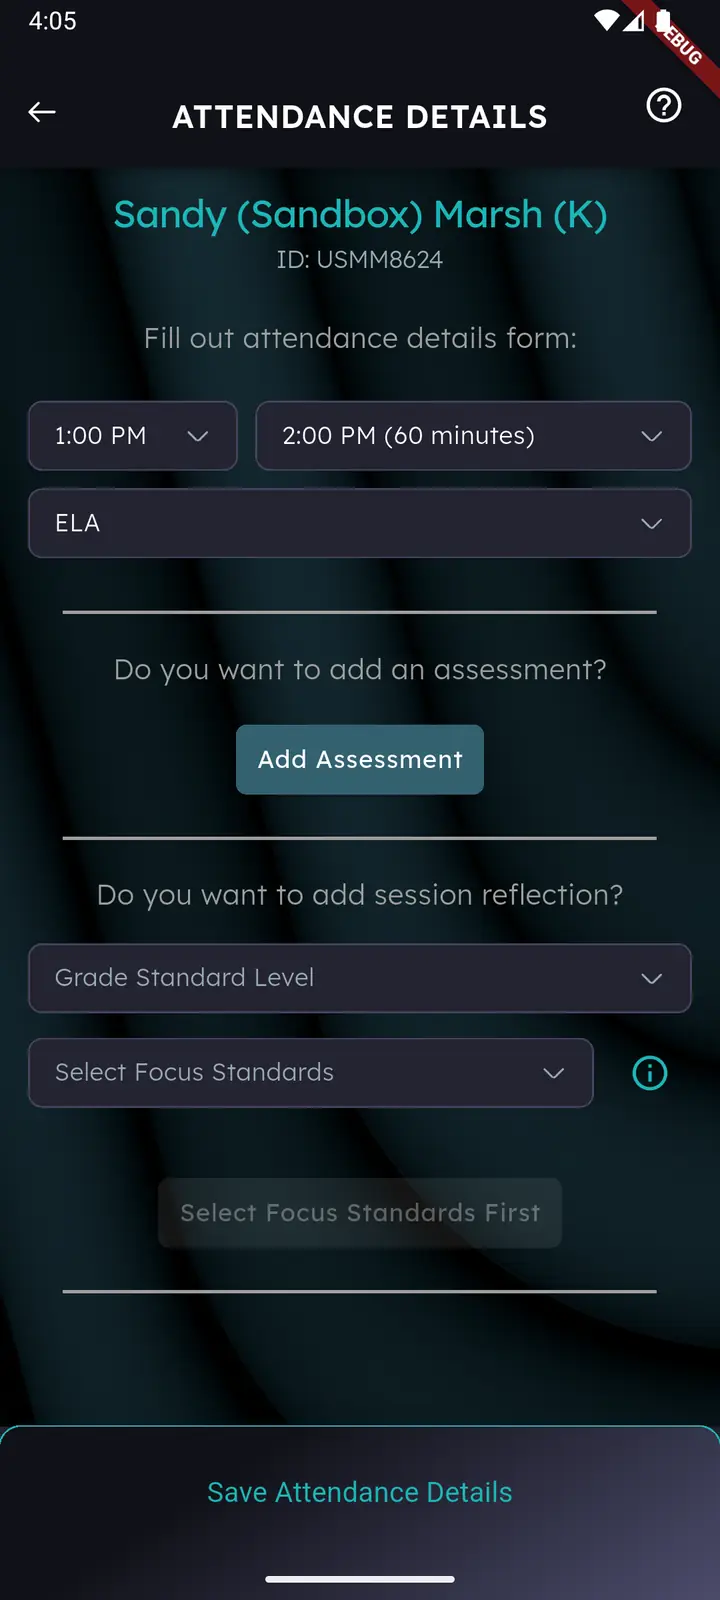
A session reflection records how well a student grasped specific focus standards in that session, on a four-point scale. Depending on your program, the reflection section appears inside Attendance Details.
Adding a reflection
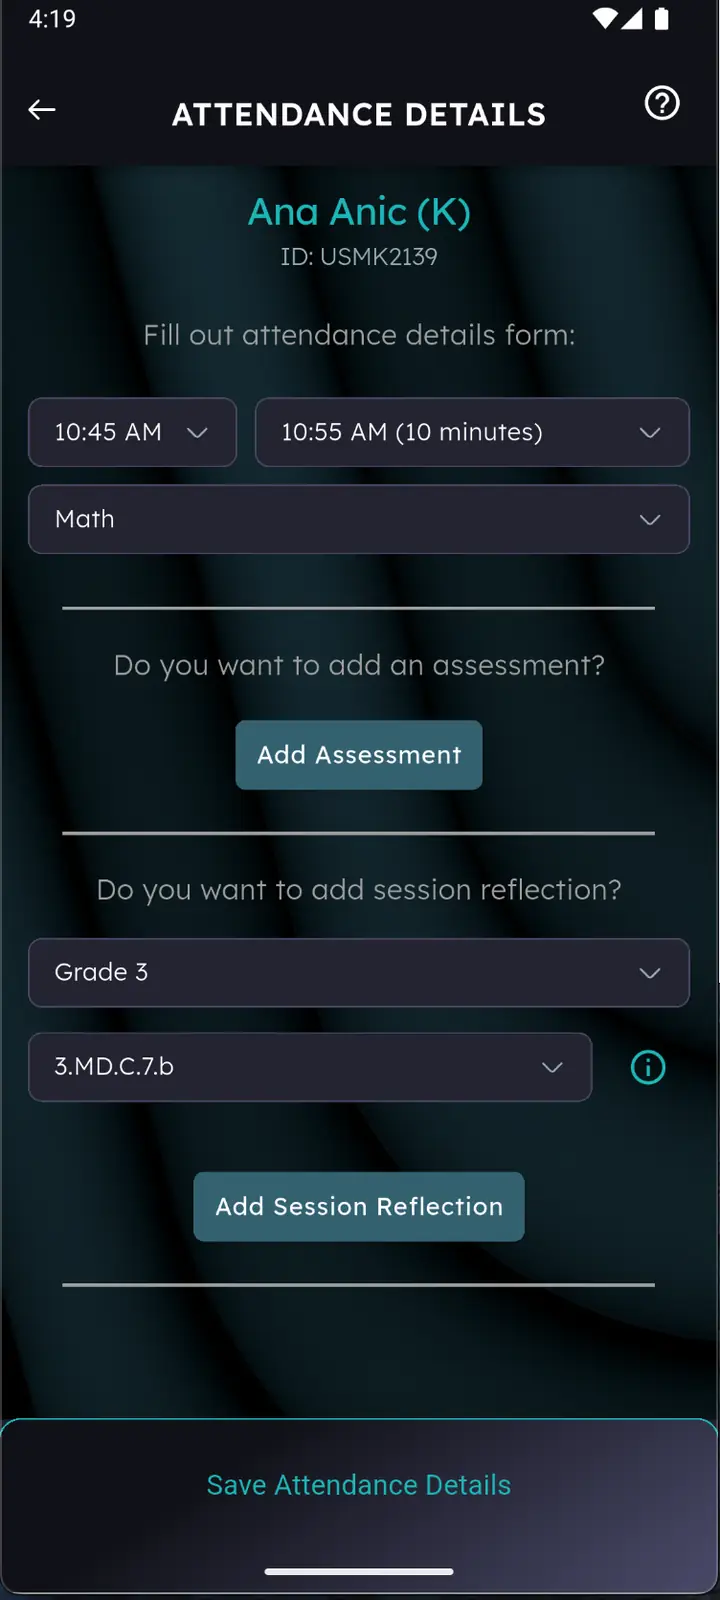
- Tap a present student’s card to open Attendance Details.
- Fill in the mandatory fields (time in, time out, subject).
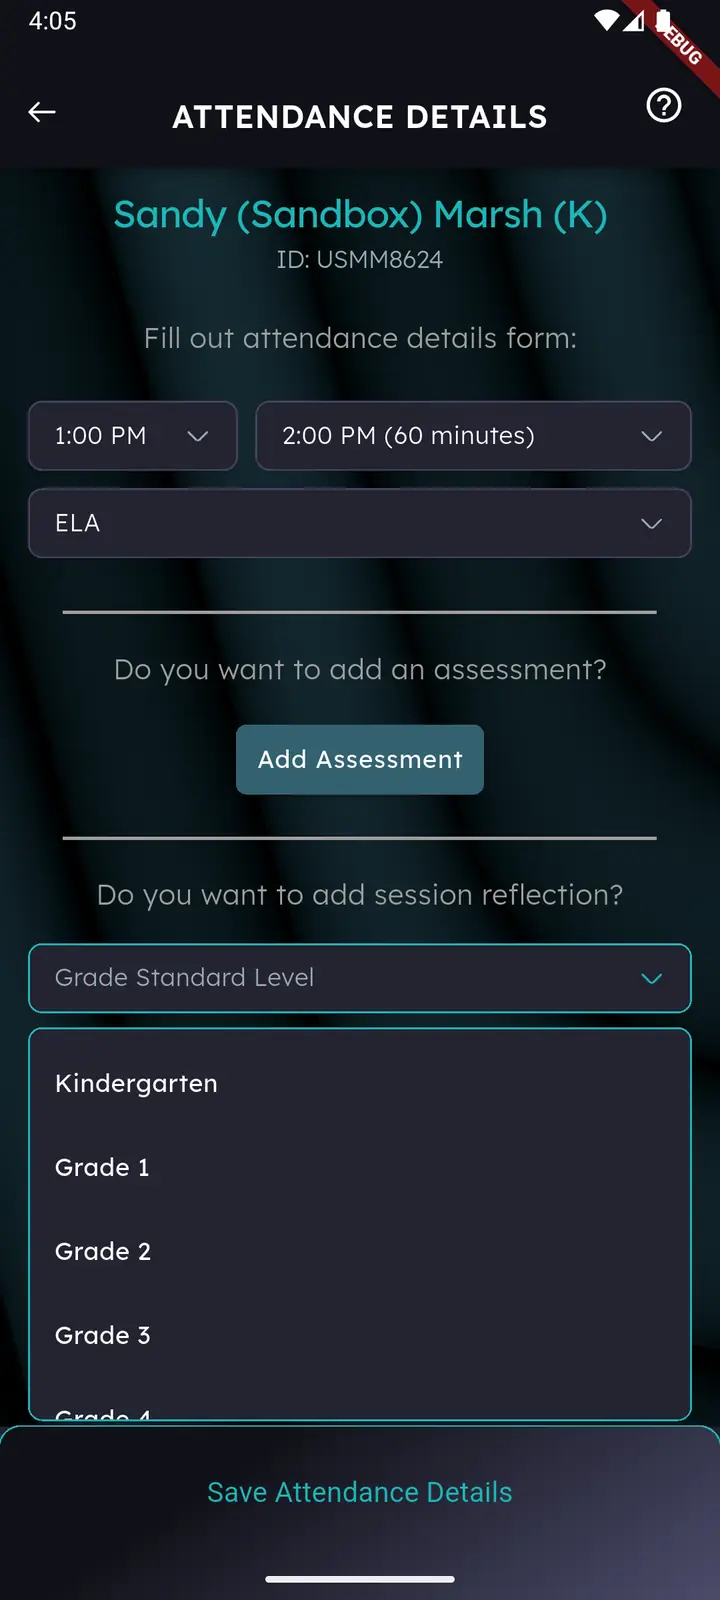
- Choose a Grade Standard Level from the dropdown. This filters which focus standards are available.
- Select one or more Focus Standards. 2.2.7 On flows that use them, subject topics are part of this step too.
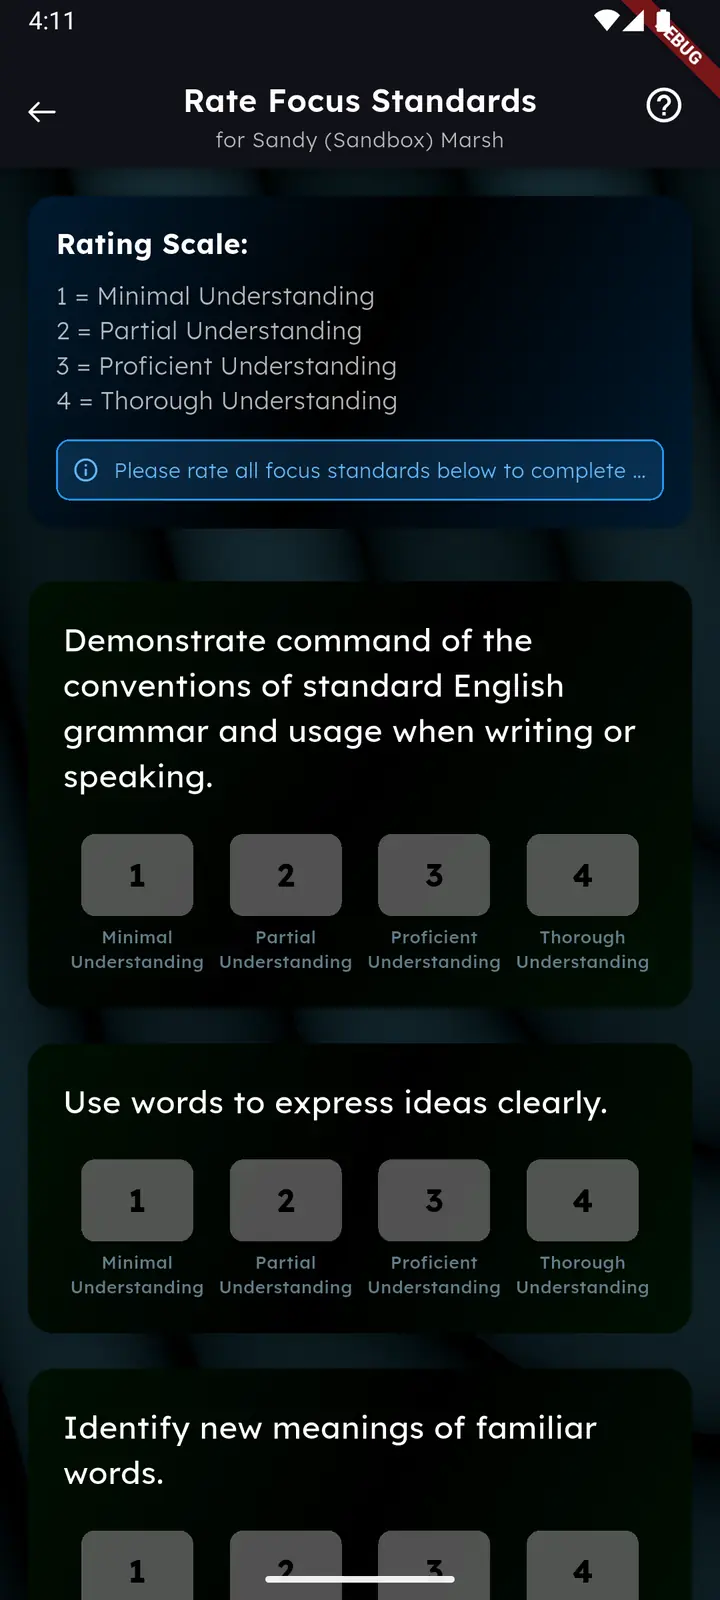
- Tap Add Session Reflection to open the Focus Standards screen.
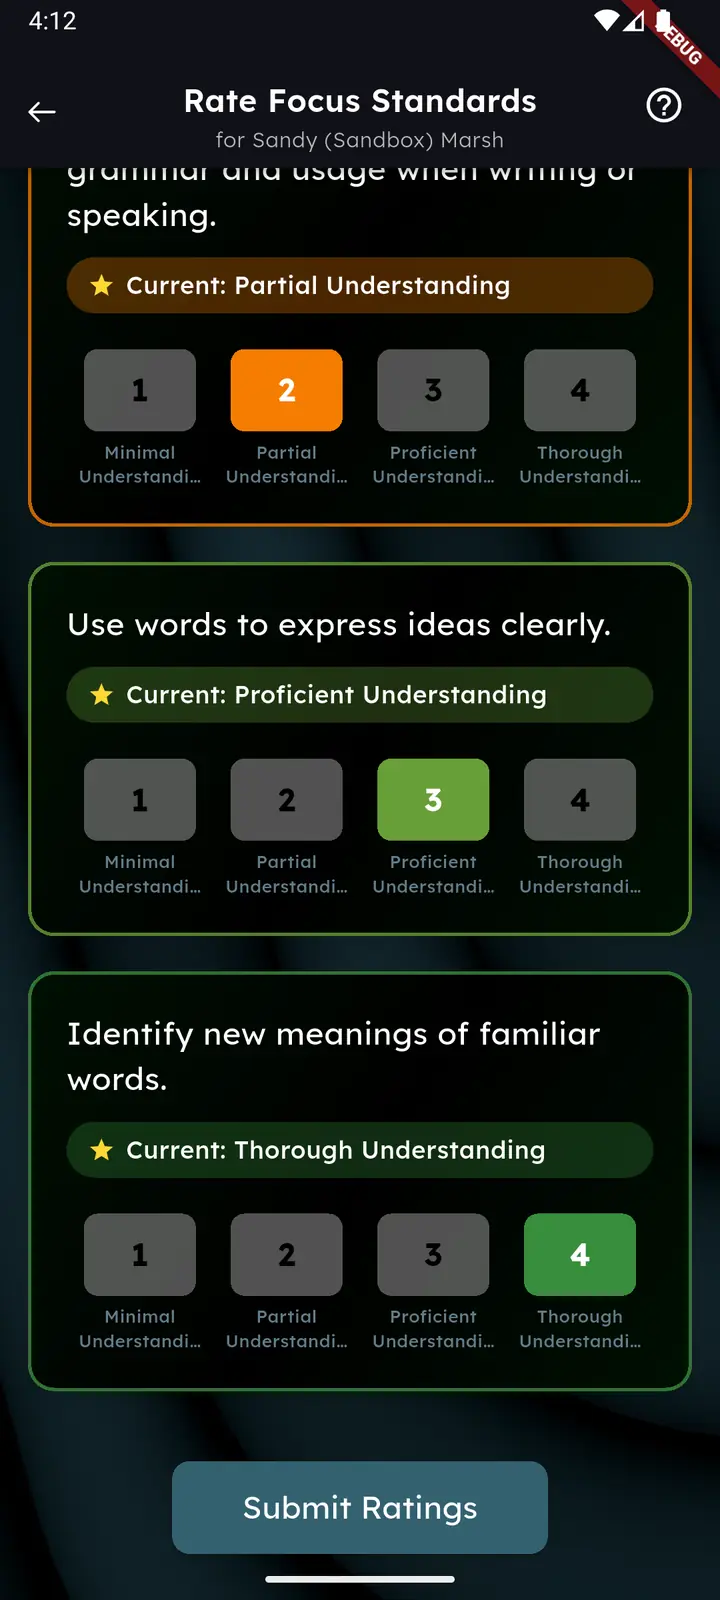
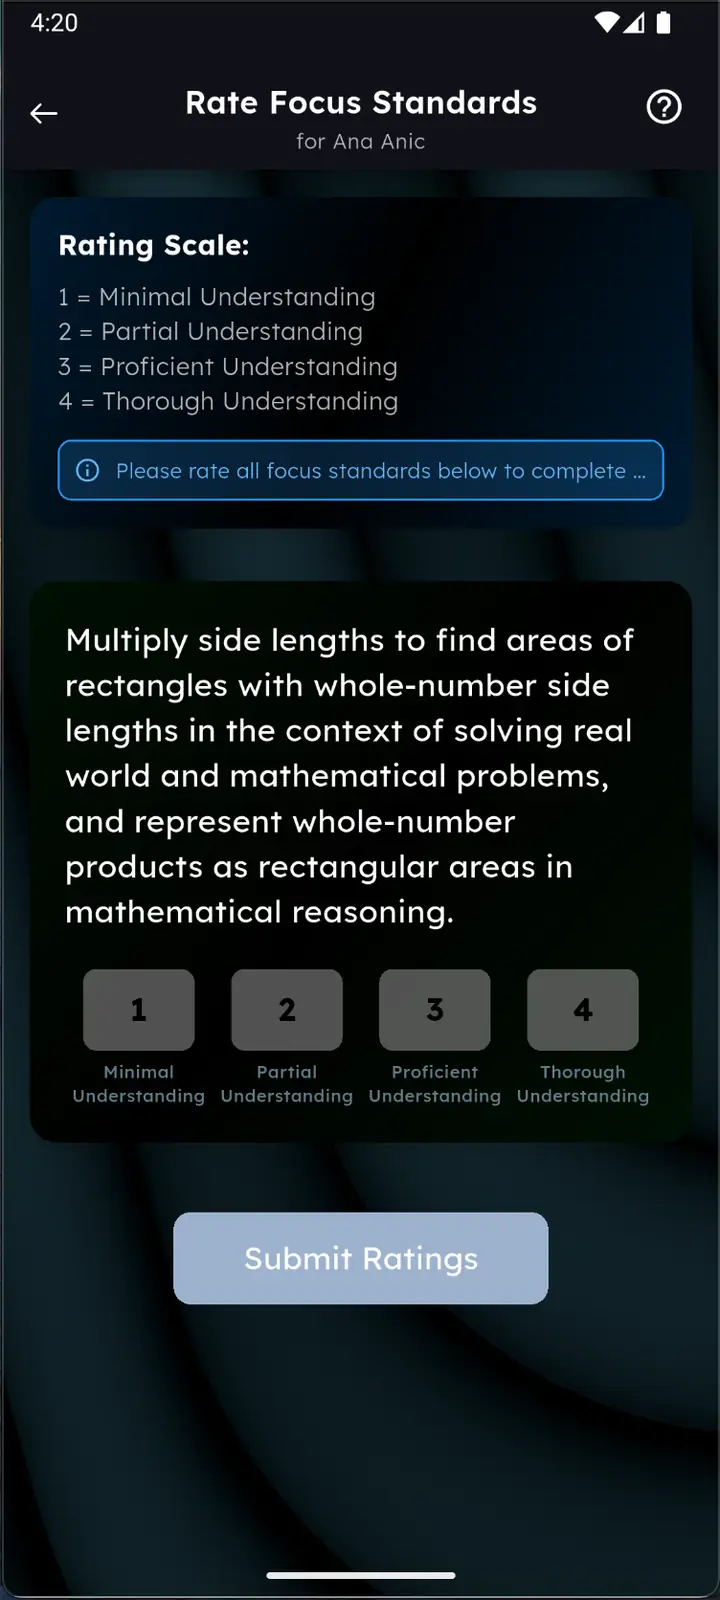
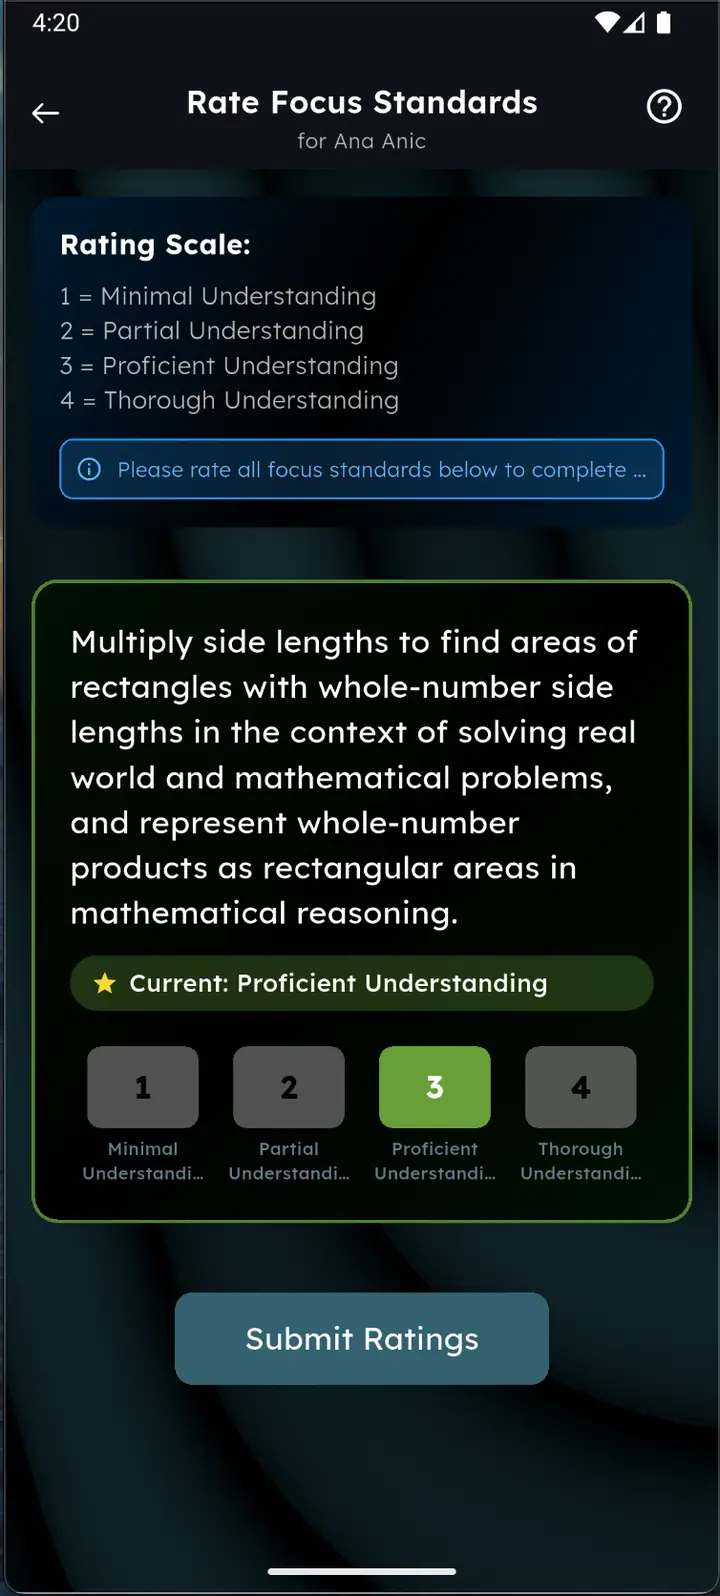
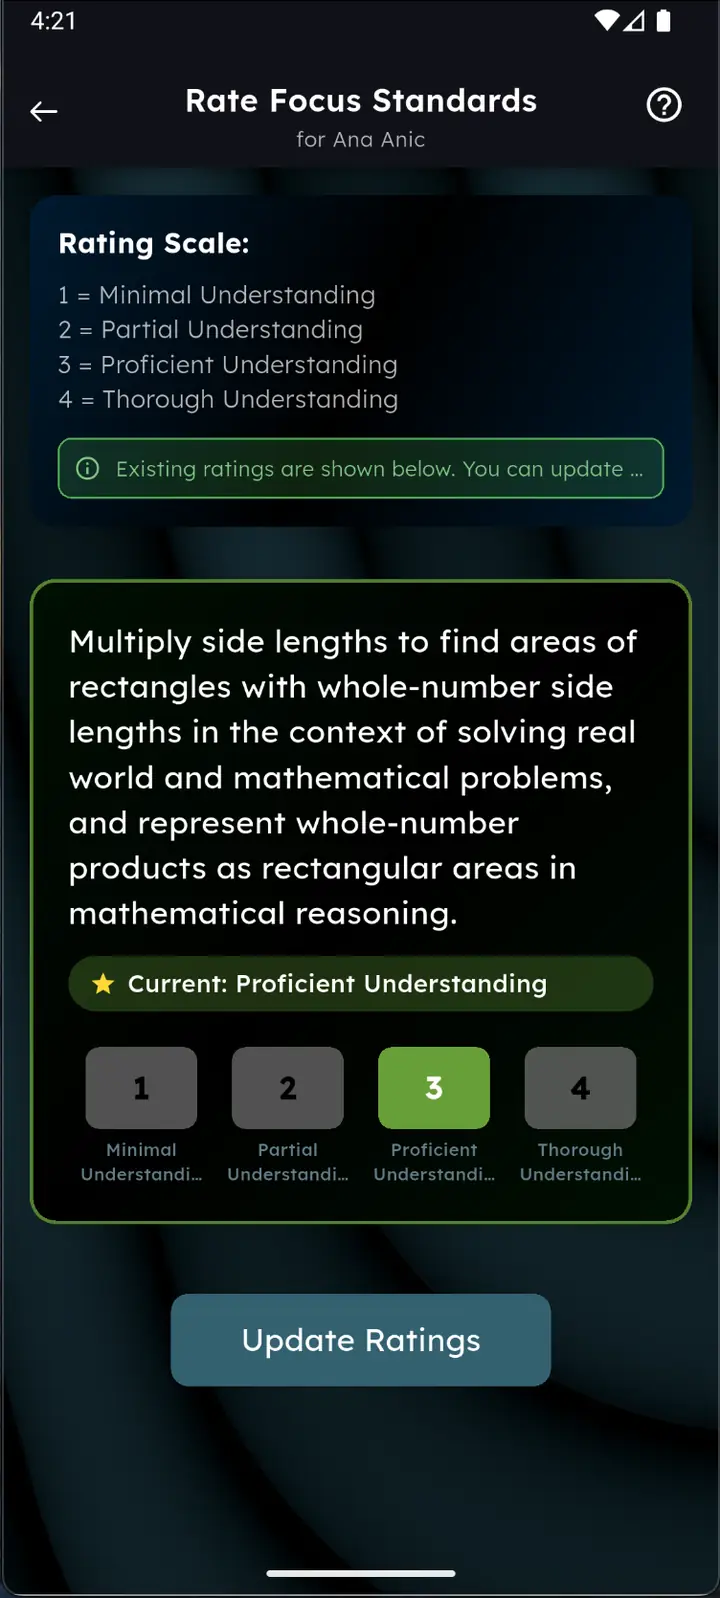
- Rate every standard from 1 to 4, then tap Submit Ratings.
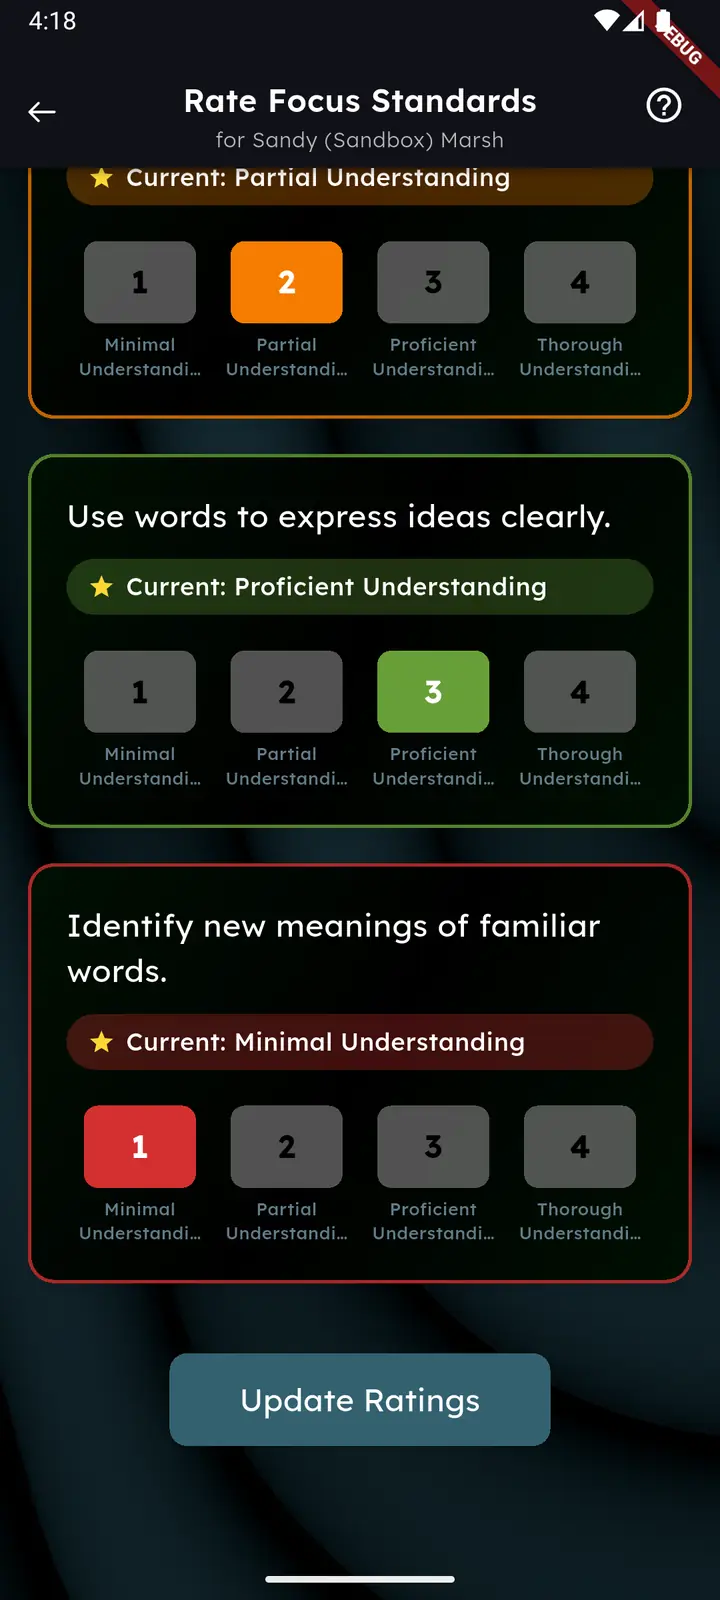
- After submission you can Update Ratings or go back to Attendance Details.
- 1 — Minimal Understanding
- 2 — Partial Understanding
- 3 — Proficient Understanding
- 4 — Thorough Understanding
Editing, clearing, and multiple reflections
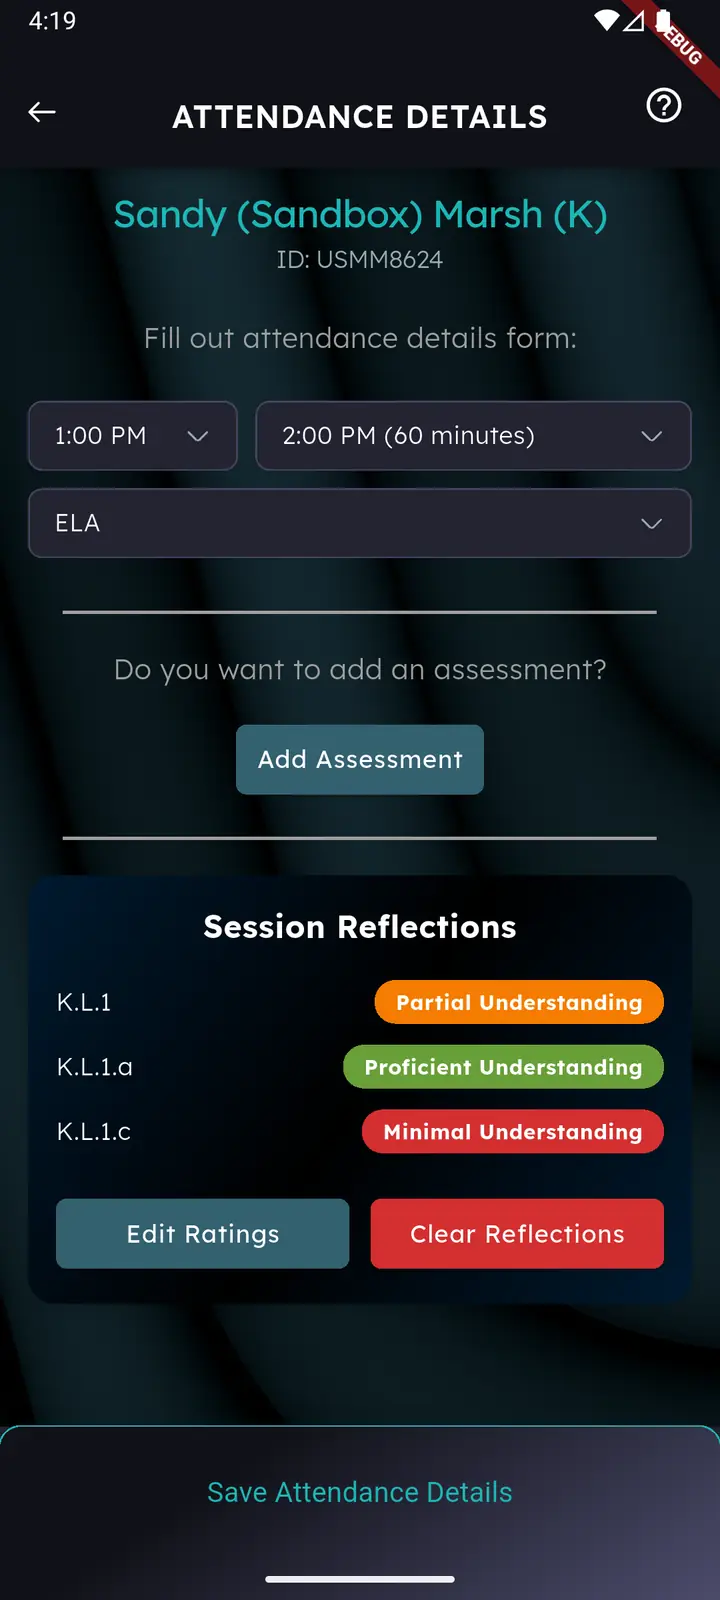
Back on Attendance Details, the saved reflection is summarised per standard with its level, plus two actions: Edit Ratings and Clear Reflections.
A student can now carry more than one session reflection for the same session — useful when a single block covers two subjects or two standard sets. Add another with Add Session Reflection; each is listed separately.
Reflections can be edited or deleted as long as the session is Opened. After it locks or ends, they are read-only.
Students
Administrators load the school rosters, but educators can add students too — from the STUDENTS view, while building a group, or in the middle of creating a session.
The STUDENTS view only appears for program types that use roster-based sessions. Student Number programs don’t track named students.
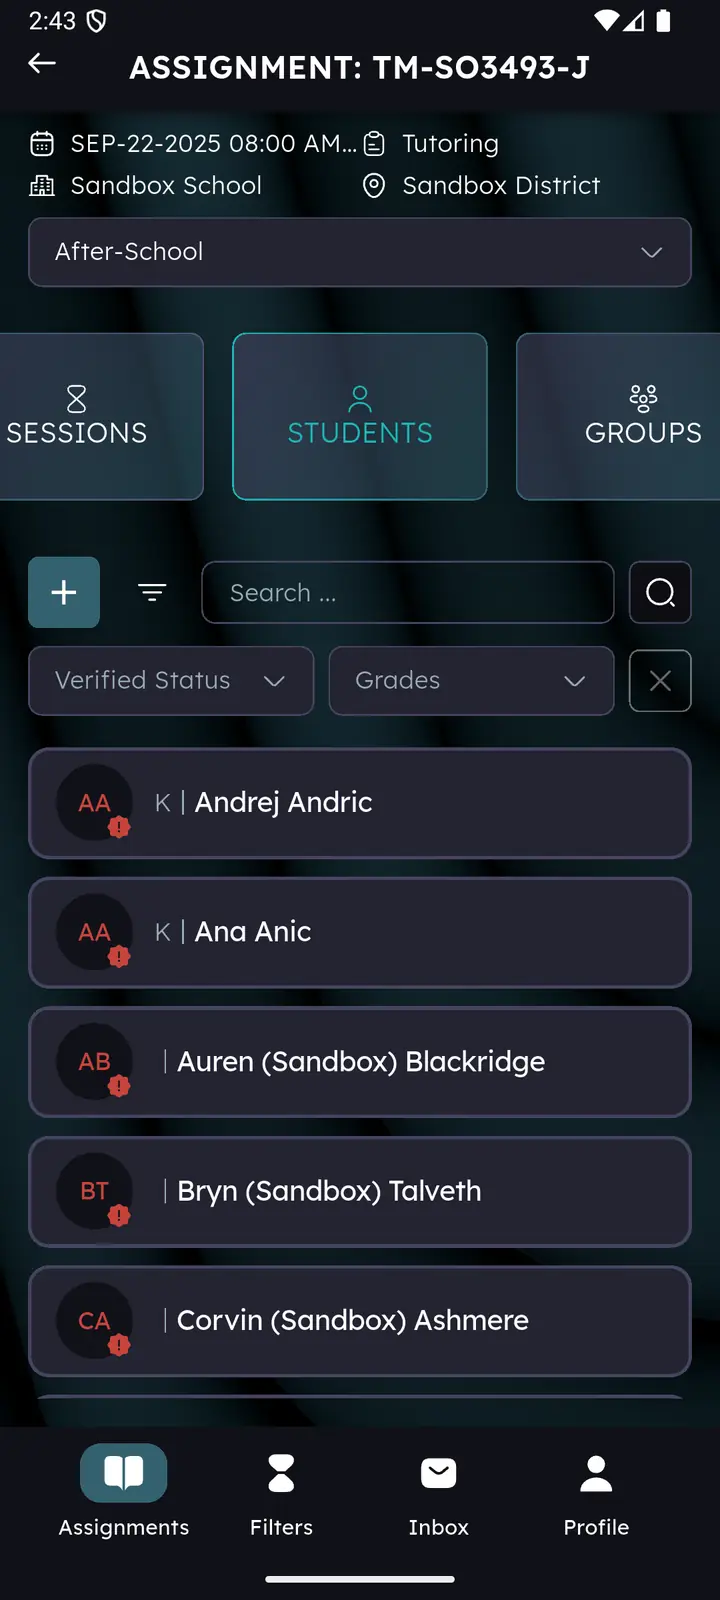
- Search and filter — find a student by name, or narrow the list by Verified Status and Grades. The × button clears both filters.
- Refresh — pull down on the list.
- Open a profile — tap any student card.
Adding a student
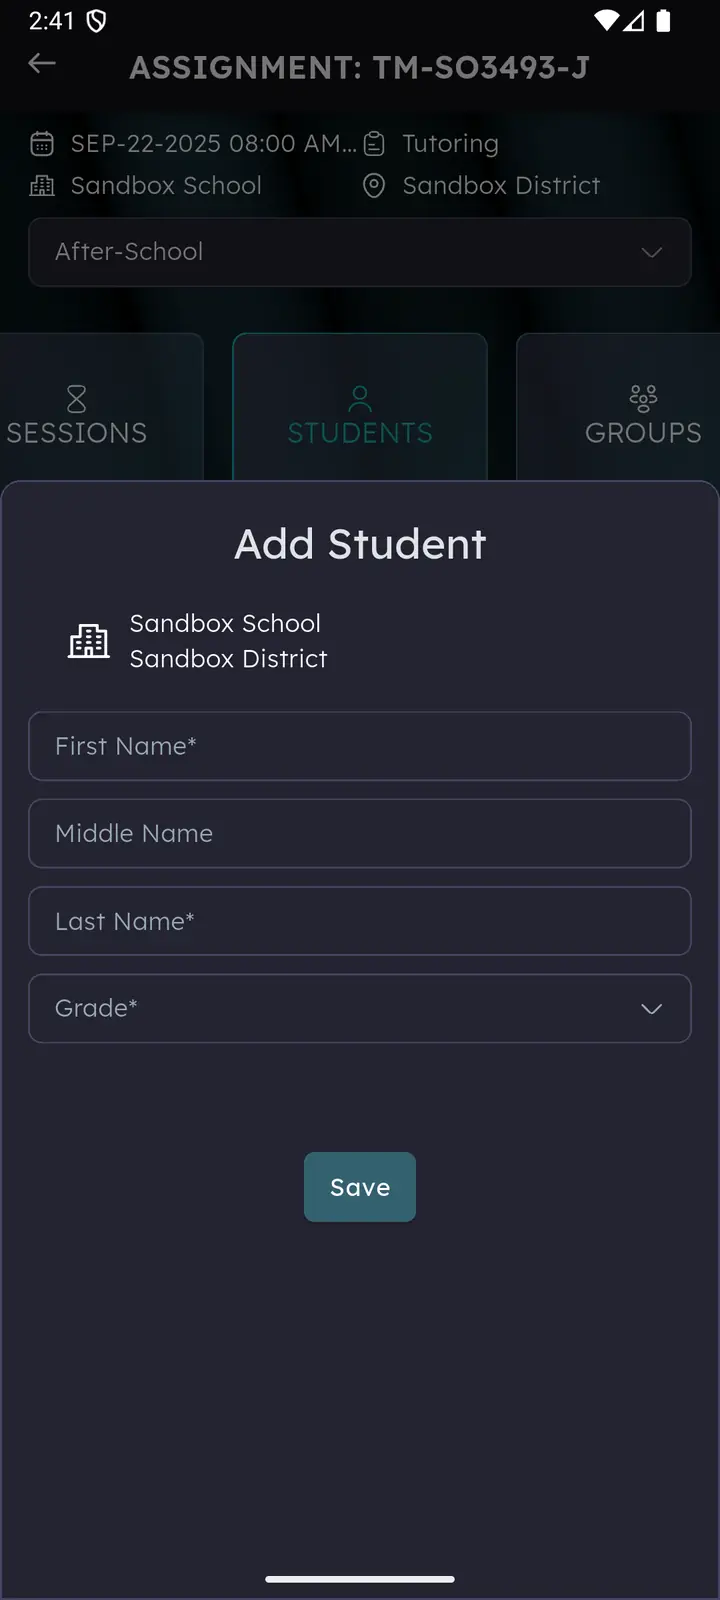
- Tap the + button.
- Enter first name, middle name (optional), last name and grade. Fields marked
*are required. - Tap Save.
The student joins the school’s roster. Adding them to a group is a separate step — see Chapter 12.
Search the list first. There is no way to remove a student from a school roster yourself, so a duplicate has to be cleaned up by support.
Student profile
One student, everything on record: the sessions they attended, the assessments and surveys they’ve taken, and a consolidated report.
Four ways in
- Students screen → tap a student card.
- Groups screen → open a group → long-press a student card → tap the open icon.
- Session → open the session → tap a present student → Attendance Details → tap the student’s name.
- Surveys → the same route as above, then the Surveys tab.
The tabs
The header carries the student’s name, ID, grade, active and verified state, and school. Below it:
| Tab | What it holds |
|---|---|
| Sessions | Every session this student was part of, with completion and status. Only one session can be open at a time from here. |
| Assessments | Completed assessments with type, grade and score. Filterable by Assessment Type and Subject. |
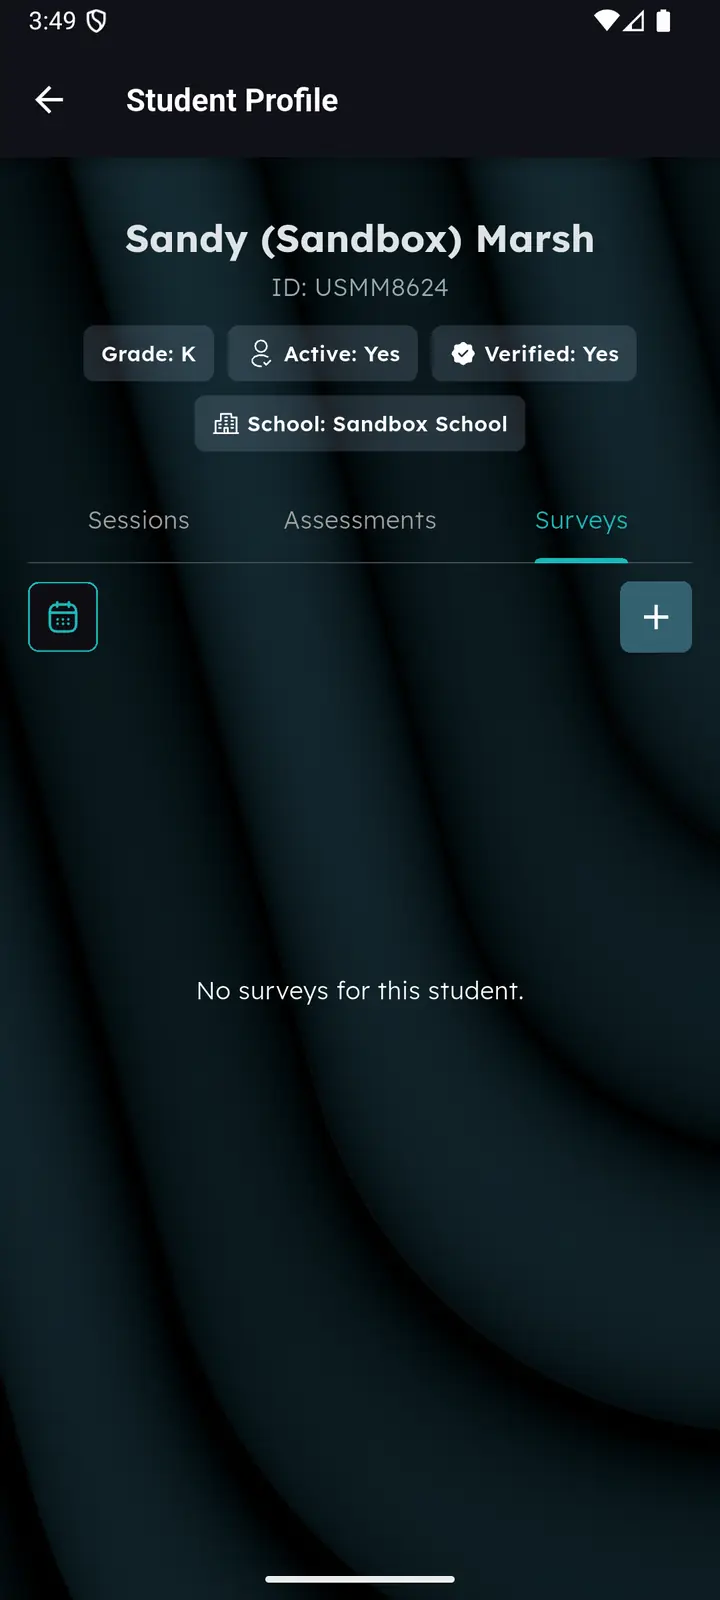
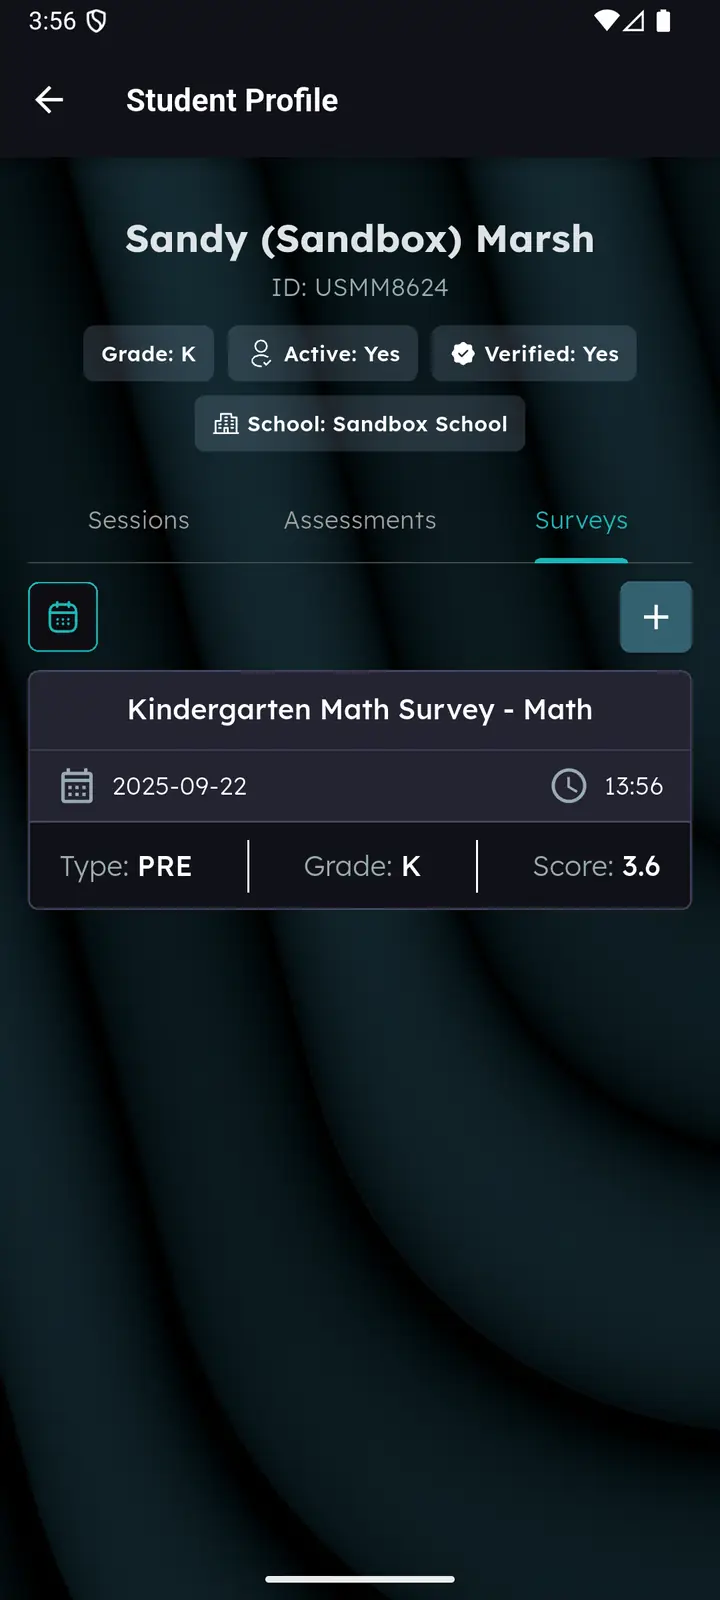
| Surveys | Completed Student Subject Comfort Surveys with their average score. |
| Progress Preview | Progress Checks — short auto-graded questionnaires, up to three attempts per check. Rolling out; may not be in your build yet. |
| Report New in 2.2.3 | A per-subject summary in one place: educator notes, session reflections with their ratings, and assessments. |
The report gathers what has already been entered elsewhere; there is nothing to fill in on it, and PDF download was removed in 2.2.5.
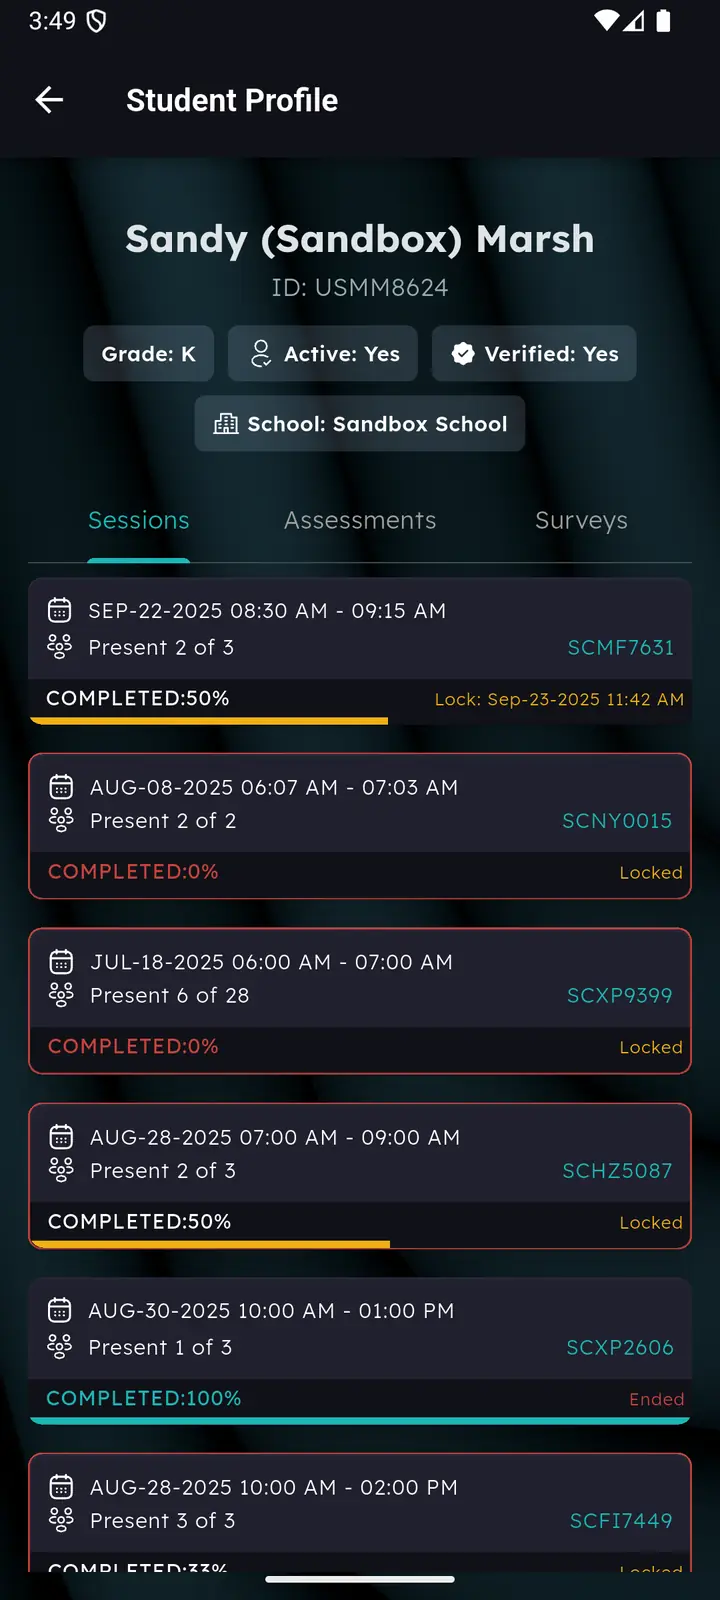
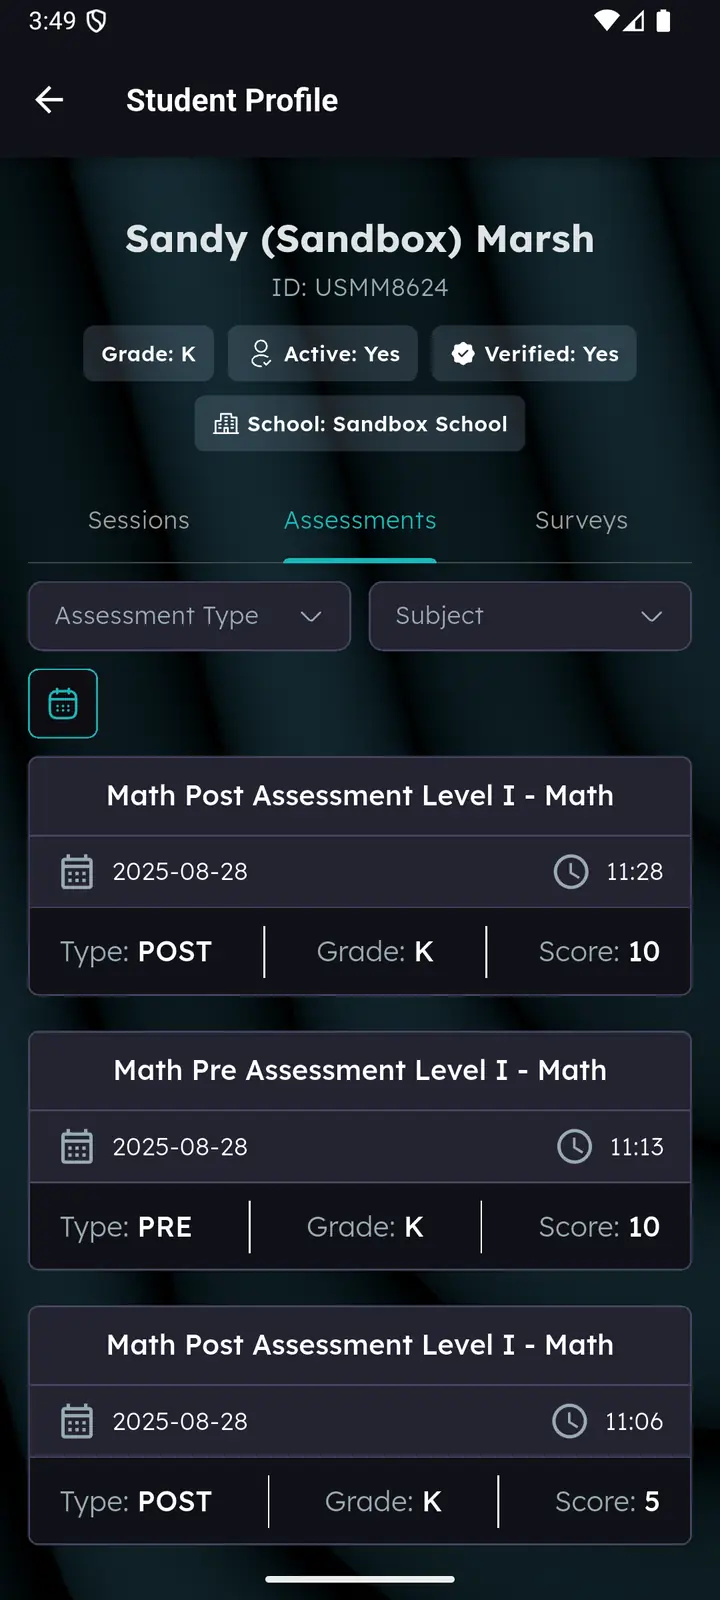
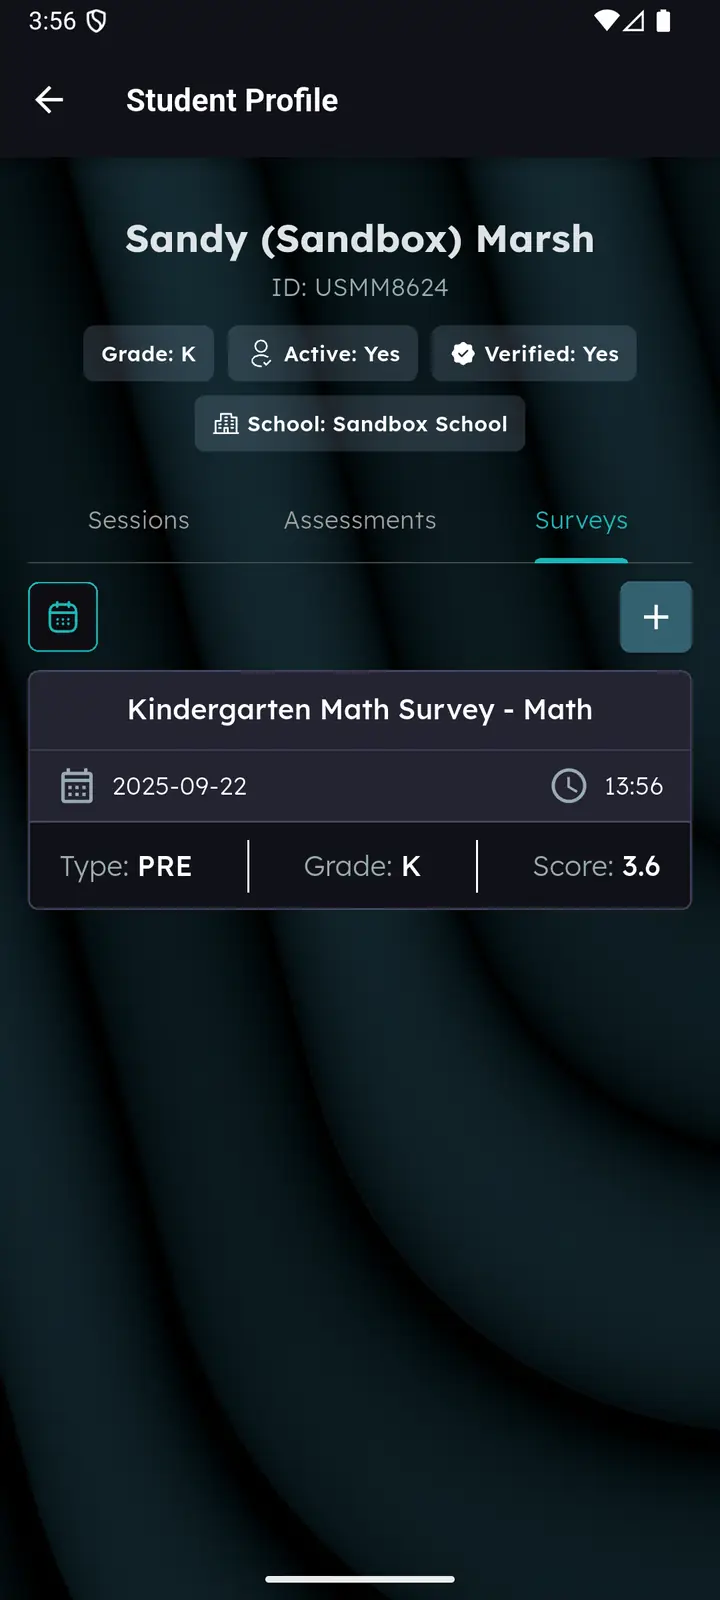
They were captured on an earlier build and show three tabs. Newer versions add Progress and Report to the same row.
Assessments
An assessment records how a student did on a set of questions. You never build one from scratch — you start from an assessment bank and fill in that student’s answers.
Assessment banks
A bank is the template: subject, type (PRE / POST), grade, maximum score, the list of questions and any attached documents. Banks are the starting point for every assessment.
- Filters — narrow by Assessment Type and Grade.
- Multi-subject support 2.2.5 — a bank can cover more than one subject.
- Filtered by state 2.2.7 — you only see banks relevant to your state, which keeps long lists manageable.
- Progressive loading — banks load page by page as you scroll.
Assigning an assessment to a student
- In an Opened session, tap a present student’s card.
- Select a subject — this enables the assessment bank list.
- Tap a bank card. Any assessments this student already has from that bank are listed.
- Tap + to add a new one, or tap an existing one to review it.
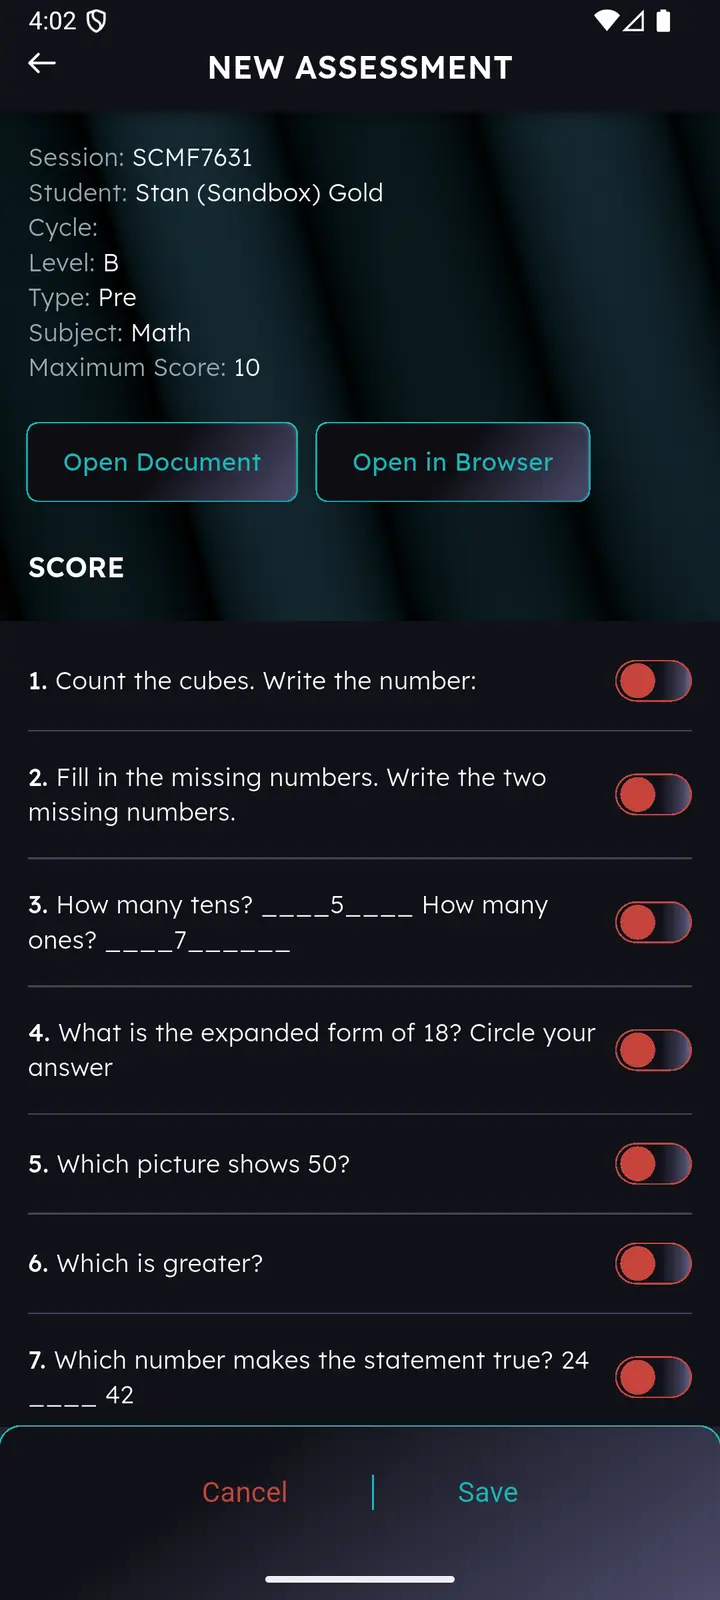
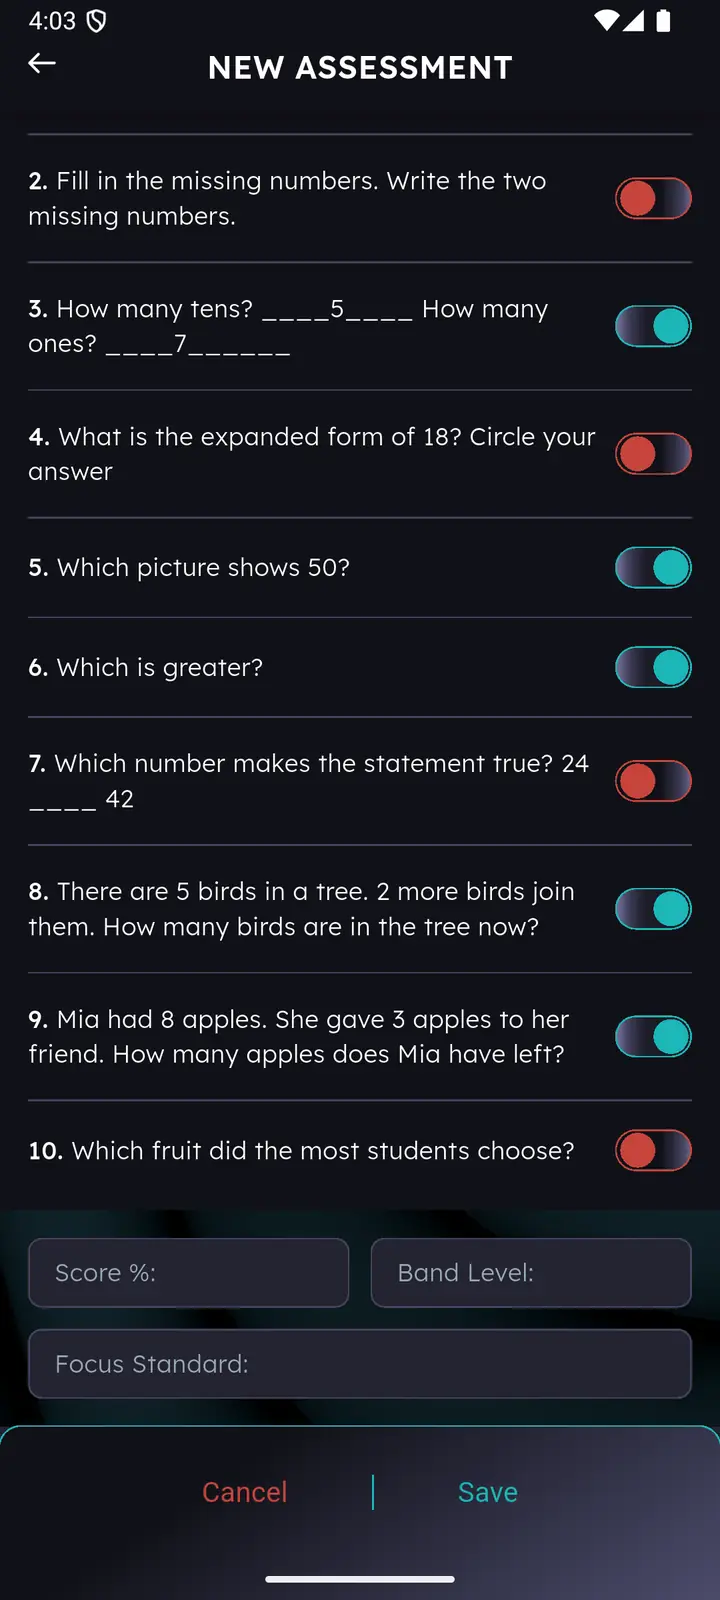
- In the assessment window:
- Open Document shows the question sheet as a PDF; Open in Browser opens it in a new tab.
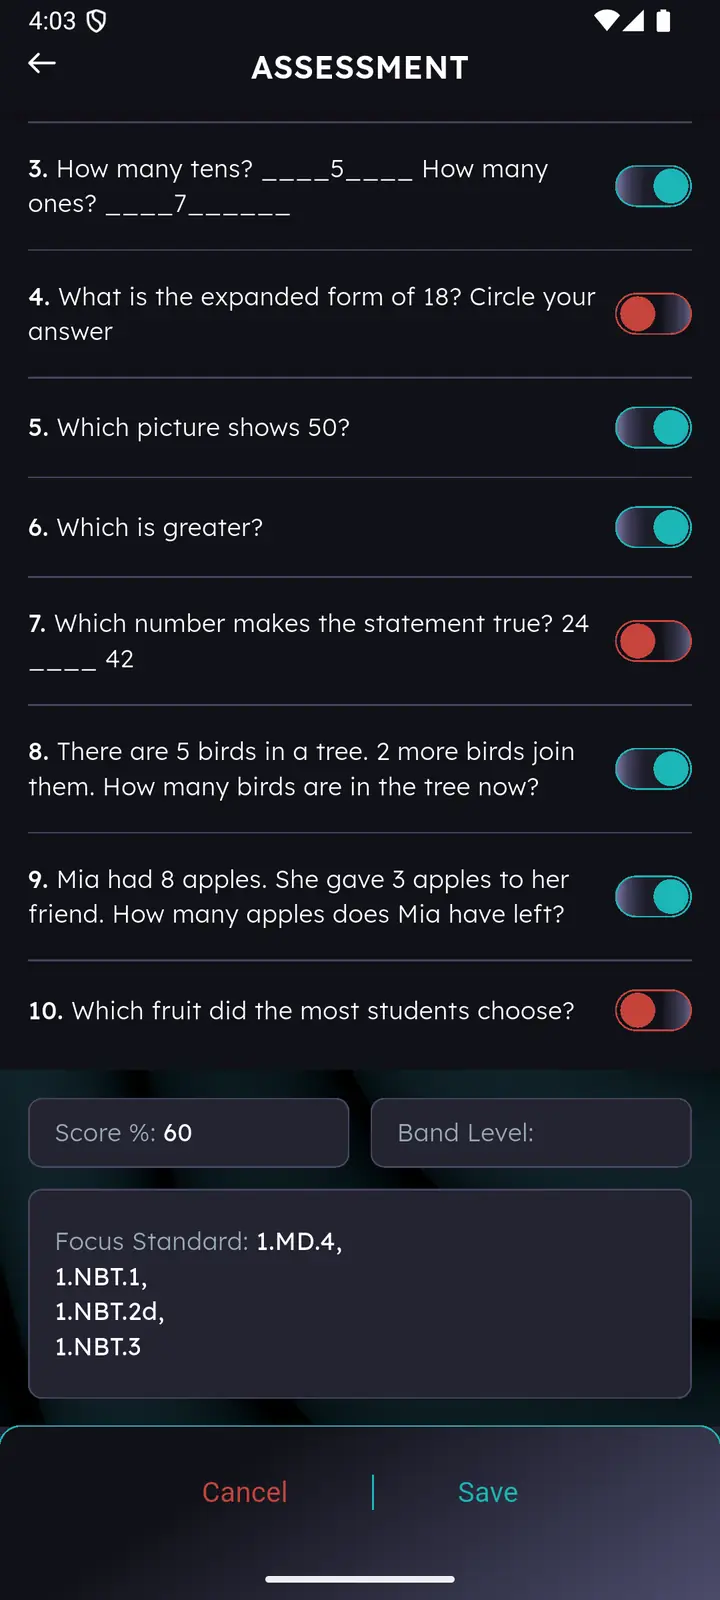
- Toggle each question on for correct, off for incorrect.
- Tap Save.
Score percentage, band level and focus standards are calculated on save. Reopen the assessment to see them.
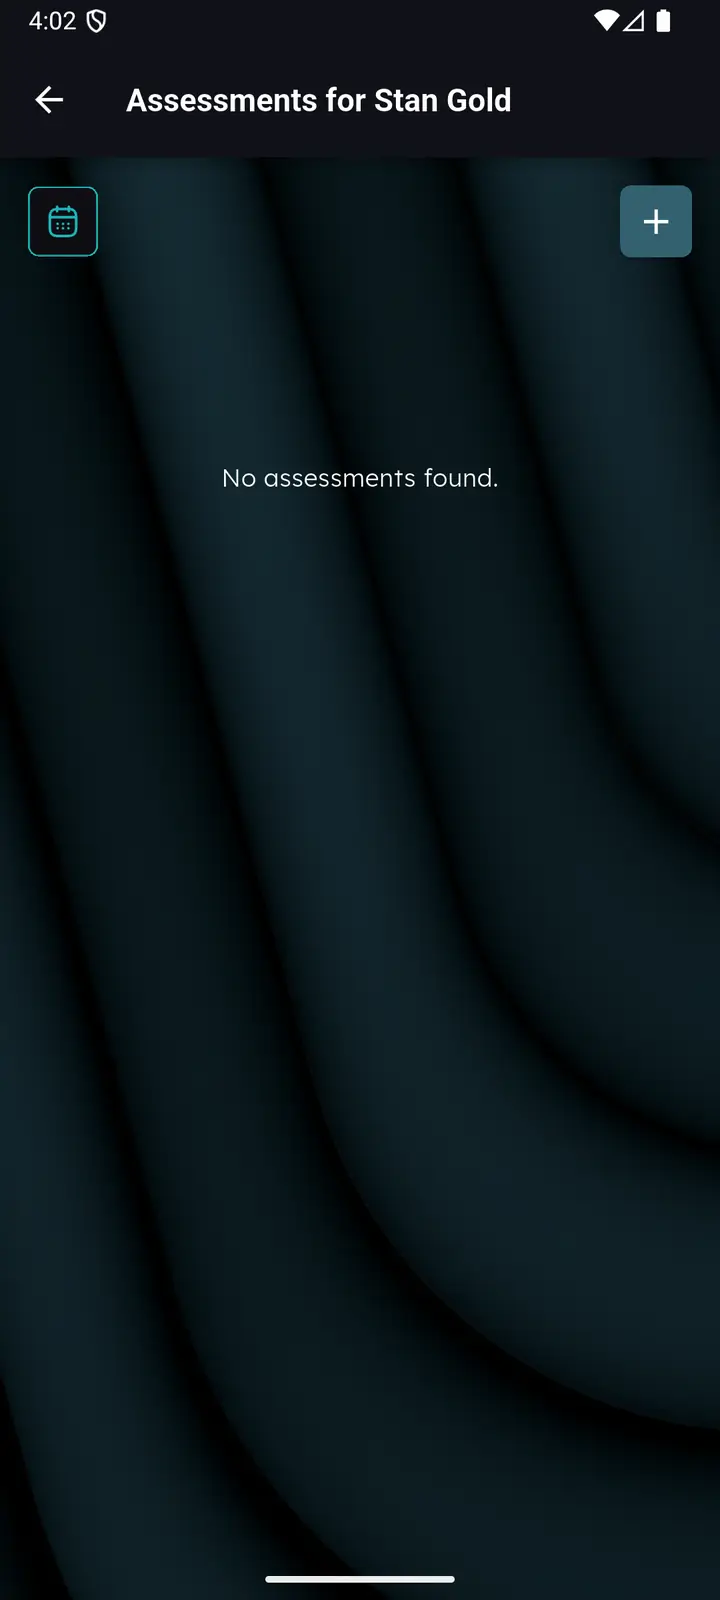
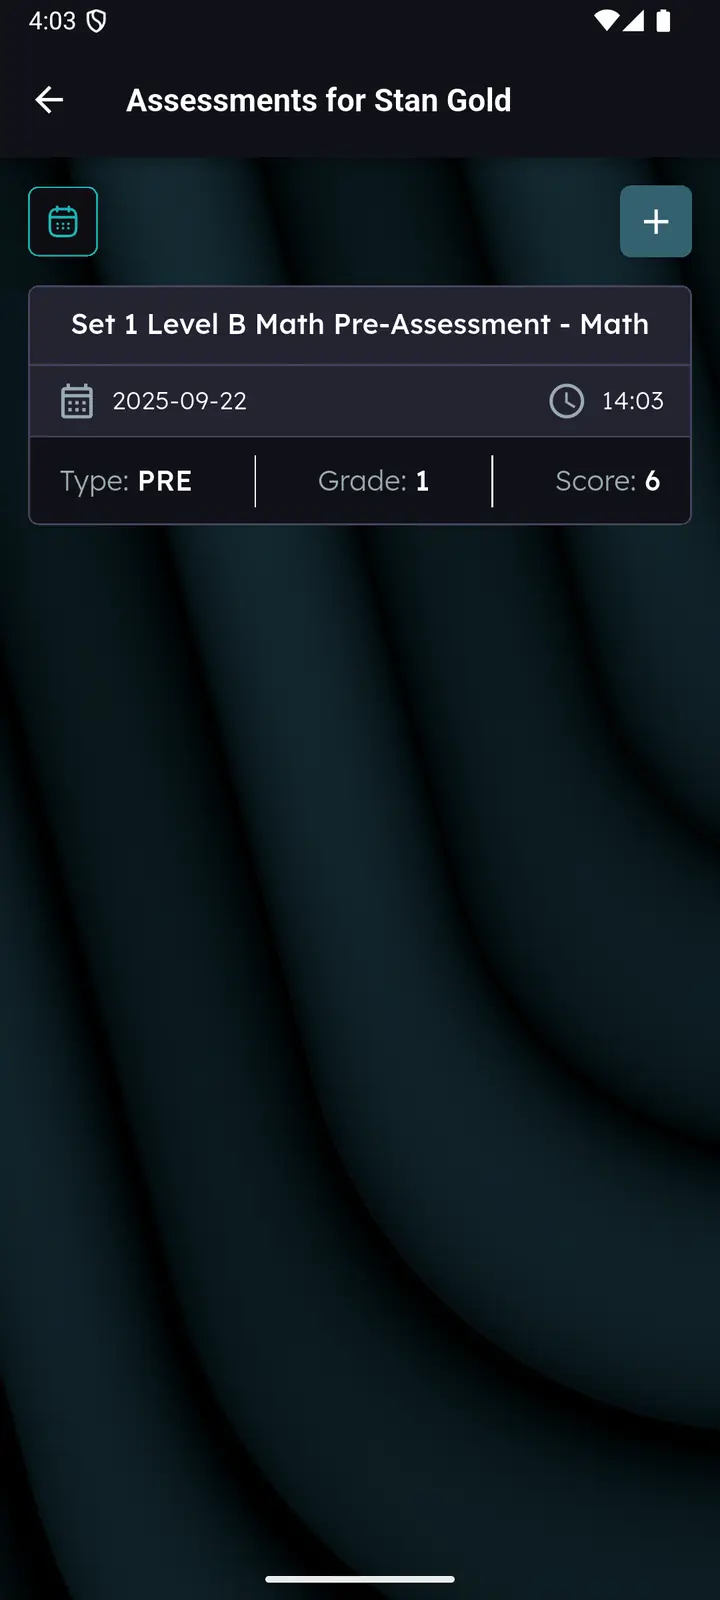
Two ways: open the student’s profile and check the Assessments tab, or watch for green-labelled banks while assigning — green means this student already has assessments from that bank.
Assessments are switched on per partner. If the partner running your program has them turned off, the button is hidden on every roster flow.
Surveys
Student Subject Comfort Surveys ask a student how confident they feel about a subject, on a five-point agree/disagree scale. They live on the student’s profile, not inside a session.
Survey banks
Like assessment banks, a survey bank is the template: subject, type, grade, maximum score and its list of statements.
Assigning a survey
- Open the student’s profile and go to the Surveys tab.
- Tap + to add a new survey.
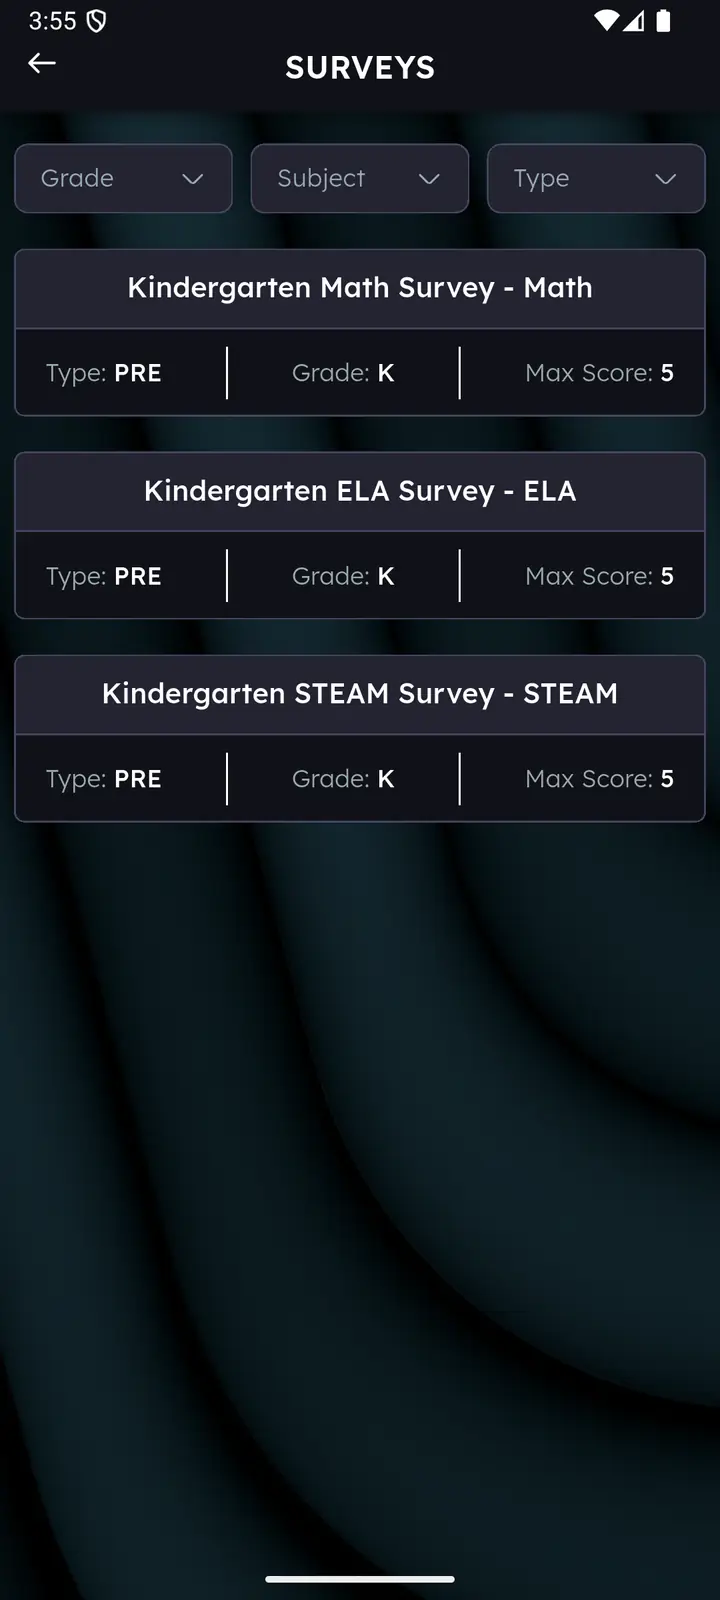
- Choose a survey bank. Banks can be filtered by Grade, Subject and Type.
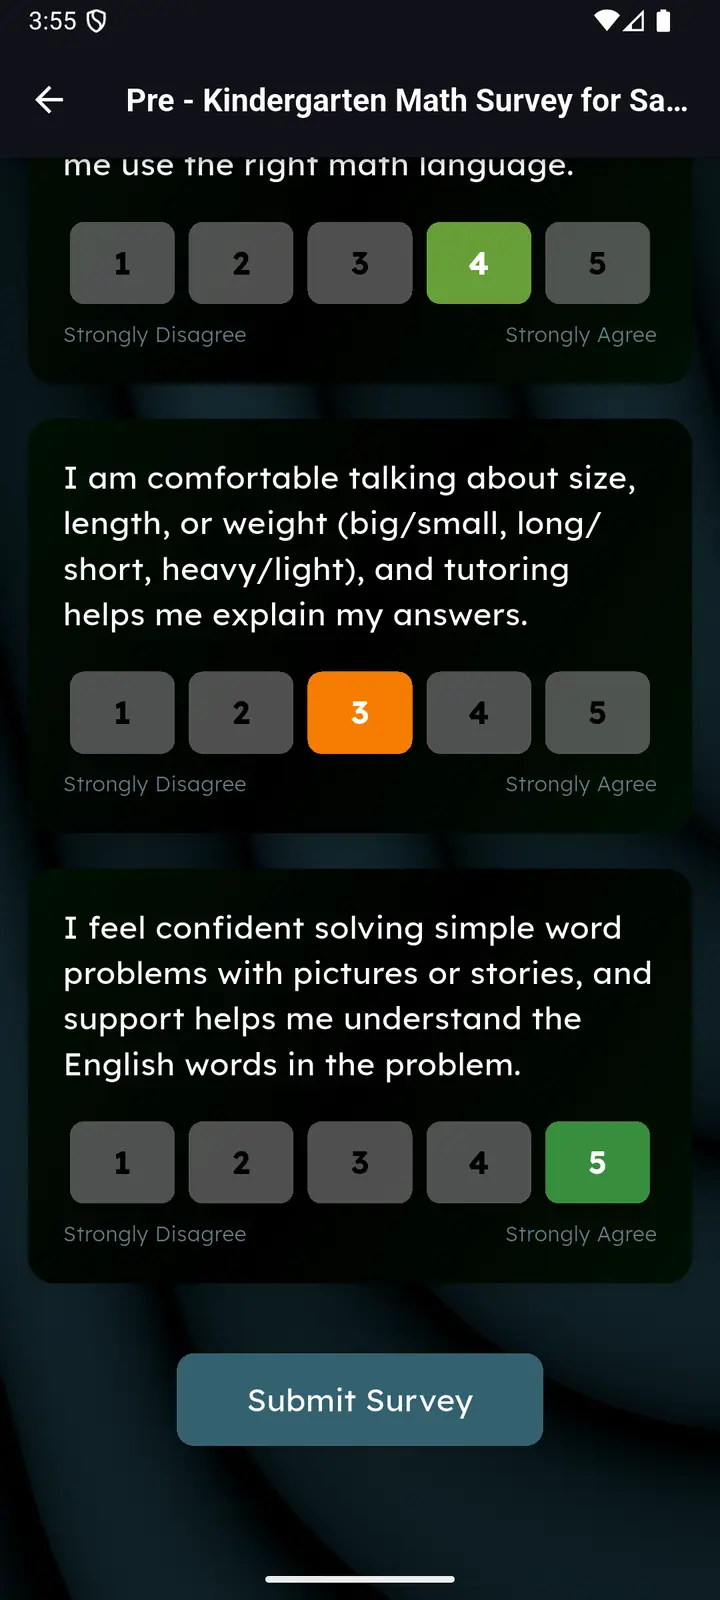
- Work through the statements, marking each from 1 (Strongly Disagree) to 5 (Strongly Agree).
- Tap Submit Survey.
Completed surveys stay on the profile with their average score — 3.6 out of 5 in the example below.
Student groups
A group is a saved set of students you teach together. Groups are created by educators, they’re mandatory for roster sessions, and they exist to stop you re-picking the same fifteen names twice a week.
Visibility and scope
- The Groups list only appears once you’ve selected an assignment, or set the district / school / program filters.
- Groups are scoped to that school plus program type — a group made for one program won’t show up under another.
- Pull down on the list to refresh. With no groups, you get an empty state and a create action.
Why bother: faster session setup, fewer attendance mistakes, and a clean separation between classes, cohorts and periods.
Creating a group
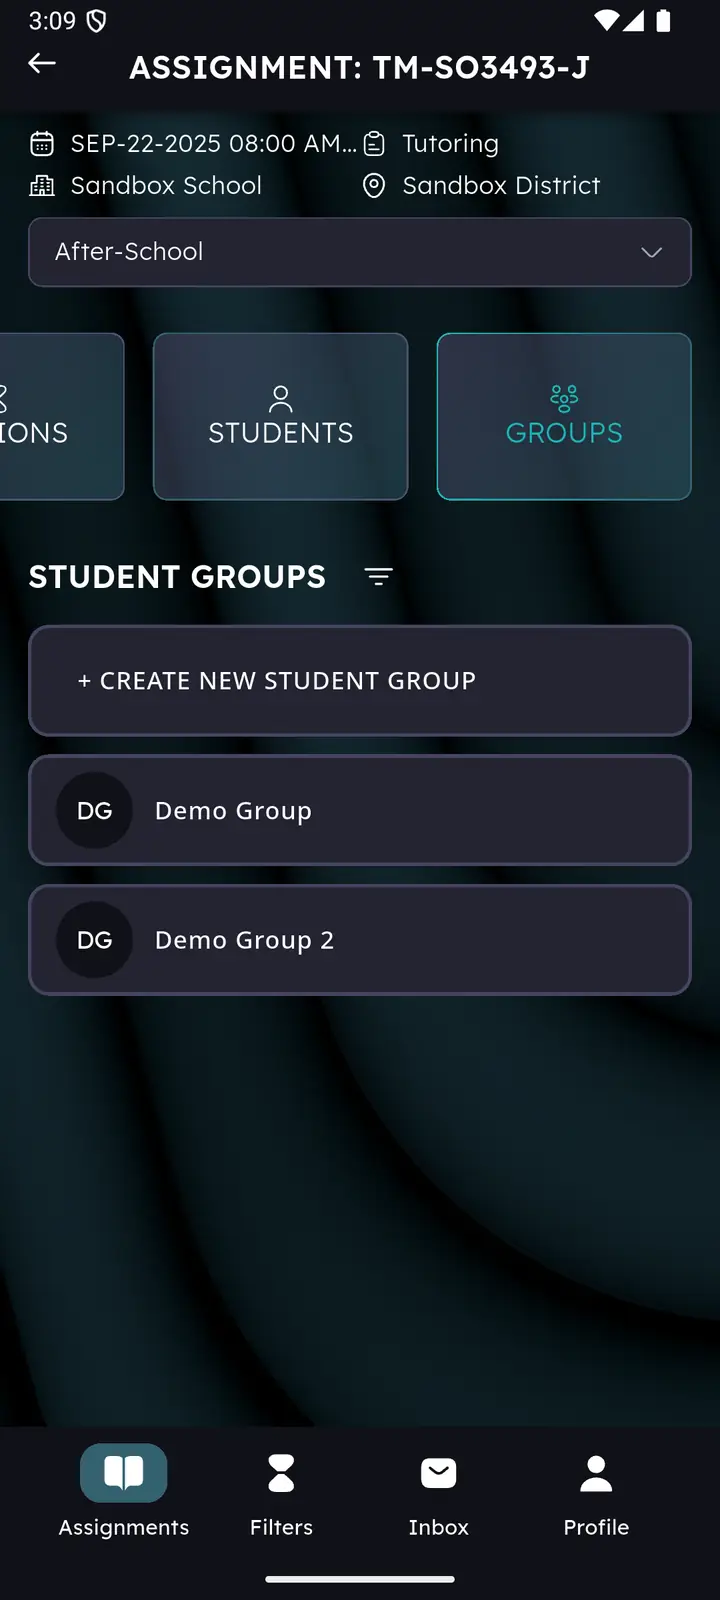
- Go to the GROUPS view — or start from session creation, when it asks you to pick a group.
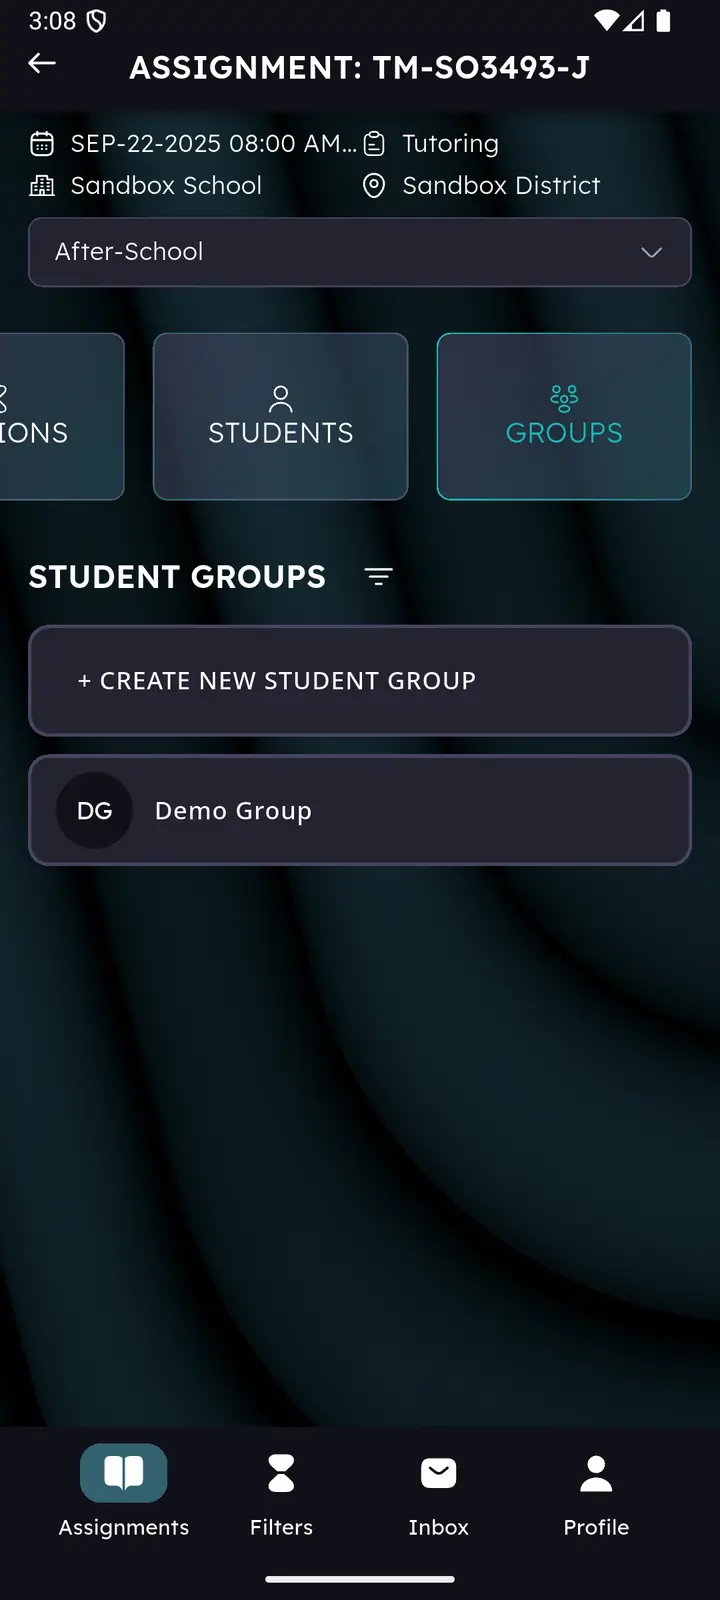
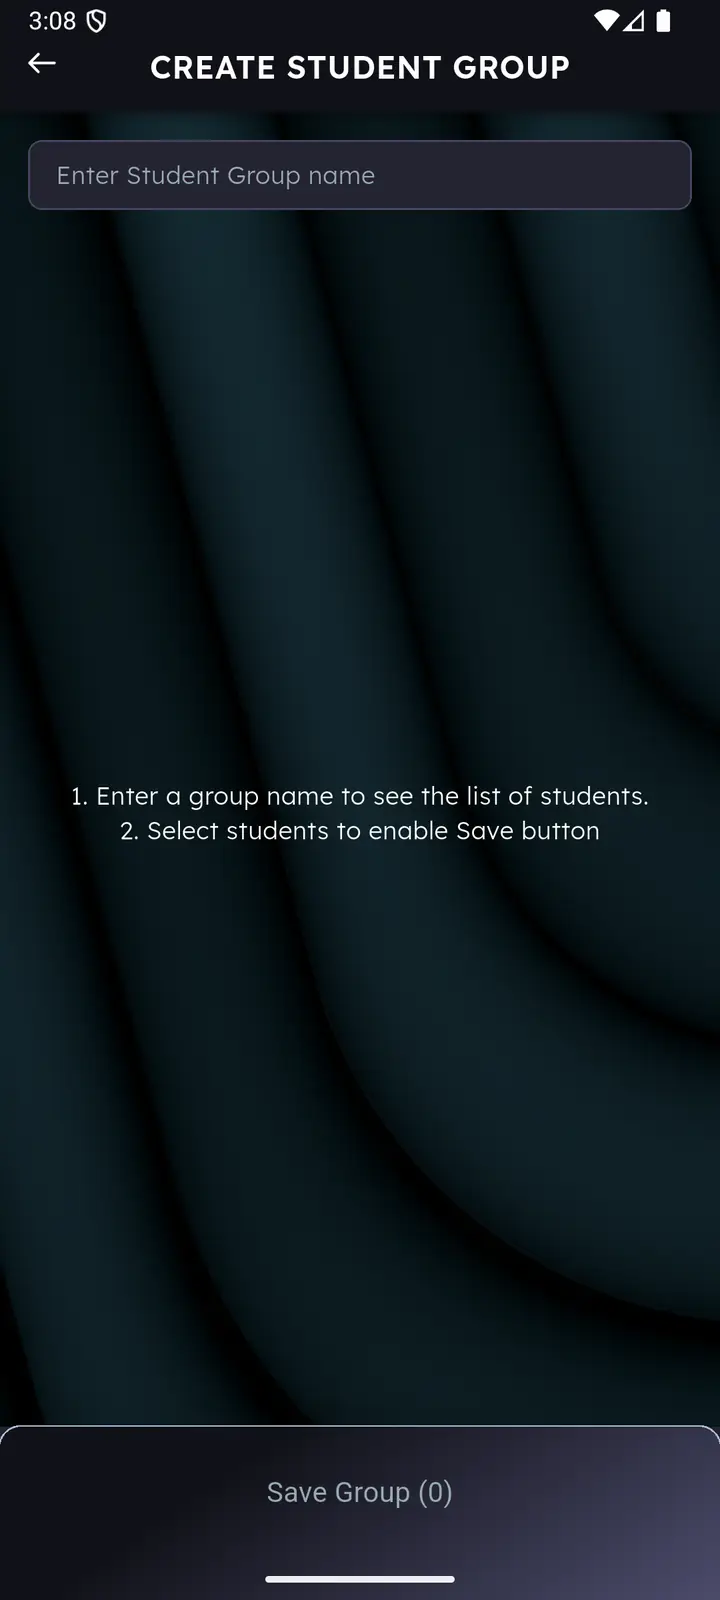
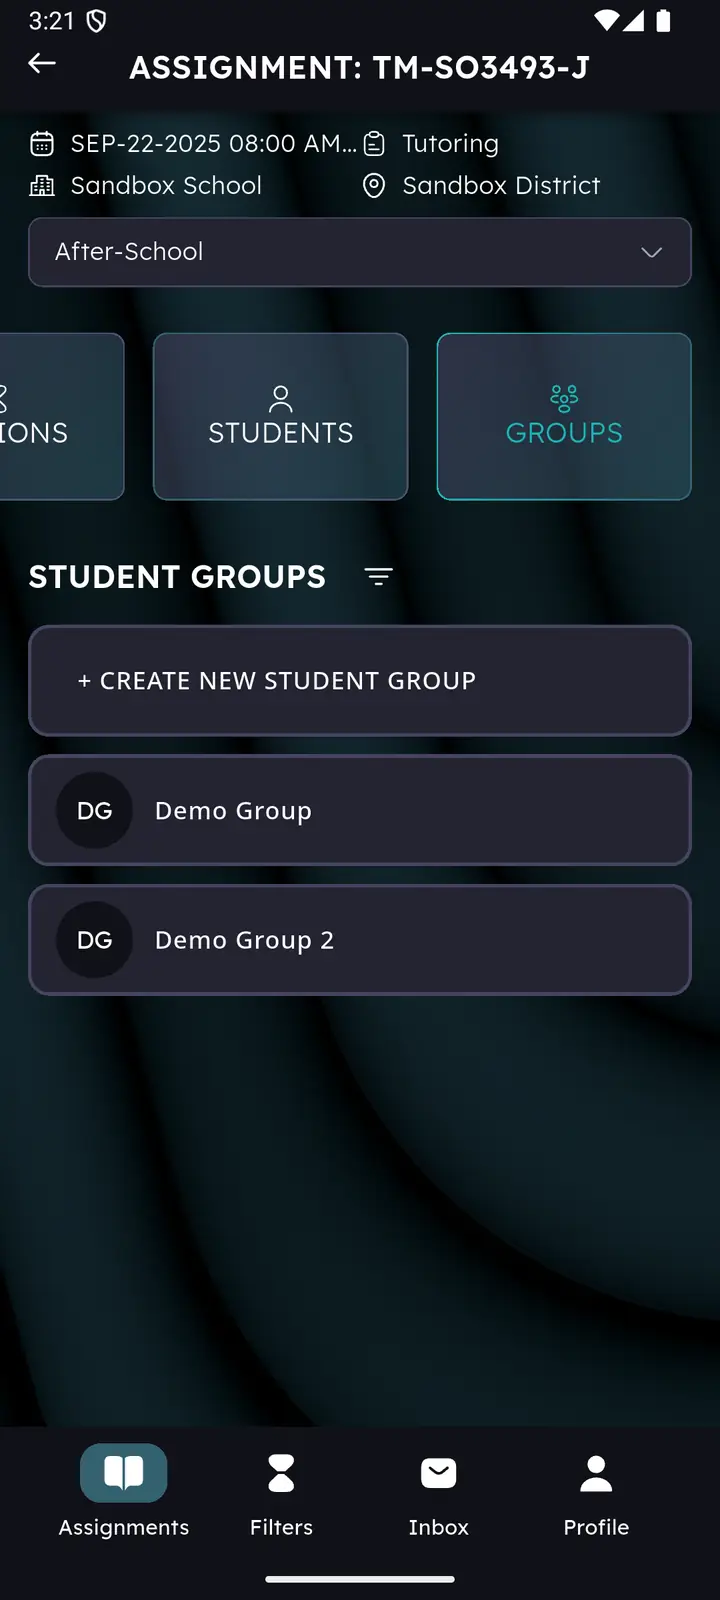
- Tap + CREATE NEW STUDENT GROUP.
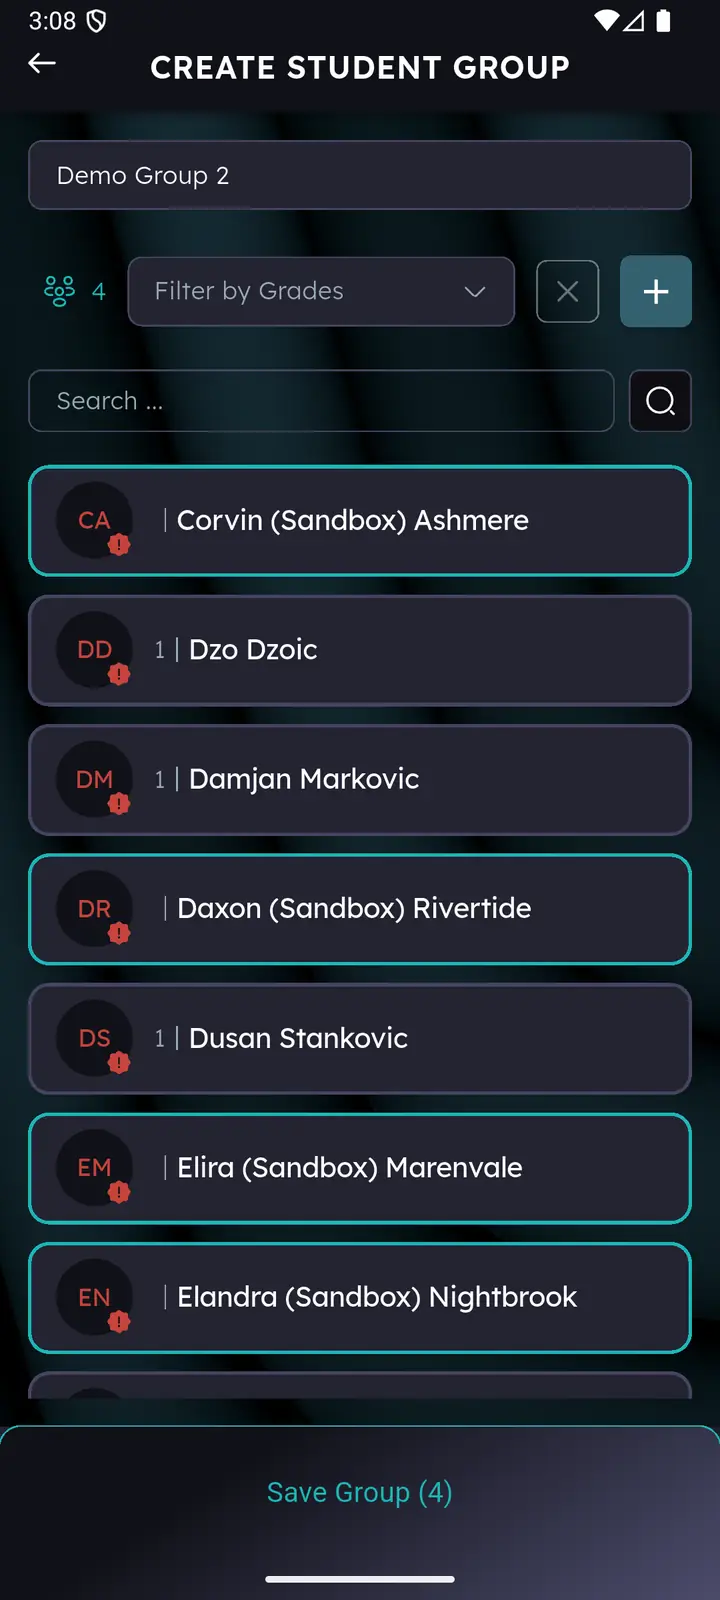
- Name the group. The student list only appears once there is a name. Use something you’ll recognise in a hurry, e.g. Grade 6 – Reading – Tue/Thu.
- Select students from the school list. Use search or Filter by Grades to cut it down.
- Tap Save Group. The counter in the button tells you how many are selected.
Editing a group
- Open the GROUPS view.
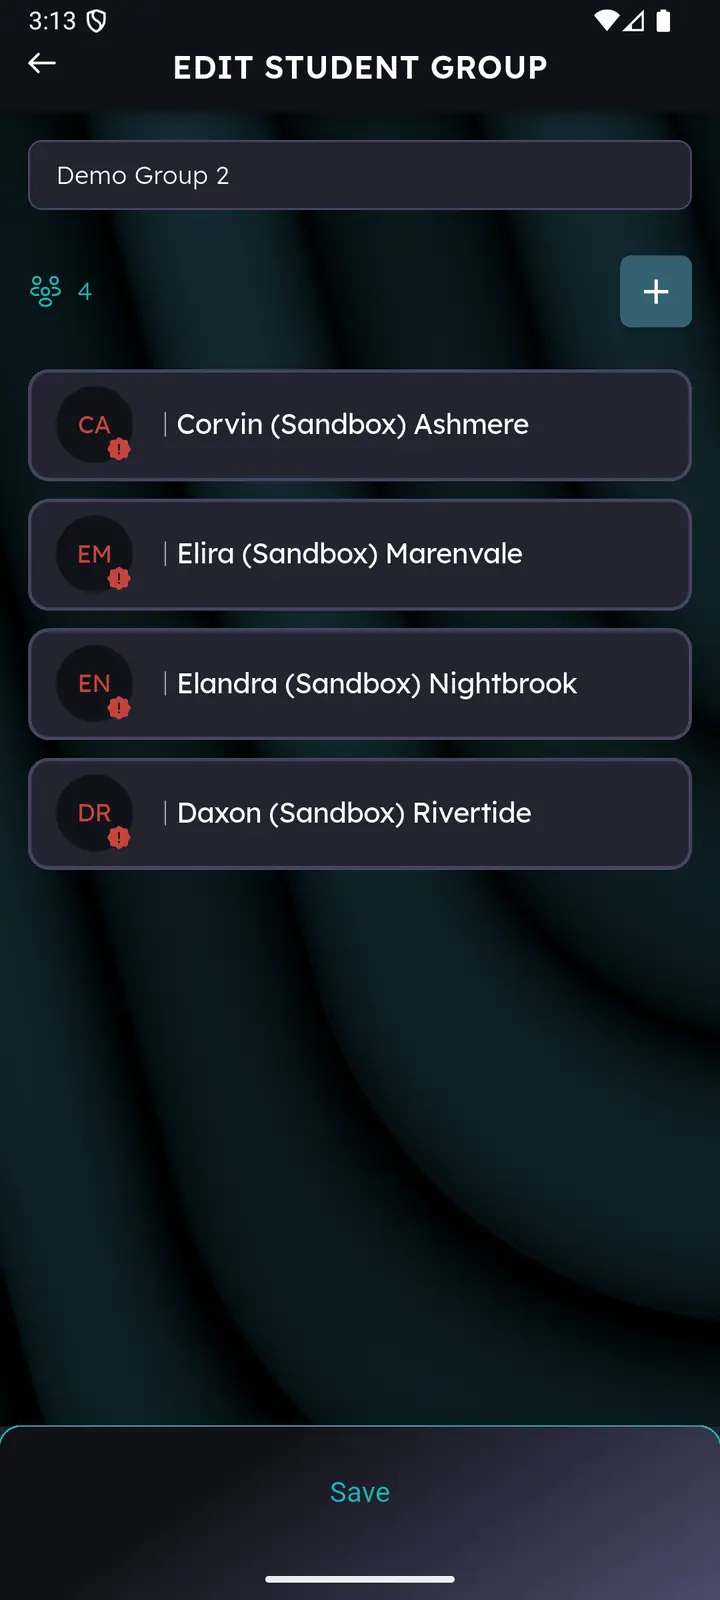
- Tap the group you want to change.
- Update the name, add students or remove them.
- Tap Save.
Changes take effect the next time you use the group. Sessions that have already ended stay exactly as they were.
Adding students who are already on the roster
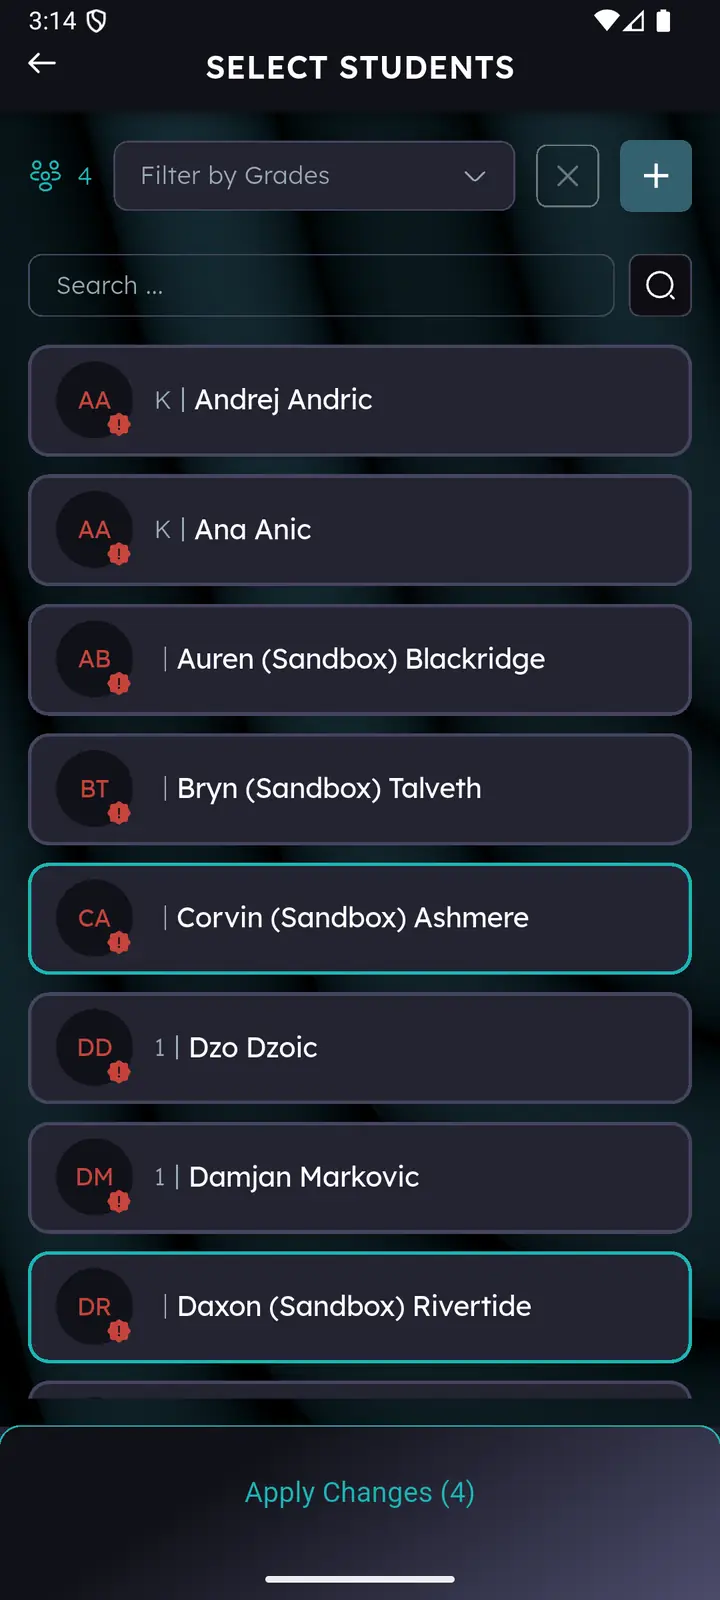
- Tap + to open Select Students.
- Select one or more students and tap Apply Changes.
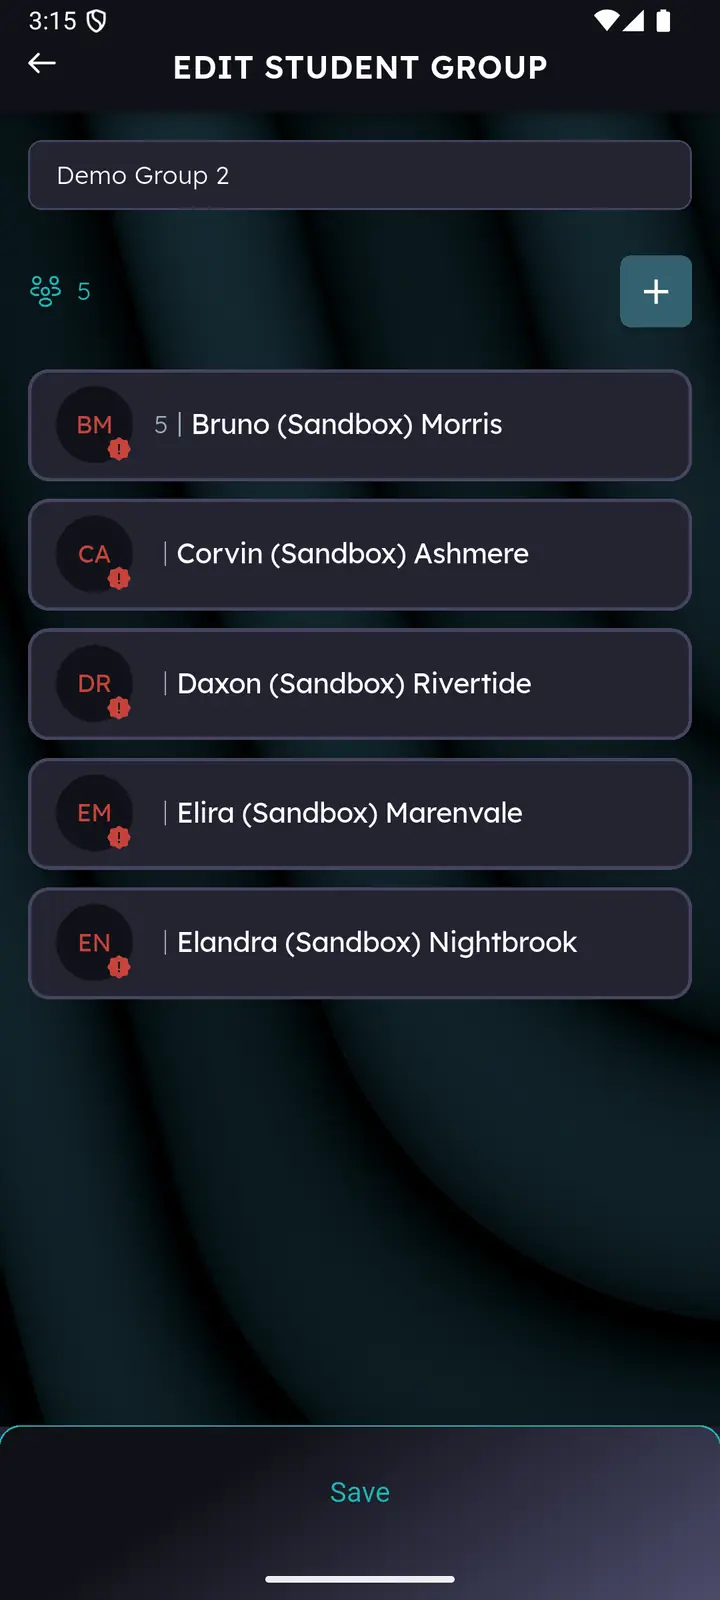
- Tap Save on the group.
Apply Changes only updates the edit in progress. Nothing is stored until you tap Save on the group itself — navigating away first loses the change.
Adding a brand-new student
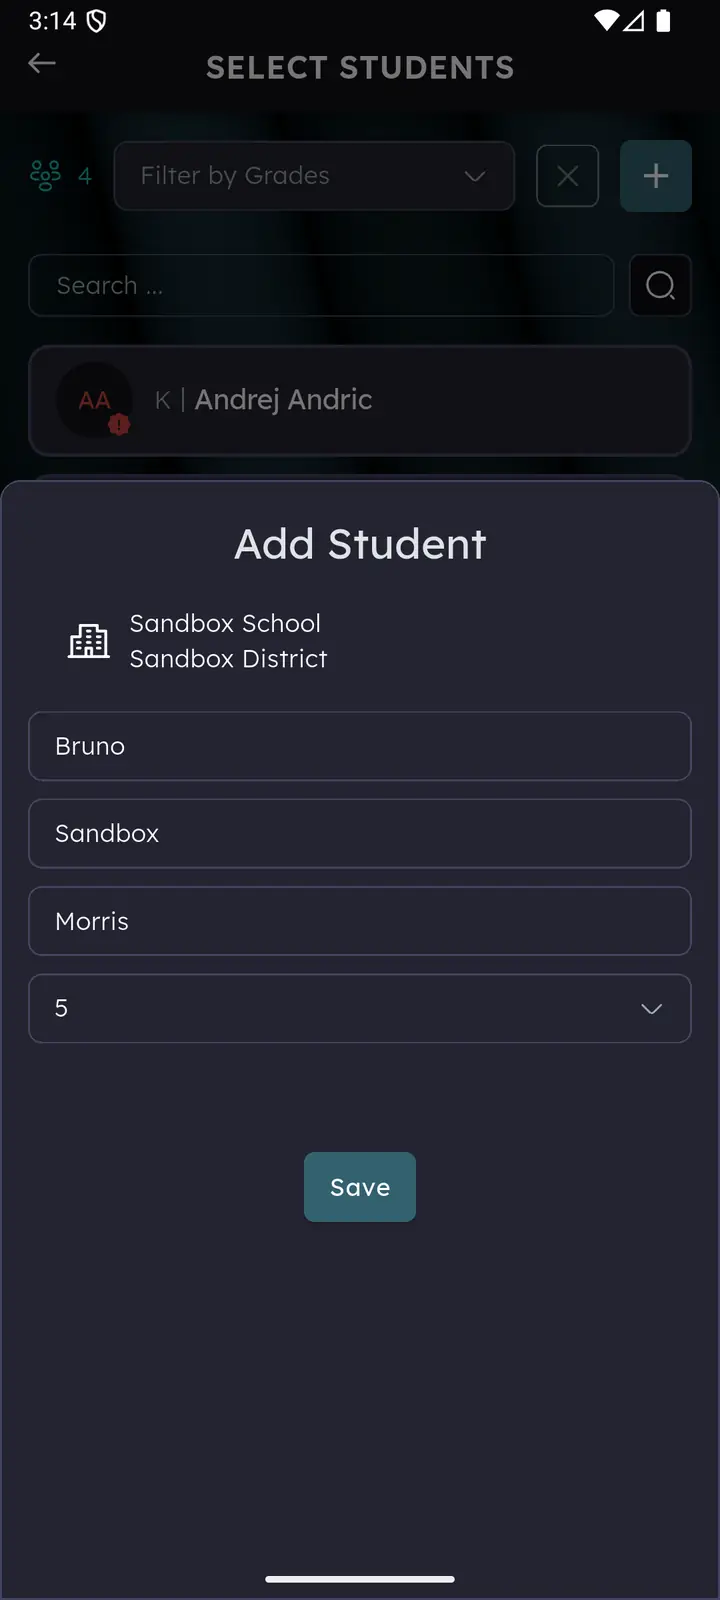
- From Select Students, tap + to add a student.
- Enter their details and tap Save. This puts them on the school roster — not yet in the group.
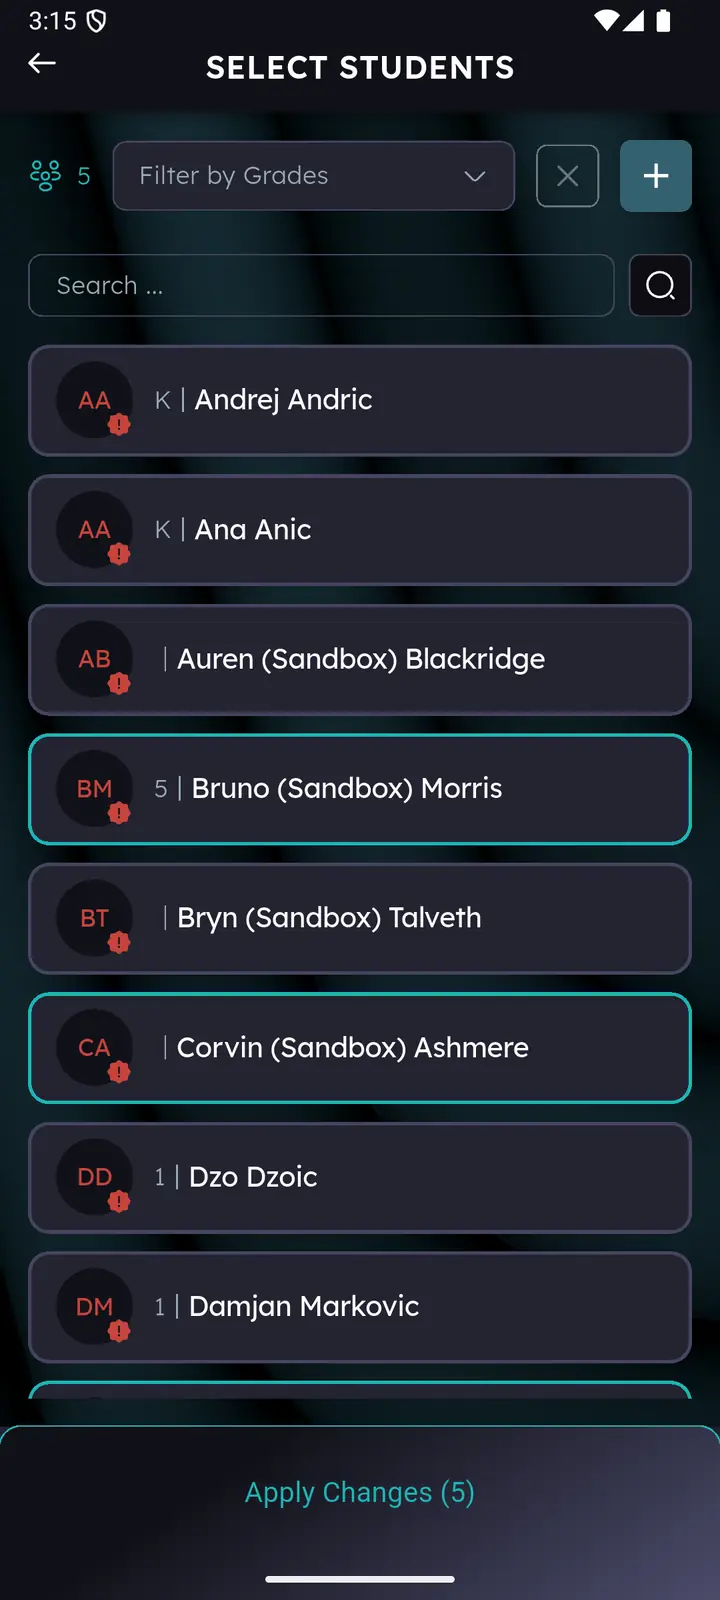
- Find them in the Select Students list and select them.
- Tap Apply Changes, then Save the group.
Removing a student from a group
- From group edit, open Select Students.
- Long-press the student card and tap Delete — or simply deselect them, depending on your build.
- Tap Save.
Removing a student from a group does not remove them from the school roster.
Deleting a group New
Groups can now be deleted outright — earlier versions only let you rename and re-use them.
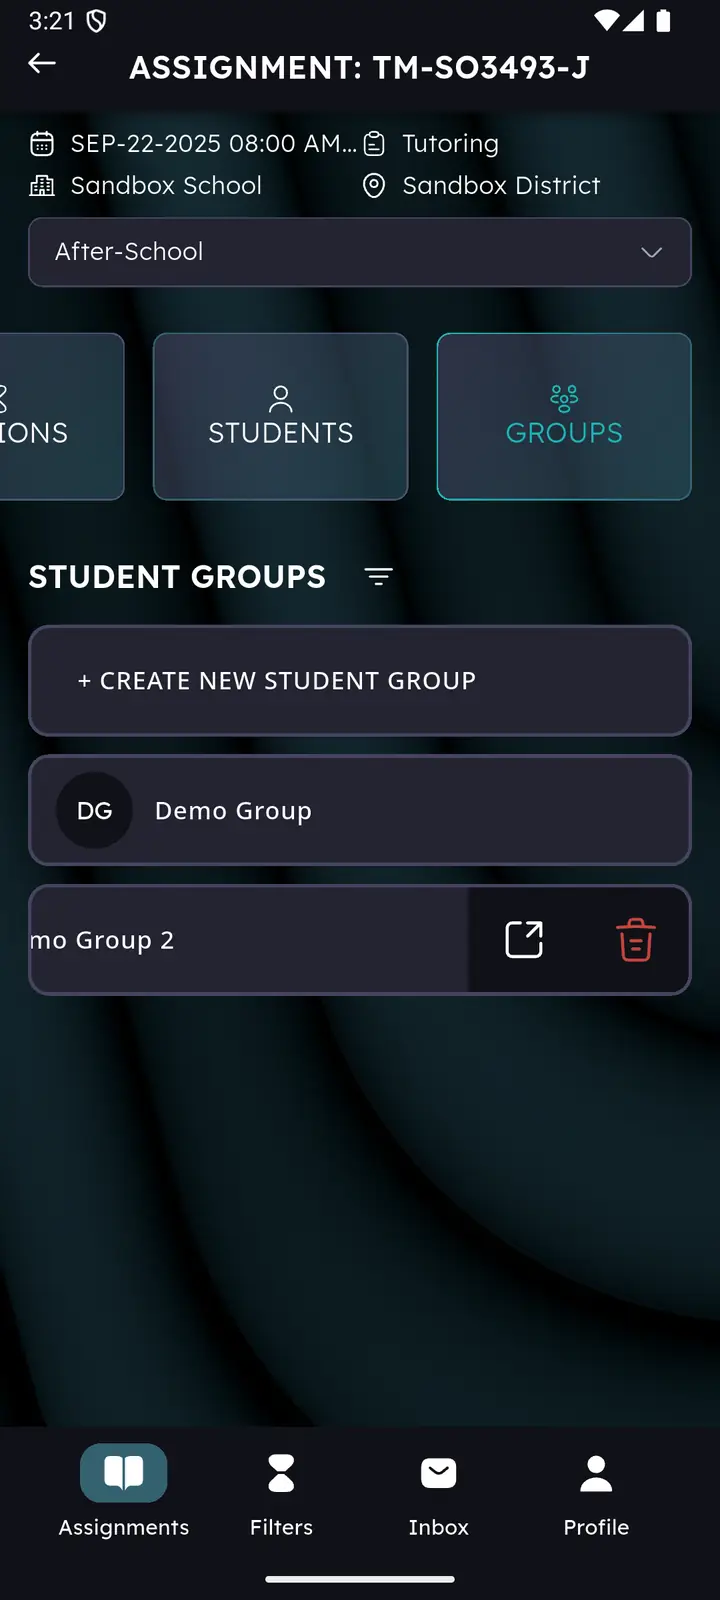
- In the GROUPS view, long-press the group card. An open icon and a red trash icon slide in.
- Tap the trash icon and confirm.
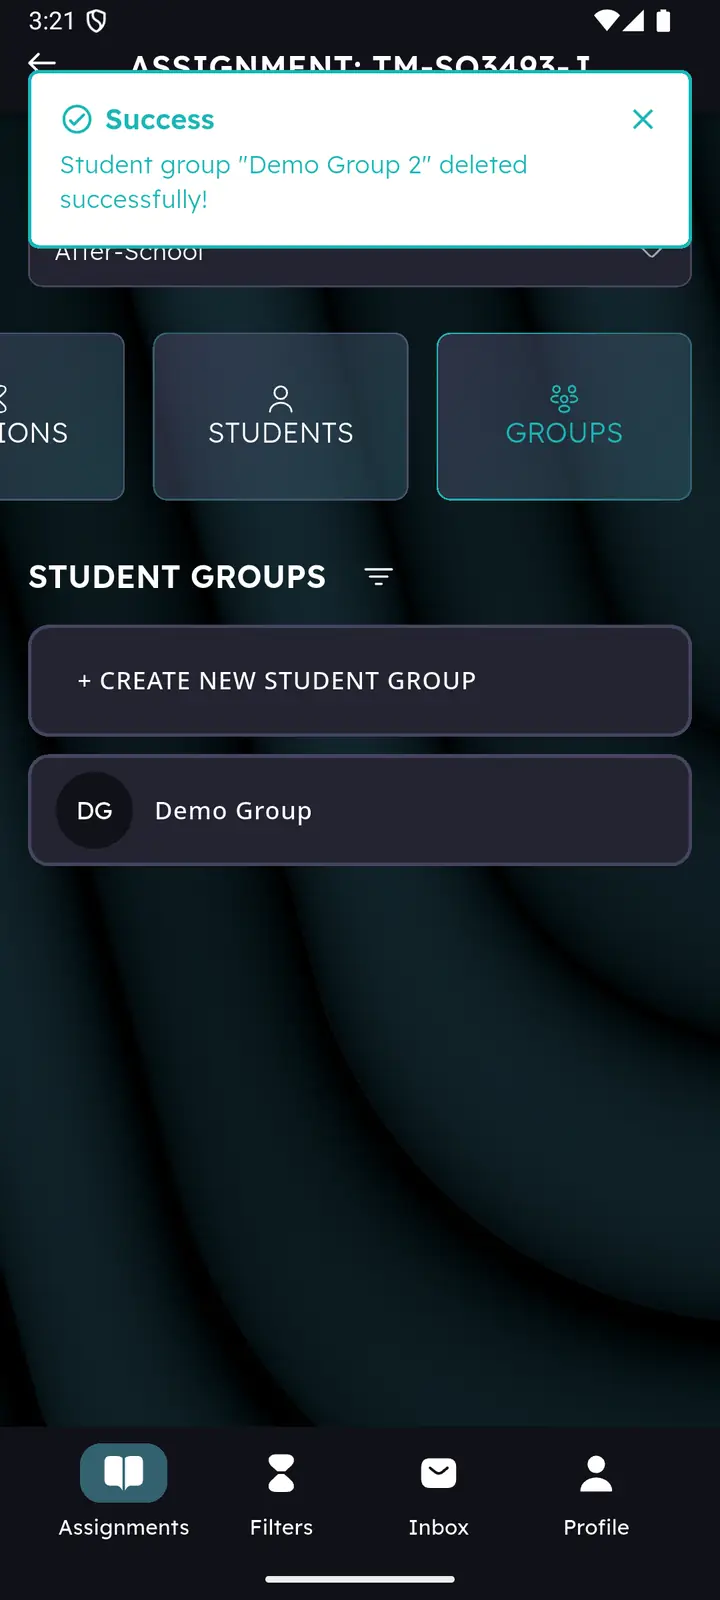
- A confirmation appears: Student group “…” deleted successfully!
Deleting a group removes the saved set of names. Sessions already run with that group keep their attendance records.
Best practices
- One purpose per group. Don’t mix programs or subjects in the same group.
- Descriptive names. Subject or level plus day or period, so the right group is obvious at a glance.
- Consistent naming. Pick a convention — Period 1 / Period 2, or A-Week / B-Week — and stick to it.
- Review monthly. Rename or delete groups you no longer use so the list stays short.
- Create in-flow. You can make a group from the session creation screen without abandoning your setup.
Troubleshooting
I don’t see Groups at all
Make sure an assignment is selected, or that your filters match a roster-type program. Student Number programs have no groups.
The + button is missing
Your organisation may not allow educators to create students. Contact an administrator.
My changes disappeared
You almost certainly navigated away before tapping Save. Reopen the group and redo the change, saving at the end.
Inbox
Messages from your organisation arrive in the Inbox tab rather than by email — schedule changes, reminders about unfinished sessions, program announcements.
- Two tabs — Unread and Read, each with a count badge. Opening a message moves it across.
- Open a message — tap it to read the full text.
- Delete a message — use the delete action on the message row and confirm in the Delete Message dialog.
- Scrolling — older messages load as you reach the bottom; the list ends with No more messages.
- Empty — an empty tab shows an inbox icon and a short line of text, not an error.
Sessions lock 24 hours after creation, and the Inbox is where reminders about incomplete sessions land — a quick look before your first session is usually enough.
Your profile & settings
The Profile tab holds your own record, your password, the app version you’re running, and the way out.
Profile information
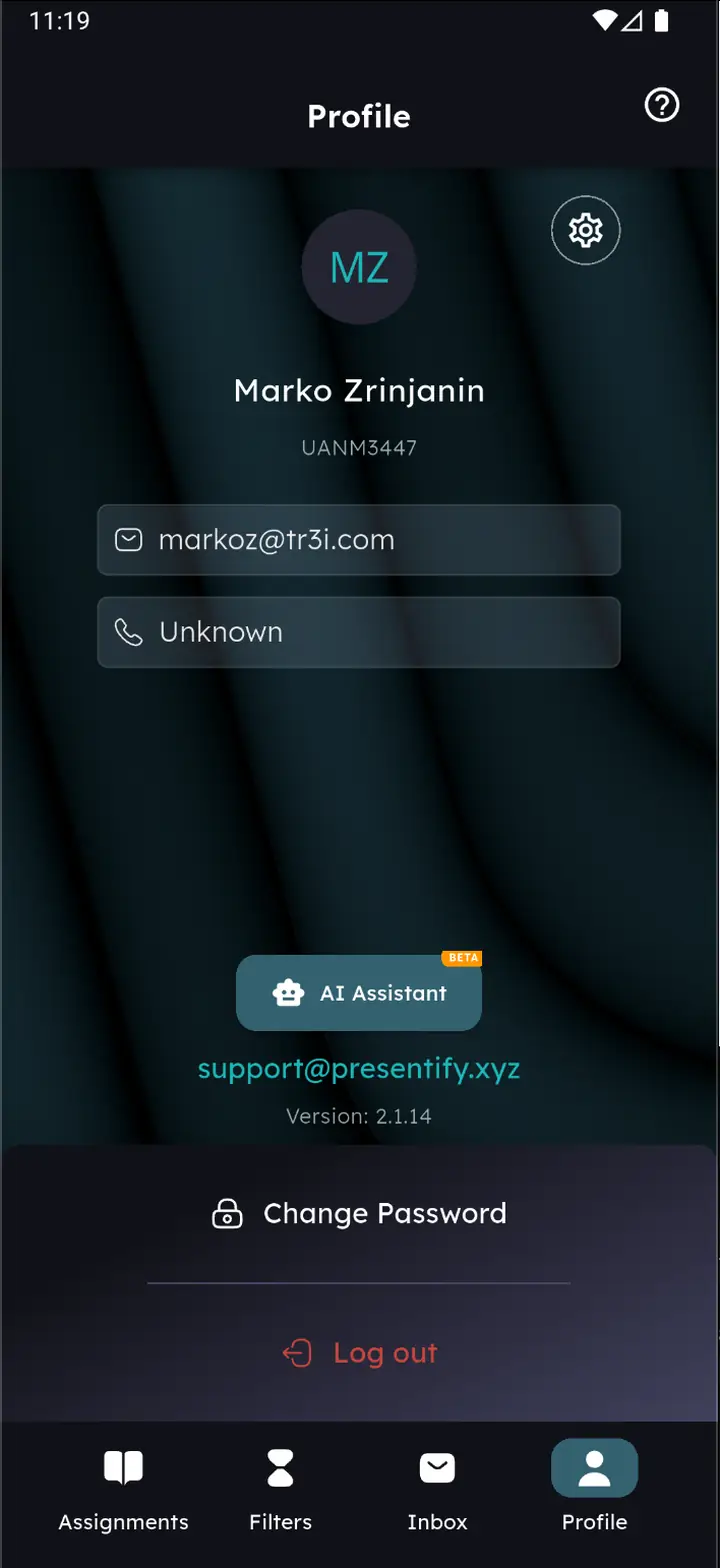
Your name, educator ID, email and phone number are shown here. They can only be changed by an administrator — if something is wrong, ask them or write to support.
The version number at the bottom of this screen is the first thing support will ask for.
Changing your password
- Tap Change Password.
- Enter and confirm your new password.
- Tap Save Changes.
Settings New
Tap the gear icon on the Profile screen.
| Section | What it does |
|---|---|
| Appearance | Choose Light, Dark or System. System follows your device setting. |
| Downloads | Shows how many assessment PDFs are stored on the device and how much space they use. Delete and free… clears them; documents re-download when you next open them. |
| Documentation | Flows Docs — in-app documentation for each session flow. Only visible to accounts with permission for it. |
Logging out
Tap Log out to return to the Login screen. If Remember me was ticked, your email address stays filled in.
Smartie, the in-app assistant
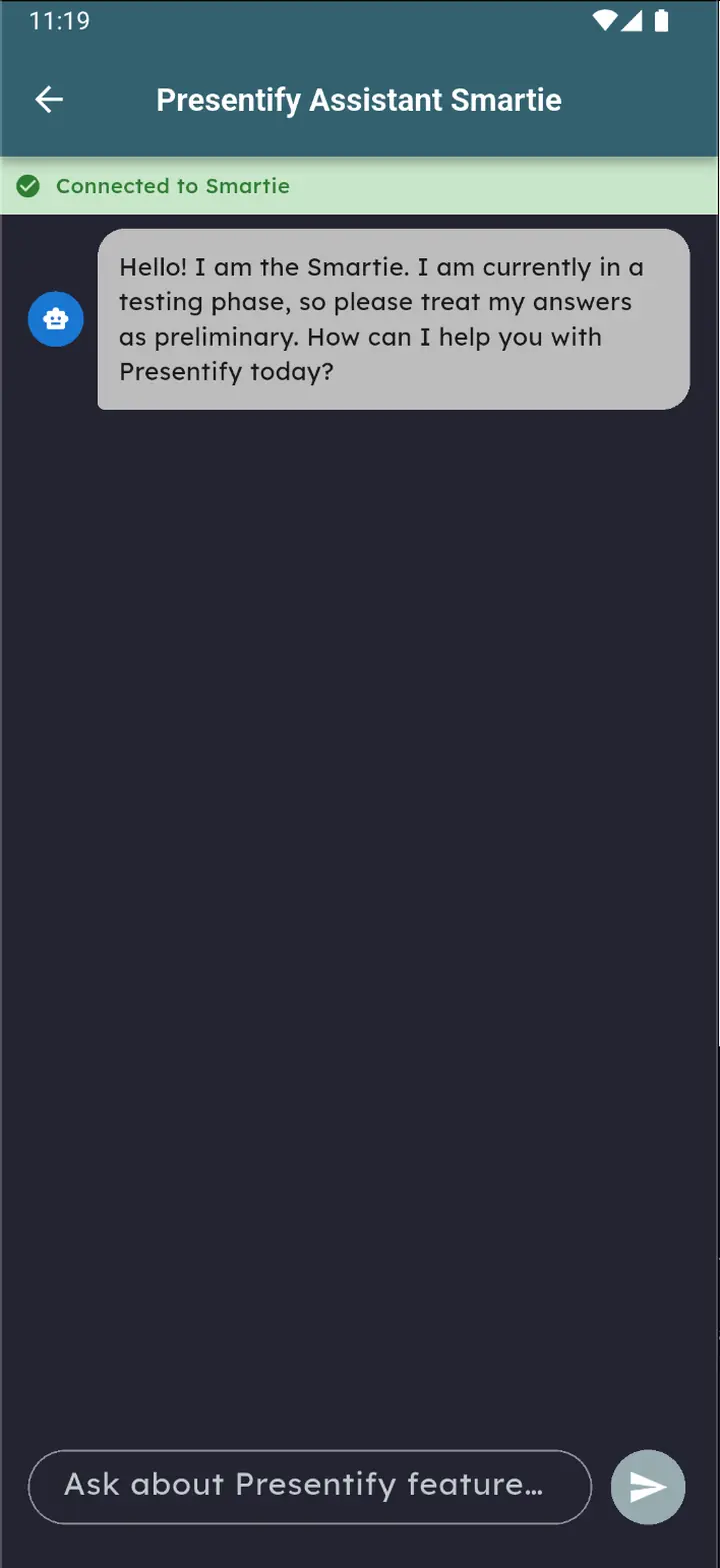
Smartie answers questions about using Presentify. Tap AI Assistant on your Profile screen to open the chat.
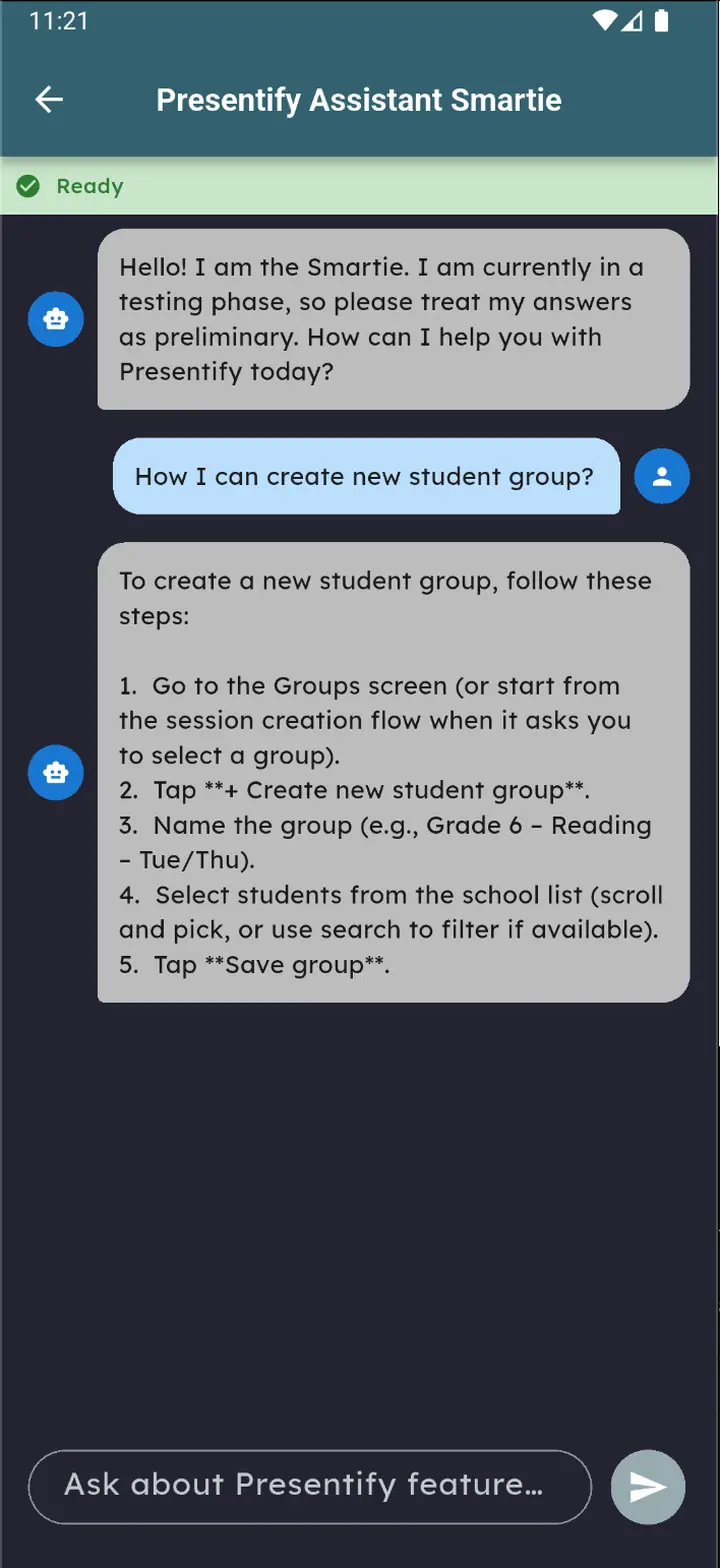
- Ask in plain language — “How do I create a new student group?” — and Smartie replies with the steps.
- A status line at the top shows Connected to Smartie, then Ready.
- It draws on this handbook, so it’s best at “how do I…” questions about the app itself.
Smartie says so itself when it greets you: treat its answers as preliminary, and check anything important against this handbook or with support. It has no access to your students’ data and cannot make changes in the app on your behalf.
Support
Reaching support from inside the app
The support address appears on two screens: the Login screen and your Profile screen.
- Tap the address — it’s copied to your clipboard.
- Long-press — your default email app opens, if one is set up on the device.
What to include
These four things resolve most tickets in one reply:
- The app version from the Login or Profile screen, and whether you’re on web, iOS or Android.
- The session code (e.g.
SCXN9825) or the student ID involved. - What you expected to happen, and what happened instead.
- A screenshot, if there’s anything to see.
Duplicate students, duplicate sessions and locked sessions that need reopening all have to be handled by support — there’s no educator-side action for them.
Frequently asked questions
I’m having trouble logging in
- Most login problems come down to an out-of-date app. Install the latest version — or, on the web, hard reload.
- Tap Login issues? on the Login screen for the built-in checklist.
- Double-check that you’re using the credentials from your V2 registration email.
Where do I find my assignments?
On the Assignments screen, which opens straight after you log in. It shows the seven assignments nearest today; tap Show All for the rest.
I didn’t get a password reset email
Check your Spam or Junk folder first. If it isn’t there, wait a few minutes and request the reset again.
I marked a student present but completion still shows 0%
Marking someone present isn’t enough. You also need time in, time out and subject saved for that student. Until all three are stored, they don’t count toward completion — see Attendance details.
I can open a session but can’t change anything
It’s locked. Sessions lock automatically 24 hours after creation if the required data wasn’t entered, at whatever completion percentage they had reached. Locked sessions are read-only; contact support if one needs reopening.
How do I delete a duplicate student?
- There’s no way to remove a student from a school roster yourself.
- You can remove them from a student group, which keeps them out of your sessions.
- For the roster itself, contact support.
How do I delete a duplicate session?
Updated An Opened session can now be deleted from the app — tap the trash icon on its card in the Open tab and confirm. Locked and Ended sessions still need support.
How do I rename a student group?
Open the GROUPS view, tap the group, edit the name and tap Save.
How do I delete a student group?
Updated Groups can now be deleted: long-press the group card in the GROUPS view and tap the red trash icon. Sessions already run with that group keep their records. See Deleting a group.
How can I tell which students I’ve already entered assessments for?
- From the student’s profile — open the Assessments tab; everything already recorded is listed there.
- While assigning — in an open session, tap a present student, pick a subject to load the bank list, and look for green-labelled banks. Green means this student already has assessments from that bank.
How do I create a student group?
Go to the GROUPS view, tap + CREATE NEW STUDENT GROUP, type a name — the student list appears once there is one — select students, and tap Save Group. Full walkthrough: Creating a group.
Can I use Presentify on a computer?
Yes. The web app has the same features as mobile. The one difference: instead of installing an update, you hard reload the page when prompted.
What’s new
Educator-facing changes since version 2.1.9, which the previous edition of this guide described. Fixes and internal work are left out.
- Multiple session reflections per student per session.
- Progressive loading in the assignments list.
- Improved focus standards listing in roster details.
- Assessment banks filtered by state, so lists are shorter and more relevant.
- Subject topics became part of session reflections.
- Multi-subject support for assessments.
- PDF download removed from student reports.
- Student Report added to the student profile — educator notes, session reflections and assessments per subject.
- New session time picker.
- Main filters reworked to district → school → program.
- Locked Student Number sessions can no longer be edited.
- Web Press Enter to submit the login form; browser back button behaves correctly.
- Other now sits at the end of the subject list.
- Focus standards filtering.
- Progressive loading for assessment banks.
- Scores support decimals.
- Surveys renamed Student Subject Comfort Surveys.
- Add Assessment is hidden on roster flows where the partner has assessments switched off.
A Progress tab on the student profile with short auto-graded questionnaires — four questions, four options each, up to three attempts per student per check, with the score calculated for you. It may not be in your build yet; this handbook will be updated when it ships.